After spending countless hours putting together a killer workstation, you have a tricked-out desktop computer, multiple monitors, bangin’ speakers, and… a computer desk that’s too tiny to fit it all. Here’s how to build your own ergonomic, customized computer table that displays all your tech, looks awesome—and doesn’t break the bank.
What you’ll need
There are an infinite number of ways to construct a desk. But for this particular project, I have four criteria I need my DIY computer desk to hit:
- Large: The vast majority of desks you’ll find in the store are 60 inches long or less. I needed a large computer desk at least 80 inches across to fit all my gear, and the few store-bought options I found just didn’t cut it. They were either ugly and cheaply made, or too expensive—a large, decent-quality one will run you at least $400.
- Cheap: Making something yourself instead of buying it almost always saves some money—in this case, it’s going to cut hundreds of dollars from the price. Our materials cost about $250 new, but depending on your deal-hunting skills and the parts you already have lying around, you’ll hopefully be able to get everything for $150 or less. That’s about half the price of most store-bought desks this size. Since there are so many different options for materials, make sure you pick the best wood for desktop. The type of wood you choose can depend on what color or design you’re going for as well as how much weight it will have to support.
- Easy: You can fabricate an entire desk out of a single sheet of plywood or medium-density fiberboard (MDF) for under $100, but doing so requires a lot of tools and know-how. We want our project to be accessible to anyone, including those without lots of woodworking experience—even if that boosts the price a little.
- Ergonomic: Too many people ignore the difference between a custom “computer desk” and a “writing desk.” Over time, those differences can wreak havoc on your body. In this project, I’m going to mix the sleek look of the latter with the ergonomics of the former to get the best of both worlds.
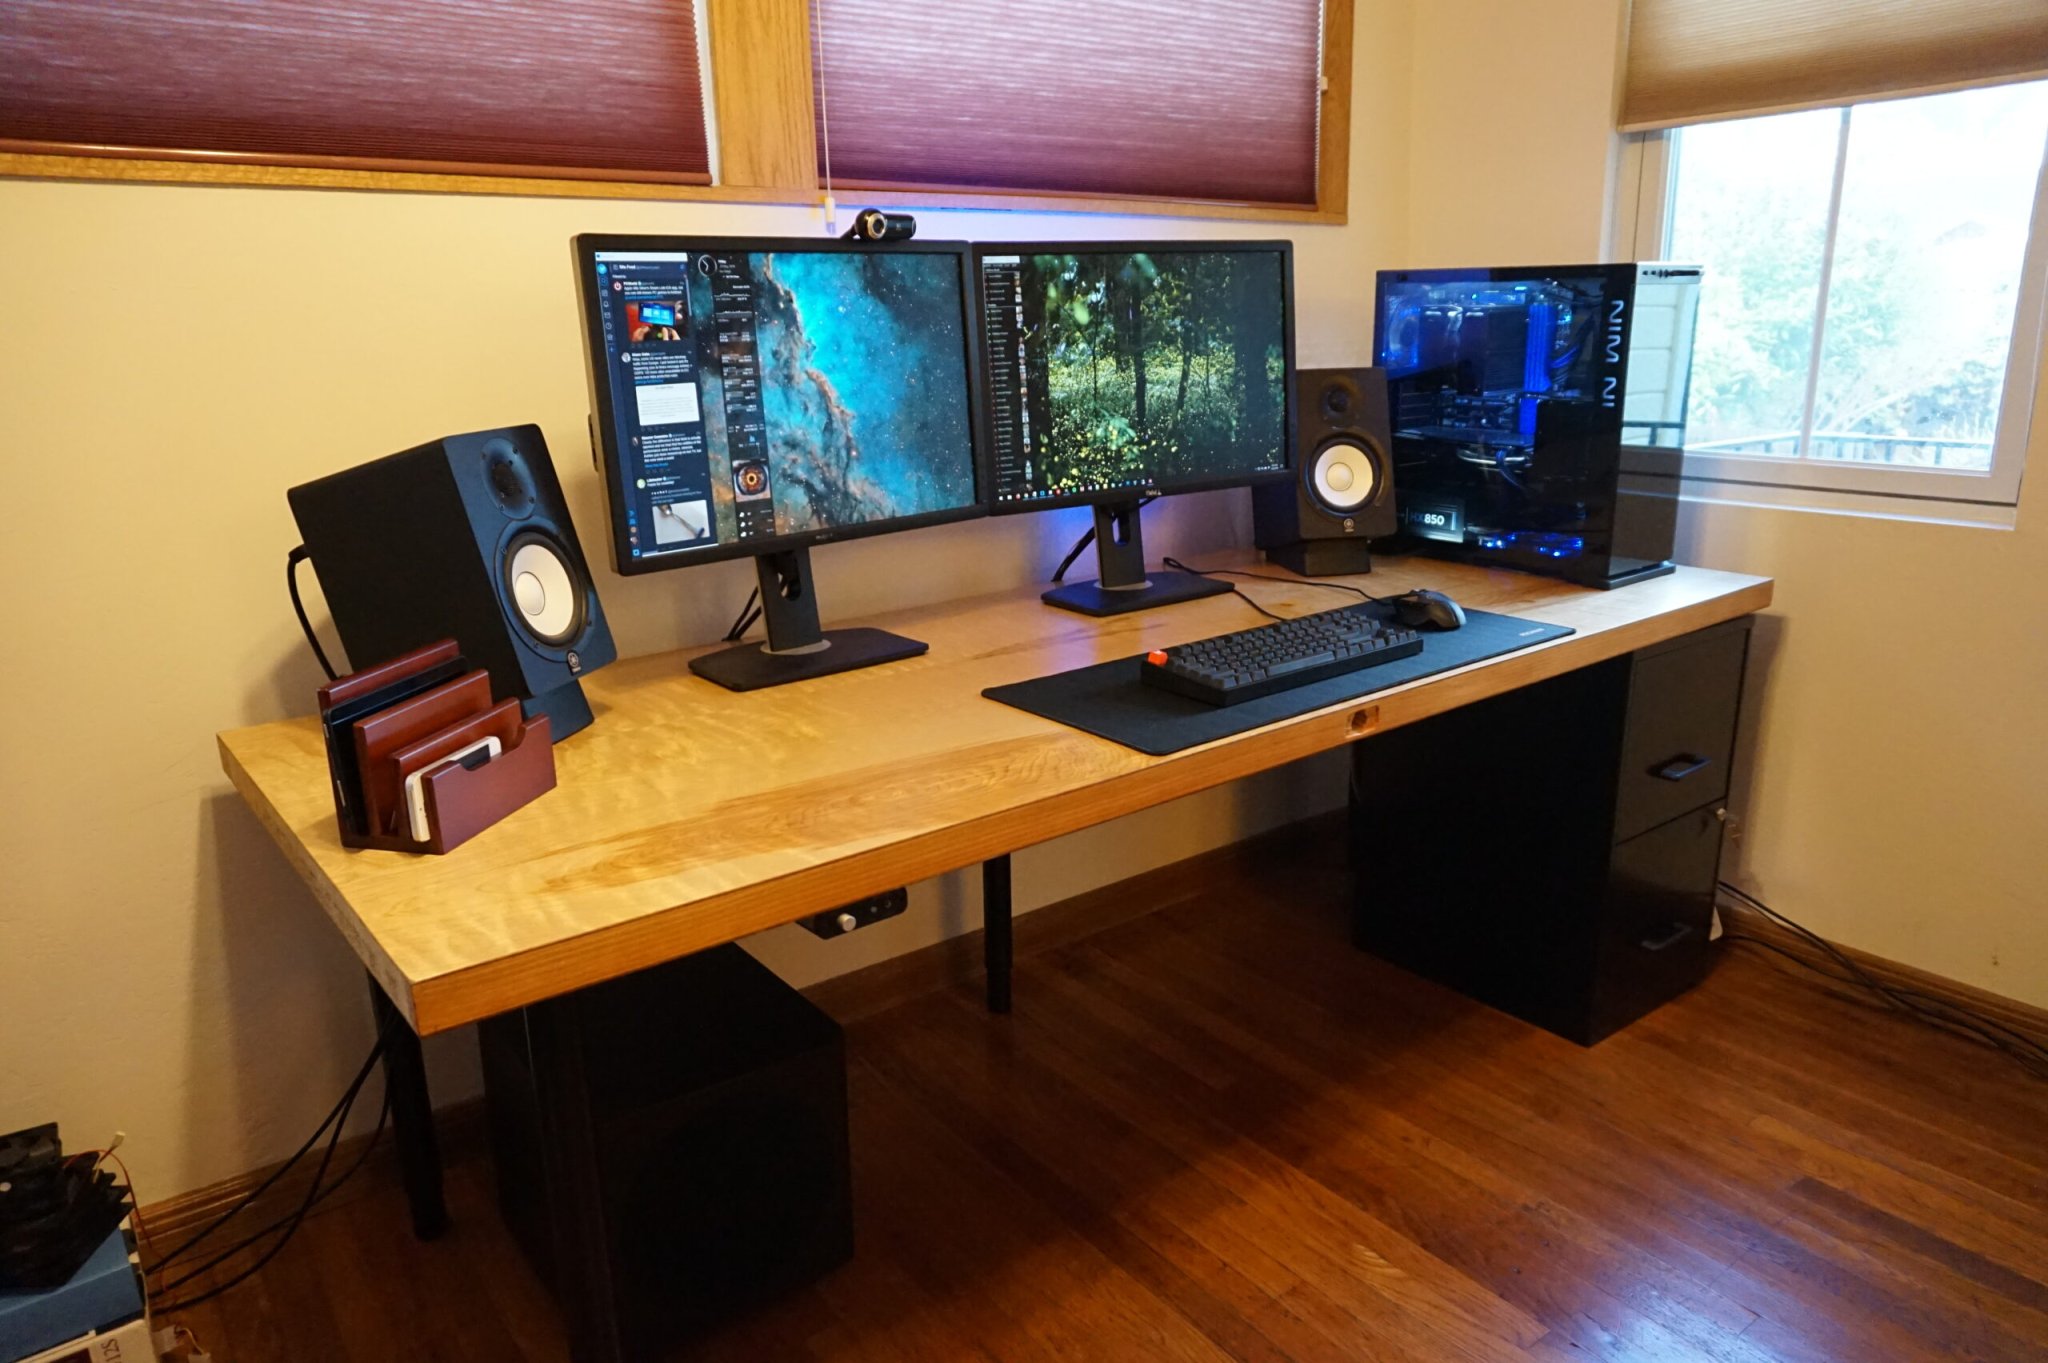
After lots of research, I decided to construct my desk out of a door slab and some adjustable desk legs from Ikea. It knocks all four goals out of the park, and as a bonus, you should be able to find the parts easily, no matter where you live. Here’s what I used.
The surface
For a big piece of furniture like this, you need a spacious desktop. And there are a few slabs you could try.
The Ikea Karlby countertop has become incredibly popular due to its large size and relative affordability—it costs between $100 and $200, depending on the size and color. Although you could use one with this guide, I wanted to go even cheaper. So I got a big door for my tabletop.
Doors have very reasonable price points, with new ones selling for $50 to $100. If you scour Craigslist, you can probably find some that cost even less, or pick up a free one if you’re really lucky. A door won’t be quite as polished around the edges as the Karlby, and it may require extra work to stain or paint, but I dig the more industrial look. Keep an eye out for something that’s solid core (not hollow) and has a width that matches your ideal desk depth—most doors range from 24 to 36 inches wide. If you have a circular saw, you can always cut a larger slab down to size, but for a patient shopper, that shouldn’t be necessary.
[Related: The best safety advice for any beginner woodworker]
I opted for a door that shows off the wood grain. Then I sanded, stained, and finished it myself. If you end up using a secondhand door, you may have to deal with a hole where the handle used to be, though you can always use it for cable management in the back. In my case, I hid the hole under my mouse and keyboard mat.
The legs
This is the other half of this desk’s special sauce. You’ll need four or five support legs, with the total number depending on whether you want to add a set of drawers to your workspace.
While most people would recommend standard desk legs or industrial pipe, I chose Ikea’s Olov legs. At $15 apiece, they’re a bit more expensive than Ikea’s regular table legs, but they’re adjustable, which means you can find the perfect height for you. This is crucial for good ergonomics, so it’s well worth the extra cost.
Again, hunt Craigslist to see if you can find cheaper legs. I bought a used table containing five Olovs from a neighbor. It cost $30 total—much less than the $75 Ikea would charge for five new legs.
The drawers
No workspace is complete without a place to stash your flash drives, sticky notes, and other miscellanea. I recommend that you fulfill this requirement with a filing cabinet or set of drawers that matches your ideal desk height (for a guide to calculating that height, see the next section) so you can use it as one of the legs. Because it depends on your own size, this component will be very personal.
I don’t want to sound like a broken record, but Craigslist is your friend here—though Wayfair will also do if you don’t have a bustling secondhand market in your area. I used a filing cabinet I already had in my house with a plastic desk organizer jury-rigged into the top drawer to hold all my stuff.
Everything else
Those are the bones of our build, but you’ll probably want a few other things to pull it all together. I highly recommend two of these anti-sag stiffeners, which are important for large pieces of furniture that tend to sink under their own weight.
I bought an unfinished door and stained it myself, so I also needed wood stain and a semi-gloss polyurethane.
Other items will help keep your gear in order. If your computer monitors aren’t height-adjustable, you may want to prop them up on something like a monitor stand. To really tidy up your workspace, I also recommend some sort of cable management, like a rain gutter or the Ikea Signum tray. Be sure to add a mousepad too—it’ll protect the desk surface from black marks and excessive wear.
Last, you’ll need two tools: a drill and a screwdriver (or a drive bit for your drill). You must attach everything to the wood with screws, but you’ll want a drill to create pilot holes, and a drive bit will make it much easier to put the pieces together. If you don’t own one, borrow a drill from a neighbor.
Building the desk
Once you’ve collected all your parts, you’re ready to put everything together.
1. Prepare the surface. I started by sanding, staining, and finishing my door myself. This process isn’t too difficult, but the instructions are outside the scope of this article. If you’ve never done it before, then enlist the help of a friend, or check out these fantastic YouTube guides from Steve Ramsey. It should only take a couple hours of your time, plus a few days of waiting for everything to dry between coats.

2. Plan the ergonomics. While you’re waiting for the door to dry, do a little ergonomic experimentation. Grab your desk chair and adjust the seat height and arm rests to a comfortable position. Your feet should be flat on the ground, with your elbows and knees at approximate 90-degree angles. Once you’ve got your position just right, measure the distance from the floor to the top of the arm rests, and then subtract the thickness of your surface—usually about an inch and a half. The resulting measurement is the setting you’ll want for your Olov legs, as well as the ideal height for your filing cabinet or drawers. Write it down, and buy the drawers if you plan to include them.

3. Place your parts. When your slab is ready, flip it upside down and plan out your build, starting with the legs. I recommend one leg in each of the four corners, with a fifth one in the center of the back edge for support. If you plan on incorporating that filing cabinet, it will replace one of those front legs.
Next, grab your anti-sag braces and find a place for them near the middle of the surface. If they bump up against the area where you plan to put your filing cabinet, you may need to set them slightly off-center. If you have any cable management trays, stick them in whatever empty space you have left over. I’m using an Ikea Signum tray and mounting my surge protector on its underside. I had to do a little finagling to find room for everything, so it’s a good idea to plan this all out before you start drilling holes.

4. Start assembling. Once you’ve found a place for everything, mark and drill some pilot holes for the legs, anti-sag braces, and anything else you’re attaching to the underside. This is critical: If you just start screwing into the surface, you’re likely to split the wood. Attach everything, including the leg brackets, except for the legs themselves. This will take some time and elbow grease, so again, I recommend using your drill as a driver to make things go a lot faster.

5. Add the legs. Now’s a good time to carry your door into the office for the last few steps—you’ll find it a lot less cumbersome to move before attaching the legs. Once it’s arrived in its new home, screw the Olov legs into the brackets. You can then adjust them to your desired height by unscrewing the bottom, sliding them out, and screwing them clockwise to tighten them.

6. Check the stability and height. Now, flip your desk over and stick the filing cabinet underneath. Ensure that everything is level. (If you don’t own a level, your phone may have a rudimentary one built in.)
While you’re reviewing the desk’s stability, also check its height with your chair. It may seem awfully low to the ground, but that’s because most desks are designed for writing, not computing. Computer desks are usually writing height, with a keyboard tray at arm level. You could set your home-built desk higher and use a screw-on keyboard tray to improve the ergonomics, but I prefer to put everything on one big, flat surface.

7. Set everything up. Once you’ve double-checked the size and stability of your creation, set up your computer, adjust your monitor so the top is at eye level, and enjoy your new custom workspace!

Make it your own

This is how I made my desk. But there are a million ways to assemble one, and you might have your own ideas. Got some woodworking chops and want to save even more money? Construct your own legs out of lumber! Want easy-access USB ports? Build them into the surface! Love tech and want to really feel like you’re living in the future? Add a fingerprint scanner! The beauty of this template is that you can adjust it to fit your own tools, skills, and needs.
This story has been updated. It was originally published on May 26, 2018.
