At the end of each workday or gaming session, I’ve taken to pulling off my headphones and tossing them haphazardly on my desk. It’s easy, but it’s a mess. I stack other things over them. They knock over my neat piles of paper. (No, not clutter. Piles.) The cord gets tangled. Chaos reigns.
I needed to make a change.
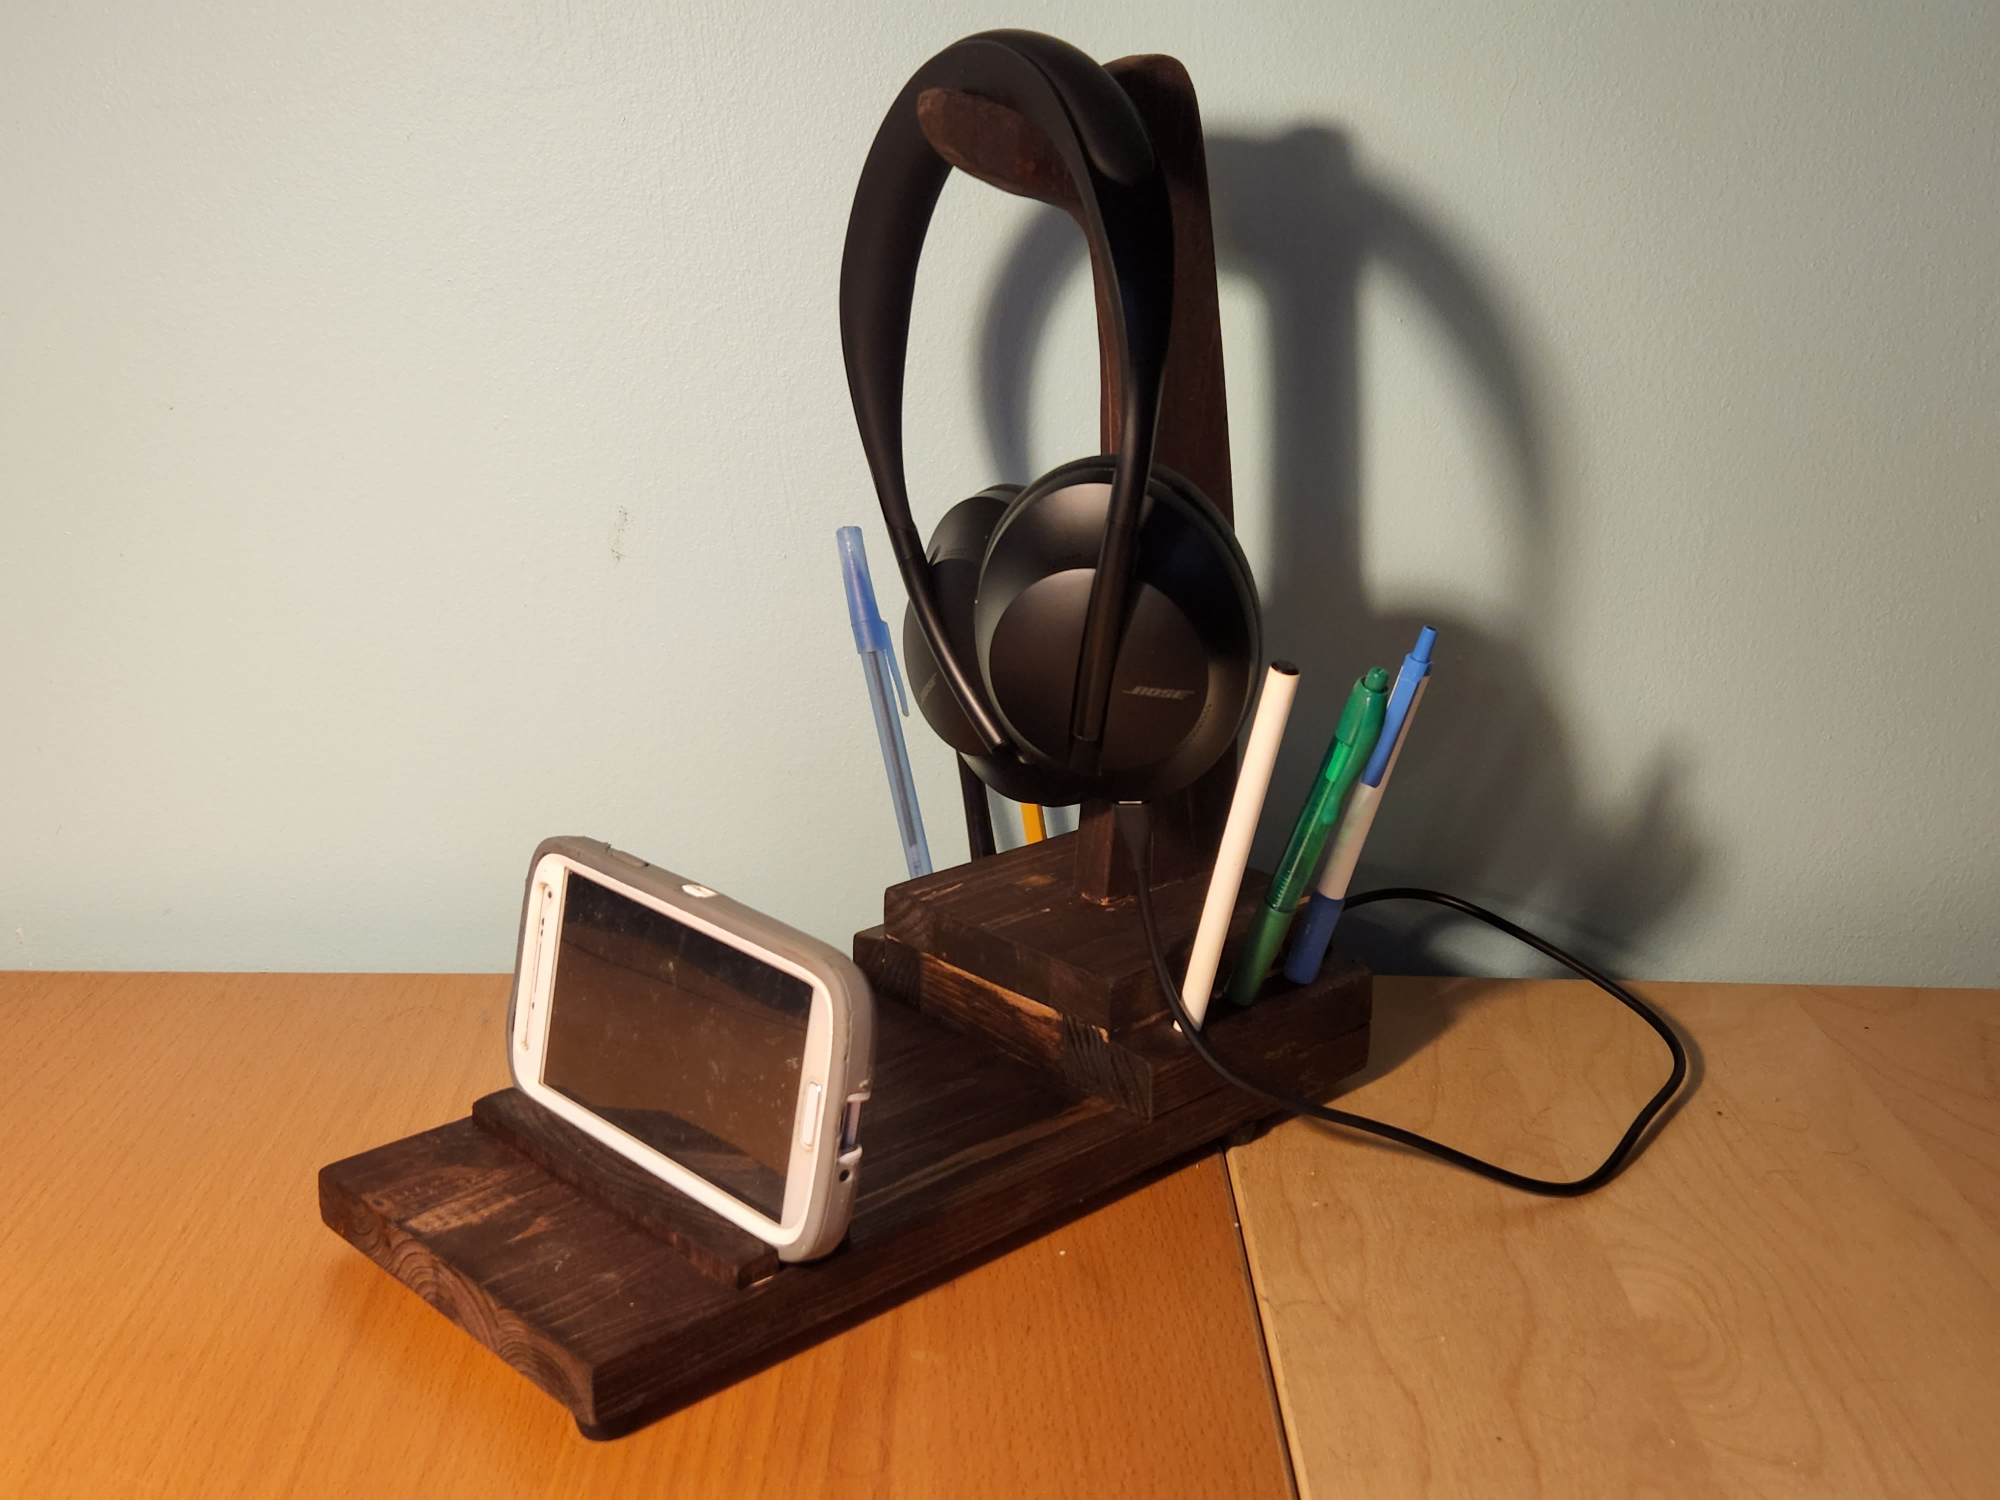
So I built a stand to keep my headset contained when not in use, which might be the first step in a longer journey toward getting the clutter on my desk under control. (OK, I admit, it is clutter.) But I didn’t want something that took up precious desk space yet served only one function. Going all-out, I added some upgrades, including a charging port, phone stand, and pencil holders. The basic project isn’t terribly difficult, and making one is a great way to practice your design skills. It’s also an excellent use for some of that scrap wood you’ve been “saving for later.”
Warning: DIY projects can be dangerous, even for the most experienced makers. Before proceeding with this or any other project on our site, ensure you have all necessary safety gear and know how to use it properly. At minimum, that may include safety glasses, a face mask, and/or ear protection. If you’re using power tools, you must know how to use them safely and correctly. If you do not, or are otherwise uncomfortable with anything described here, don’t attempt this project.
Stats
- Time: 2 to 4 hours
- Material cost: $10 to $30
- Difficulty: easy
Materials
- 1 (4-foot-long) 1-by-6 board
- Wood glue
- Spray-on polyurethane
- (Optional) red mahogany wood stain (or the stain or oil of your choice)
- (Optional) powered USB hub
- (Optional) rubber feet
Tools
- Miter saw
- Table saw
- Crosscut sled
- Straight edge
- Orbital sander
- Sanding discs (60-, 80-, 120-, 150-, and 220-grit)
- Jigsaw (or bandsaw)
- Clamps
- Drill
Instructions
1. Cut your board into two pieces. One will be the vertical stand, the other will be the base, and the exact dimensions of each will depend on the height of your headset. Mine is about 9 inches from top to bottom, so I cut the board for the stand to 11 inches long on my miter saw. This gave me plenty of clearance for the headphones to hang without touching the base.
The base can be as long as you want, provided that it is at least as long as the vertical stand extends forward. I cut mine out as a 5.5-inch square.
2. Draw the basic shape of your vertical stand. There aren’t many rules to this. Numerous shapes work, as long as they are vertically stable and have a wide enough area on top to hold your headphones. You’ll also need to add a tenon to the bottom, which is an extension that will slide into a slot in the base board to join the two pieces together. This tenon should be the same height as the base is thick. The easiest way to measure this is to place the base board on a flat surface, face down, and stand the vertical piece up next to it. Mark a line on the vertical board at the top of the base and use this line as the “floor” of your design—everything below it will be inset into the base board.
For purely aesthetic reasons, I wanted my stand to lean forward slightly. To create the angle, I measured in 1 inch along the top right edge of the board and made a mark. Then I drew a line with a straight edge that connected that mark to the bottom right corner of the board. This would be the back of my stand. From there, I made a matching line 2 inches to the left to mark the front of the stand.
For the headset hanger itself, I measured left 2 inches from the top front corner of the stand. Then I drew a 1-inch-long line straight down from there and drew perpendicular from the bottom of that line to the front of the stand. This created a parallelogram as the neck of the stand, with a rectangle off the front of it as the nose. Together, these served as the basic shape of the overall hanger.
- Note: If you have the knowledge, you can draw your design in a program like SketchUp or Adobe Illustrator, print it out, and glue it to your board to cut it out.
3. Add flair and curves to your design. With the basic shape drawn, it’s time to add some flair. For me, that meant turning my straight lines and sharp angles into curves, but let your imagination run wild.
If you’re feeling curves as well, there are a few ways to make them. The easiest, but least reliable way is to just freehand them. I only freehand smaller curves or ones that don’t follow a uniform arc. The second way is to find a circular object in your shop about the size you need, plop it onto your board, and trace it. You can also use a flexible ruler or piece of wood and some clamps or nails to trace an arc, which is how I typically do it. I’m also intrigued by the idea of making an arc drawing jig.
[Related: The surprising woodworking tools you already have around the house]
Take your time, and don’t be afraid to experiment. I drew and erased several designs before I found one I was mostly happy with. It is decidedly more duck-like than I originally wanted, but after I cut it out, it grew on me.
4. Cut out the vertical stand. The easiest way to cut out an odd shape like this is with a band saw. If you don’t have one, you can use a jigsaw, as long as you carefully clamp the wood—your workpiece—down. If you don’t have a jigsaw, you can do the job with a coping saw, but in the time it’ll take you to do that, you could’ve probably driven to the store to buy a jigsaw.
5. Cut a slot in the base board to hold the stand. This slot should be the same width as the tenon on the stand. To measure it, position the stand where you want it on the edge of the base and trace the outline of the tenon. This will give you the size of the slot without any fancy measuring.
If you’re careful and precise, you can cut this slot out with a jigsaw or bandsaw. My preferred method, however, is with my table saw and crosscut sled. Raise the height of the blade to the length of the slot. Position the board vertically with one large face flat against the fence, and the thin slot edge facing down on the base of the sled. Cut out the slot using multiple passes, moving the board left or right one blade’s width at a time in between cuts—DO NOT try to move it while it’s touching the blade.
No matter which method you use, err on the side of making the slot too small. You can always trim more off with your saw, a chisel, or sandpaper, but it’s far more work to fix a loose joint, if you can fix it at all. Test-fit the stand regularly. You’ll have the perfect fit when the vertical board stays in place with only the friction of the joint, no glue needed, though we will glue it eventually.
6. Sand, sand, and sand some more. Once all your pieces are cut, it’s time to make them silky smooth. Using an orbital sander, hit your pieces with 120-, 150-, 180-, and finally 220-grit sandpaper. The only areas you shouldn’t sand are the inside of the slot and the tenon itself. Sanding these can ruin the fit.
7. Assemble the stand. Once the pieces are smooth, spread wood glue onto the tenon and inside the slot. Slide the tenon on the vertical stand into the slot on the base, and clamp it in place as best as you can. You’ll want to really make sure your clamps pull the tenon forward and push it down.
8. Add the finish of your choice. Depending on the type of wood you used, you might want to use a stain like red mahogany, which was my choice, or just apply an oil-based finish. Test different finishes on your scraps to see which one you like best. Apply it according to the manufacturer’s instructions. Once your stain or oil is dry, apply one or more coats of polyurethane for protection, again according to the manufacturer’s instructions. I like to use spray-on polyurethane, but if you’re more comfortable with a brush or rag, regular polyurethane works just as well.
Optional additions for your desktop headset stand

The steps above will get you a sturdy, basic headphones stand, but there are plenty of ways to work in useful elements that will make your day-to-day desk life much easier. Ideally you’d pencil them into your design from the outset, but you can try to add them later, or build an entirely new stand to keep practicing your skills (and using up scrap wood).
A USB charging hub
I bought a two-outlet USB charging port to add to my stand so I could charge both my Bluetooth headset and my phone right from the stand. To attach it, I built a box large enough to contain the charging port, using the stand I’d already made as the top. I trimmed down the stand to match the dimensions of the box, which was a 4-by-4-inch square.
The box itself was just three pieces of scrap wood cut to the same height as the charging port, which forms the fourth side of the box. With those pieces cut, I glued them to the bottom of the stand and screwed the charging port into place. I chose to put it on the back of the stand so I didn’t have to look at it, but it can go on any side.
[Related: Build your own desk with custom features like USB ports and biometrics]
Finally, I glued the entire unit onto another, larger base board—5.5 inches wide by 11 inches long—and drilled a hole in the bottom of that board, inside the charger box, to slip the power cord through. To give the cord room below the stand, I added rubber feet.
A phone holder
Since I wanted to be able to charge my phone from this stand, I also added a phone holder. To do so, I modified the dimensions of the base board to be long enough that a phone could stand up in front of either the headphones or the box. If you want a phone holder but not a charging port, the phone will stand up in front of the headphones.
I cut two narrow strips of wood an inch or so shorter than my base board was wide, one a half-inch tall and one about a quarter-inch. I glued these strips parallel to one another, about an eighth of an inch farther apart than my phone was thick, and clamped them in place until the glue dried. Now I can rest my phone, in landscape orientation, in the gap between them, and it stays upright at a slight angle.
A pencil holder
This last piece was just for fun. I had some scraps left over, so I used those as pencil holders for either side of the charging box. My box is about 1.5 inches narrower than the stand’s base board, so there’s a ¾-inch gap on either side. I cut two pieces of scrap wood to that same ¾ inches wide and tall, and then cut two 4-inch long strips. I glued these to each side, then drilled three ⅜-inch holes into each one, about an inch deep. This is the perfect size to hold a pencil or regular ballpoint pen.
Make it your own
What I love about this stand design is how simple it is, yet how versatile. I’m sure there are 100 other modifications you can make to meet your specific needs. Wireless chargers, LED lights, mouse and controller holders, key rings, drawers, and even a clock are all features I could see adding relatively easily. Go forth and be creative. I know I’ll make more of these, with all new features to control my personal brand of desk chaos.
