Now that you have the parts all squared away for your home-built Hackintosh PC running Mac OS X, it’s time to perform the third and final magic step: installing OS X Snow Leopard and configuring it for maximum performance. In the final installment of our three-part guide, we’ll walk you through just that. Home stretch!
For this guide we’ll be focusing on the Core i7 950-based setup we’ve detailed in the previous installments. This is definitely the part of the process that involves the most step-by-step instructions, so rather than risk botching something in translation here I’m going to point you to the guides I used. But like before, we’ll cover the basic concepts here first so you have some understanding of what’s going on. It helps!
As you know by now, we’ll be relying on the “iBoot+MultiBeast” method for Hackintoshing, brought to you by the fine folks at tonymacx86.com. The first half of this guide will be an annotated walk-through of Tonymac’s main instruction set for MultiBeast, and in the latter half we’ll be using this hardware-specific guide to configuring MultiBeast. So bookmark those two pages now.
As you may have gathered, this is a two-step process: First, we’ll burn a custom boot CD intended to trick OS X into thinking your computer is an EFI-based machine ready for Snow Leopard. Then, after starting up your fresh OS X install with the help of your iBoot disc, we’ll run MultiBeast to configure hardware and install a bootloader that will boot OS X (and any other OS) from your hard drive. Let’s do this.
Preparing Your BIOS
The first step is adjusting your BIOS settings to prepare for OS X. Assuming you’re using a Gigabyte motherboard, you do this by following the instructions to enter BIOS setup immediately after turning your computer on (usually by pressing the Escape key). Then, it’s just a matter of matching the configuration spelled out by Tonymac in the first step of his guide. Don’t worry, you’ll only have to deal with these scary screens once.
Installing Mac OS X
Following along with Tonymac’s guide, the next step is to download the iBoot disc image and burn it with Disk Utility or something similar. Turn on your computer with this disc in the drive, and it should boot from it (if it doesn’t, you can press F12 at startup on a Gigabyte board to manually select your boot disc). After some optical drive whirring, you’ll soon see a screen like this:

At this point, pop out your boot disc and insert your Snow Leopard install disc (this has to be a retail Snow Leopard disc, not one that comes with a new Mac.) Press F5, then wait for the Mac OS X Install Disc icon to show up. Press Enter to boot when it does (if you have problems, there are some troubleshooting tips on Tonymac’s guide). Once the installer is up and running, follow Tonymac’s instructions for partitioning and formatting your disk (this will erase everything, remember).
OS X will go through its standard install process. If you’re using an SSD like I recommend, feel free to take a moment now to marvel at how quickly the install takes place. Also, it’s likely that the OS X install screen will look stretched and distorted while you install–don’t worry, this is normal.
Once OS X is done installing, you’ll restart and boot from your iBoot disc again. Now, on the Chimera bootloader screen, you should see an option for your fresh Snow Leopard install. Choose this and voila, hopefully OS X boots as you’d expect.
On my system, sound and ethernet were both working immediately, which is nice. Your display resolution may still look a little funky at this point, but that will be fixed once we enable full graphics card support with MultiBeast. Before doing that, follow Tonymac’s instructions for downloading and manually applying the latest Snow Leopard update package (currently version 10.6.7). You want to run the MultiBeast app before running the upgrade, then do your MultiBeast install once the upgrade finishes without restarting your computer.
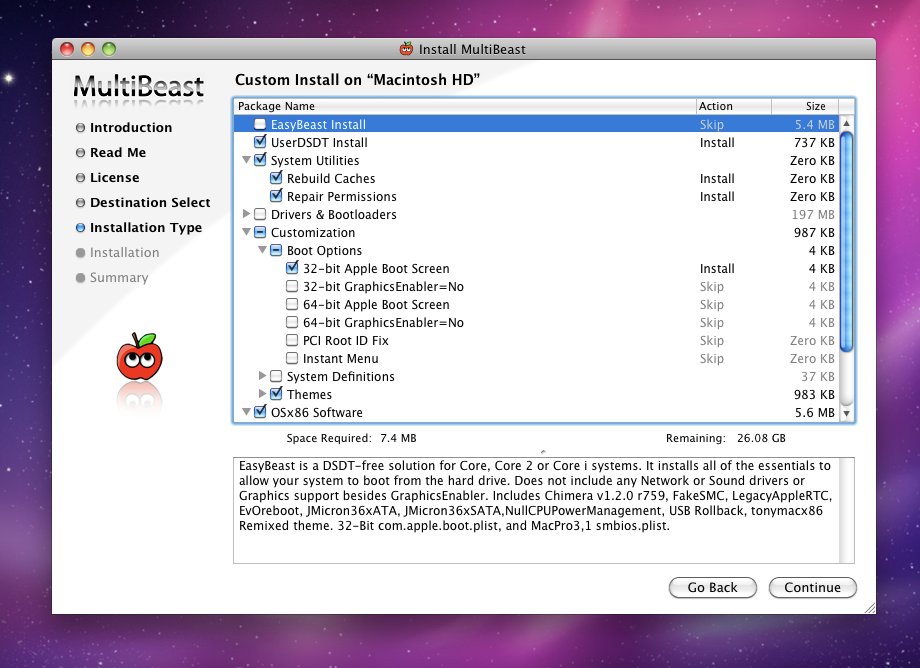
Running MultiBeast
Think of MultiBeast as a package installer, not an app in its own right. What it does is let you pick and choose from an assortment of device drivers and enablers to install; you’ll only need the ones that apply to your hardware. Most of what MultiBeast installs ends up in two folders: /System/Library/Extensions or /Extra/Extensions. It also comes with some handy utilities you may need, under the “OSx86 Software” heading–go ahead and install these too. And in addition to installing software, you can use MultiBeast to rebuild your kernel extension (kext) caches and repair your system permissions, which are both necessary whenever you add or remove a kext. These options are filed under “System Utilities.” If you ever need to change anything, you can run MultiBeast again and choose only the new options you want to change–it doesn’t remove anything from previous installs.
As I mentioned before, there is a guide on the tonymacx86.com forums with MultiBeast settings for our exact hardware build (the guide was originally written by MultiBeast’s main developer MacMan, and has since been updated to accommodate changes in newer versions of MultiBeast by forum user notshy. Big thanks to these guys). The subsequent discussion thread is full of users with the exact same hardware, so it’s a great resource for asking troubleshooting questions and reading up on others’ experiences.
To install, first grab the correct DSDT file for your motherboard’s firmware version (explained in more detail in part two of this guide) and copy it to the desktop. Then, it’s just a matter of matching your MultiBeast checkboxes to the install guide:

After a restart, you should be able to boot without your iBoot CD and, once installed, enjoy a perfectly working OS X install with full sound, networking and graphics support. Huzzah.
Troubleshooting + Tips
With Hackintoshing, there’s always a chance something might not go exactly according to plan. So if your machine doesn’t work perfectly from the get-go, or little things like sleep aren’t functioning the way you’d expect, take a deep breath and hit the tonymacx86 forums. Someone in there has almost certainly experienced something similar, and hopefully has shared a solution to their problem. Here are a few common troubleshooting pointers:
- Keep your iBoot disc: If booting from your hard disk should fail for whatever reason, you can always boot again from your iBoot disc to get into your system. Booting from iBoot loads a vanilla set of barebones extensions that should work in most cases. Once you’re back in, you can run MultiBeast as many times as you need to fix the problem.
- Software updates: The great thing about the MultiBeast install is that OS X’s Software Update works just like it does on an Apple Mac. But before installing an OS X system update, it’s a good idea to check out tonymac’s site to see if anything has changed. There’s always a chance that a new update could do something funky. Since building mine though, I’ve updated from 10.6.6 to 10.6.7 without a hitch.
- 64-bit?: On the tonymac forums, you’ll find a lot of folks talking about whether to run a full 64-bit version of the kernel (the core system software) or the default 32-bit kernel. I’d explain what that means, but it’s probably not even worth it. All you need to know is that it may sound like 64-bit is the much speedier way to go, but for 99 percent of folks (me included), Apple’s 32-bit kernel is just fine. The cool thing about OS X is that 64-bit apps like Photoshop will run in full 64-bit mode even when you’re running a 32-bit kernel. And a 64-bit kernel can cause all kinds of problems with older devices and other apps that may not have 64-bit support. So you can cross that obsession off your list.
- /Extra/Extensions: Keep an eye on this folder to see everything that MultiBeast installs on your system. Also, keep it backed up so you can roll it back should anything go haywire. Reverting to a snapshot of this folder’s contents when things were running smoothly is a great troubleshooting technique.
- Updating MultiBeast?: MultiBeast is updated fairly frequently to include additional support for the latest hardware components. Technically speaking, it’s a cinch to update individual components from within MultiBeast (I just recently updated to the new Chimera bootloader, which had better support for my graphics card). But if you don’t have any specific complaints with your system, I’d leave things as-is. When I updated the bootloader, somehow my /Extra/Extensions folder was wiped clean. It took me a while to figure that out and get things back to normal. So if it’s not broken, don’t fix it! (unless you’re willing to troubleshoot new issues).
- Unplug stuff: USB devices (or combinations of USB devices) can sometimes complicate things. If your system is behaving badly and you can’t figure out why, unplug all your USB gadgets and add them back one at a time to see if you can find the culprit.
Windows Too!
Installing Windows on your Hackintosh is as easy as slapping in a fresh hard drive in addition to your OS X disk and installing Windows on it. The Chimera bootloader should recognize it immediately, and you can use the Chimera startup screen to choose between booting OS X or Windows. It’s great.
So, that’s about it. I hope these guides were helpful and that some of you have been inspired to try your own Hackintosh system. Also, don’t forget to check out part one and part two of our guide.
