If you’re the kind of person who tends to hoard odds ’n’ ends in the hope of upcycling them someday, you’ll enjoy making these artistic cufflinks. So dig into your arts and crafts cabinet and let me show you how resin and a bit of creativity can turn bland bits of material into flashy accessories.
You can use pretty much anything, but for this article, we’re using chocolate wrappers, cracked eggshells, the shiny foil from old CDs, and headphone cables. If you’re yearning to work with resin, these funky cufflinks are a good place to start.
Oh, and before you begin, feel free to crank up your favorite music and ease into some mindful meditation of a different kind.
Stay safe, seriously
The most important part about working with resin is knowing how to use it safely. It’s a hazardous material, so if you ignore safety precautions, you could get hurt. So whether I’m working on a large-scale resin painting, wood, or in a 16-millimeter metal circle, this is how I stay safe:
- Read the safety instructions on the resin packaging. These will tell you how to care for any resin-related injuries. Plus, if something does go wrong—like resin gets in your eyes—you may not be able to read the packaging to figure out what to do.
- Wear eye protection, gloves, and an apron. The more covered-up you are, the better.
- Work in a well-ventilated area. Resin is a chemical, and it emits fumes that can affect your lungs. It’s pretty smelly, too, so you may be grateful for good air circulation.
- If you have kids or pets, make sure they’re not around. As I said, resin can be harmful.
- Cover your work area with newspaper and keep paper towels nearby. Spilled resin is sticky and you don’t want it on the floor or table. I have a separate table I use for resin projects so I can leave it undisturbed.
- Don’t use the tools for anything else. You really don’t want to bring the resin measuring cup or stirrers into the kitchen.
- Keep your mobile phone on silent to minimize distraction. I learned this the hard way. I was in the midst of carefully pouring resin into cufflink blanks when my ringtone jarred me so badly that I accidentally poured too much, making a merry mess. Once the resin dried, the cufflinks were permanently stuck to the base of the wooden holder. It’s like working in a chemistry lab—you need to keep your focus.
The basics of working with resin
When I first started working with resin seven years ago, there weren’t many brands to choose from. I ended up using EnviroTex Lite resin at the time—the same brand I used for this story. It comes in two bottles: one for the resin and one for the hardener.
I have also used ArtResin, but it was not available when I was shopping for resin. Like EnviroTex Lite, it also comes in two parts. If I could get my hands on them, I would experiment with ultraviolet resins and eco-resins, but they’re not available where I live. UV resins dry—cure—under UV light in a matter of seconds, so they save a lot of time. Eco-resins, meanwhile, are non-toxic and solvent-free.
I also tend to buy smaller quantities of resin when I’m working on smaller projects, such as cufflinks and lapel pins, because unused resin turns yellow over time and I don’t want my projects to look old.
If you’ve never worked with resin, make sure whatever brand you buy has proper instructions on its packaging. Some, like EnviroTex Lite, call for a 1:1 ratio of resin and hardener, while others require 1:2. Even so, you have to be willing to make some mistakes along the way as you learn how to accurately mix resin and hardener.
When you mix your resin, do so according to its instructions. Otherwise, it won’t cure fully and you’ll end up with a sticky surface. The packaging will also tell you how long your brand will take to cure. EnviroTex Lite, for example, finishes in 8-72 hours.
The size of each project below is a good thing, too, because the best way to get the hang of resin is to start small. If you’re just starting out, work on one cufflink blank at a time to get comfortable pouring resin before you start handling several—pouring resin is a process you can’t rush.
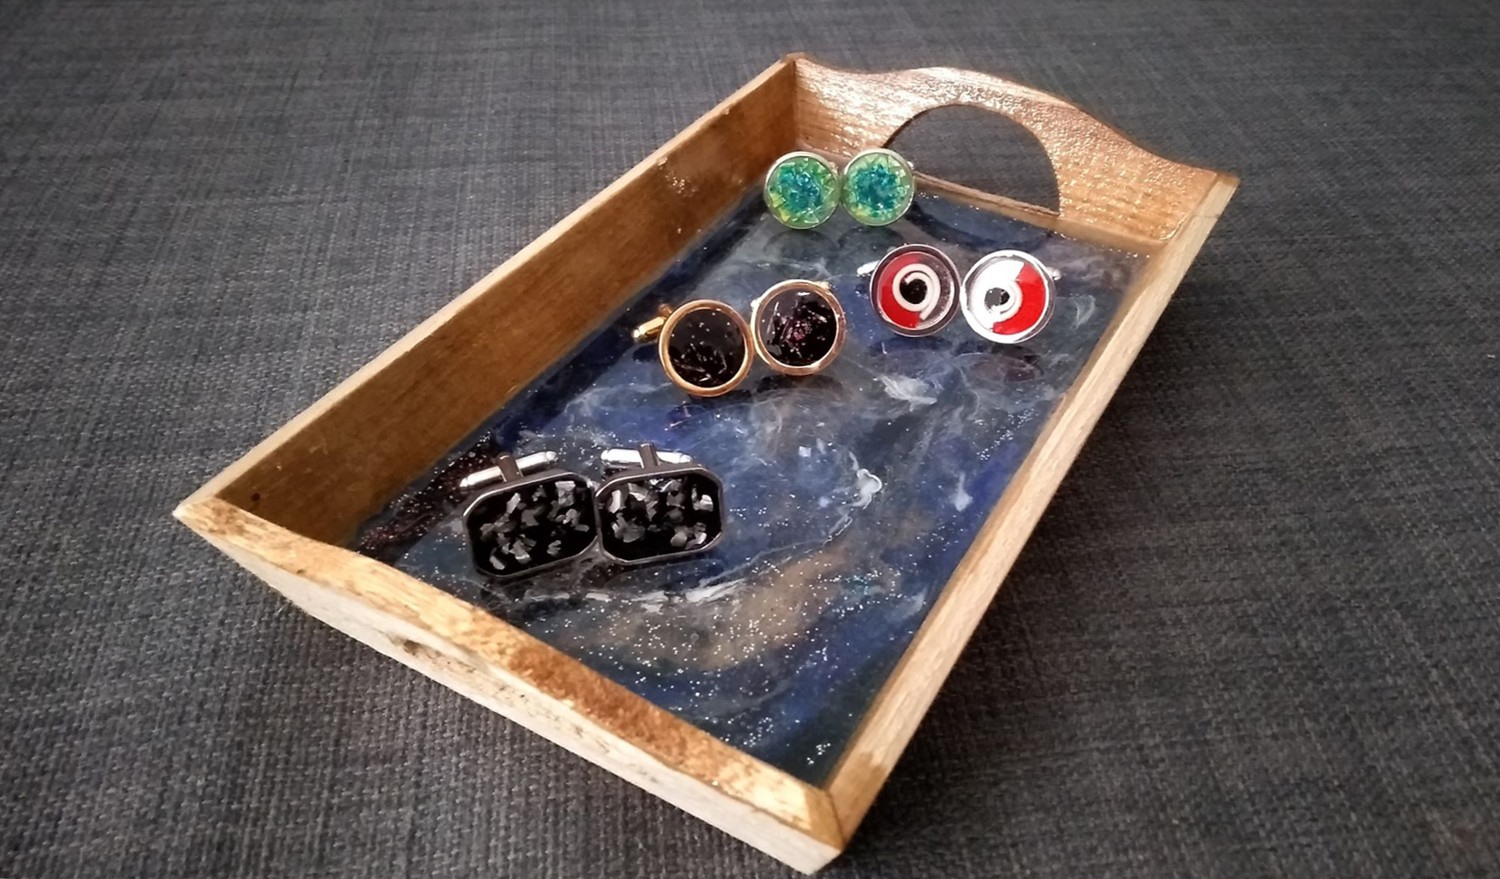
And if you find you’ve mixed more resin than necessary, don’t throw it out. You can pour it into something else (I used an old wooden tray), and experiment with colors before it cures.
What you’ll need (for every project)
Materials
- Acrylic paint
- Blank cufflink bases
- Resin and hardener
Tools
- Apron
- Eye protection
- Gloves
- Newspapers (or paper towels)
- Paintbrushes with fine brushes
- Resin measuring cup
- A sturdy table (or workbench)
- Toothpicks
- Wooden stirrers (for resin and hardener)
- Wooden rack (to hold the cufflinks in place)
Eggshell cufflinks

I have always wanted to create mosaic-like cufflinks, and I knew eggshells could help me achieve that effect.
Materials
- Eggshells (cleaned)
- Transparent craft glue
- Water
Tools
- Paper towels
- Tweezers
- A water container
Prepare the eggshells. Rinse the eggshells in a solution of warm water and vinegar. Peel away the thin membrane inside the shells and throw it away. Leave the eggshells to dry on a paper towel.
Paint the insides of the cufflink blanks. Use a fine paintbrush and color the interior with your choice of acrylic paint. I used green on my blanks. Let the paint dry.
Add glue. You can use any glue that dries into a transparent matte finish. Just put it into a blank cufflink, take a piece of eggshell, and put it on top of the glue. Then press the eggshell lightly with your fingertip to create cracks so it looks like a mosaic.
Adjust the eggshell pieces. Using tweezers, adjust the space between each piece of shell so the “grout” (the painted background) shows through. Because the cufflinks have a small circumference, I prefer this method over cracking the eggshells into tiny pieces before placing each one. Let the glue dry.
Paint the eggshells. I wanted a graded color look, so I mixed a bit of blue and yellow acrylic paints, as you can see in the photo. (Yellow on the outside, blue on the inside and a mix of blue and yellow in the middle). Let the paint dry.
Add resin. After mixing the resin and hardener, position your cufflinks on the wooden rack and use a toothpick to drop resin into the blanks, filling them to the brim.
Let the resin cure. Bubbles will rise during the first hour after pouring. Use a clean, dry toothpick to pop any that come to the surface and check for bubbles every 20 minutes until the resin is dry.
Chocolate wrapper cufflinks

Any material that gleams, I collect. That’s how I ended up with several chocolate wrappers, many from the Mackintosh and Lindt brands, and a plan to use them to achieve a look of subtle black and gold glam.
Materials
- Chocolate wrappers
Tools
- Scissors
- Tweezers
Paint the cufflink interiors. I painted the insides of my gold-toned, silver-plated cufflink blanks with black acrylic paint.
Cut the chocolate wrappers. Using sharp scissors, snip the wrappers into short, thin slivers. I used a mix of translucent purple and shiny gold wrappers.
Put the slivers into the cufflinks. Once the paint has dried, use the tweezers to place the wrapper pieces into the cufflink blanks.
Pour the resin. I decided to add a dab of black acrylic paint to the resin before pouring it onto the slivers in the bases—I wanted the wrappers to subtly show through the black, creating a feeling of trekking across the universe. You can skip that modification and simply use a toothpick to drop resin into the blanks, filling them to the brim.
Let the resin cure. Bubbles will rise during the first hour after pouring. Use a clean, dry toothpick to pop any that come to the surface and check for bubbles every 20 minutes until the resin is dry.
CD foil cufflinks

It breaks my heart when I have to throw something away without exploring how to incorporate it into some kind of DIY project. So when I spotted the rainbow sheen on the backs of some blank CDs, I made it my mission to find a way to harvest the shiny foil that produced those colors. Unfortunately, I still had to discard the transparent plastic part of the CDs.
Materials
- A CD
- Hot water
- Transparent craft glue
Tools
- A bowl
- Paper towels
- Scissors
- Tweezers
Remove the CD foil. For the type of CD I had in my hoard, I needed to soften it slightly by placing it in a bowl of hot water for a couple minutes. Once it had softened sufficiently, I cut off a few pieces of various sizes. Take care during this step, in case the pieces take flight while you’re cutting. I didn’t want the plastic, though—I wanted the shiny foil. I used tweezers to peel off the foil and left it to dry on paper towels.
Cut the foil into slivers.
Paint the interior of the cufflinks. I painted the insides of my silver-plated cufflink blanks with cadmium blue acrylic paint. Let the paint dry.
Add glue. Brush the glue into the cufflink blanks and press the foil onto it with your tweezers. Let the glue dry.
Add resin. After mixing the resin and hardener, position your cufflinks on the wooden rack and use a toothpick to drop resin into the blanks, filling them to the brim.
Let the resin cure. Bubbles will rise during the first hour after pouring. Use a clean, dry toothpick to pop any that come to the surface and check for bubbles every 20 minutes until the resin is dry.
Mobile earphone cable cufflinks

I had some broken mobile earphones lying around, and surmised that I could cut the cables into 1-centimeter bits for a set of cufflinks. My cables were white and were pliable enough to turn into small spirals that could fit within the cufflink blanks.
Materials
- 2 1-centimeter snippets of earphone cable
- Super glue
Tools
- Scissors
- Round-nose pliers
Paint the cufflink interiors. I painted half the interior of my silver-toned cufflink blanks with red acrylic paints and let the silver shine through for the other half. Let the paint dry.
Cut the earphone cable. Using scissors, cut two pieces of the cable, each about 1 centimeter long. Twirl them into a spiral with the pliers.
Place the cables into the cufflink blanks. Put a dab of super glue at the center of each blank and quickly place the wire spirals into the cufflinks. Apply pressure, making sure your fingers don’t touch the super glue—you don’t want to get the cufflinks stuck to the tip of your finger. Let the glue dry.
Add resin. After mixing the resin and hardener, position your cufflinks on the wooden rack and use a toothpick to drop resin into the blanks, filling them to the brim.
Let the resin cure. Bubbles will rise during the first hour after pouring. Use a clean, dry toothpick to pop any that come to the surface and check for bubbles every 20 minutes until the resin is dry.
As you can see, if you’ve got a barrel full of creativity and oodles of patience, there’s no end to the ways you can use resin and upcycled materials to make cufflinks. Test out different materials and let your imagination run wild. From simple pieces of decorative paper to pressed and dried flowers, the possibilities are endless.
