With summer in full swing in North America, finding a way to keep cool is a must. If you’re someone like me who relies on a fan to keep yourself from soaking your clothes in sweat, you’ve probably forgotten to turn it on, or simply wished it’d activate automatically the moment you walked in the room. Fortunately, with a bit of electronics hacking, you can get those fan blades whirring without having to flip a switch.
It’s a fairly simple project, too: just hook an Arduino Uno up to a motion sensor and an electronic switch called a relay, then plug in your fan, and you’re good to go. If that sounds complicated, don’t worry, we’ll walk you through it. And once you’ve got the hang of it, you’ll be able to apply the concept to lighting or anything else that plugs into the wall.
There are, of course, commercial smart home options available, but if you want total control over your system and something you can build upon, this is a great way to implement basic home automation.
What you’ll need:
- Arduino Uno
- Arduino Uno power supply
- Internet of things power relay
- Passive infrared (PIR) sensor
- Pre-wired male-to-male and male-to-female breadboard jumper wires (length according to your setup)
- Portable fan
- Flathead screwdriver
- USB Type-A to USB Type-B cable
- Enclosure (optional)
Wire the electronics
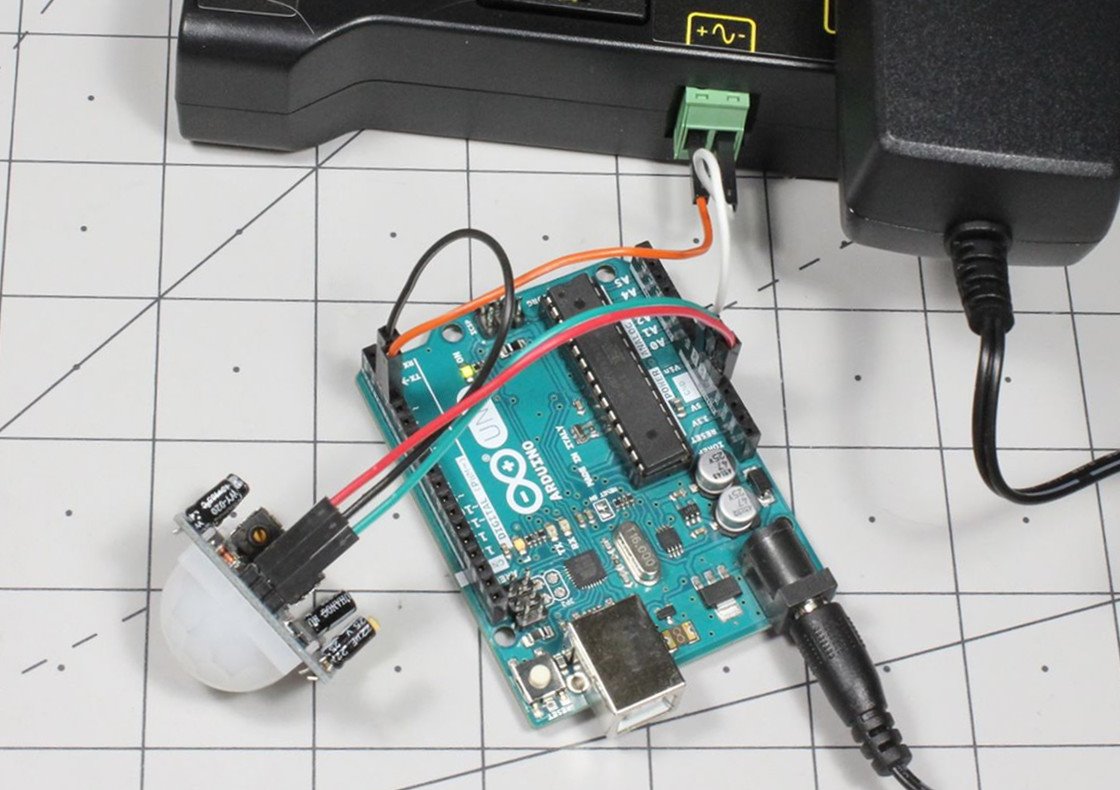
- Plug the male-to-female jumper wires into the motion sensor pins. The middle wire will be the signal line, and will connect to Pin 2 on the Arduino. The side connector pins will go into the Arduino’s ground (GND) and 5V sockets. These correspond with labels normally found behind the sensor’s white dome lens.
- Plug a male-to-male connector into a second GND pin on the Arduino. This wire will connect to the negative port on the power relay connector (labeled with a “minus” symbol). For wire installation, pull out the small green connector on the side of the power relay. Doing so will expose screws that open and clamp the wires.
- Plug another male-to-male connector into Pin 3 on the Arduino. This wire will connect to the positive port on the power relay connector (labeled with a “plus” symbol).
- Power your Arduino. To do so, plug the Arduino power supply into the always ON socket on your power relay, then connect the barrel jack on the other end of the power cord to the Arduino’s power input.
Set up the Arduino program
At this point, your Arduino has the ability to sense movement and respond, but it has no program to tell it what to do. Let’s fix that.
- Download the proper program for your computer from Arduino’s software page.
- Run the program and follow the on-screen prompts. This will give it permission to modify your system.
- Download this code from my GitHub page.
- Use Ctrl+O to load the code onto the Arduino IDE.
- Connect your Arduino to your computer with the USB cable.
- Use Tools>Board:>Arduino/Genuino Uno to choose the type of Arduino you’re using.
- Use Tools>Port to select the port where your board is listed by name.
- Use Ctrl+U to load the code onto your board.
How it works: The first few lines of the code define program variables and data storage locations. You’ll see PIRPin defined as “2” and OutPin defined as “3”—these correspond to where you plugged the PIR sensor and power relay into the Arduino.
The void setup() section defines the PIRPin as an input and the OutPin as—you guessed it—the output line connected to the relay switch. While this may be obvious, computers need to be explicitly told what to do. Perhaps the term “smart device” is a bit of a misnomer, as they need an intelligent human to set everything up.
The void loop() section, though, is where the real work occurs, as the Arduino loops this code repeatedly. First, it checks in with the motion sensor via PIRState=digitalRead(PIRpin) to see if has sensed any movement. Then, it records the number of milliseconds that have elapsed since the Arduino program began, with currentTime=millis().
- (Optional) Change the delayValue. This bit of code dictates how long the fan stays on after the sensor notices movement. In my code, it’s set to 600000 (600,000 milliseconds, or 10 minutes). Tweaking this number will let you modify the fan’s behavior to your liking. If you only want it to run for 5 minutes, change the value to 300000. The world is yours… as long as it involves turning on a fan.
How it works: When something triggers the sensor, the Arduino records that moment as triggerTime in Line 23, and compares it with the current time based on conditions in lines 26, 29, and 34. If the difference is less than the delayValue (10 minutes for the purposes of this story), the fan turns on or stays on. If the sensor detects movement during that 10 minutes, it tells the Arduino, and the timer resets. If the difference is higher than the delayValue, the program knows there hasn’t been any movement and turns the fan off.
Connect your fan and stay cool
- With your fan unplugged, turn it on and set it to your preferred cooling setting.
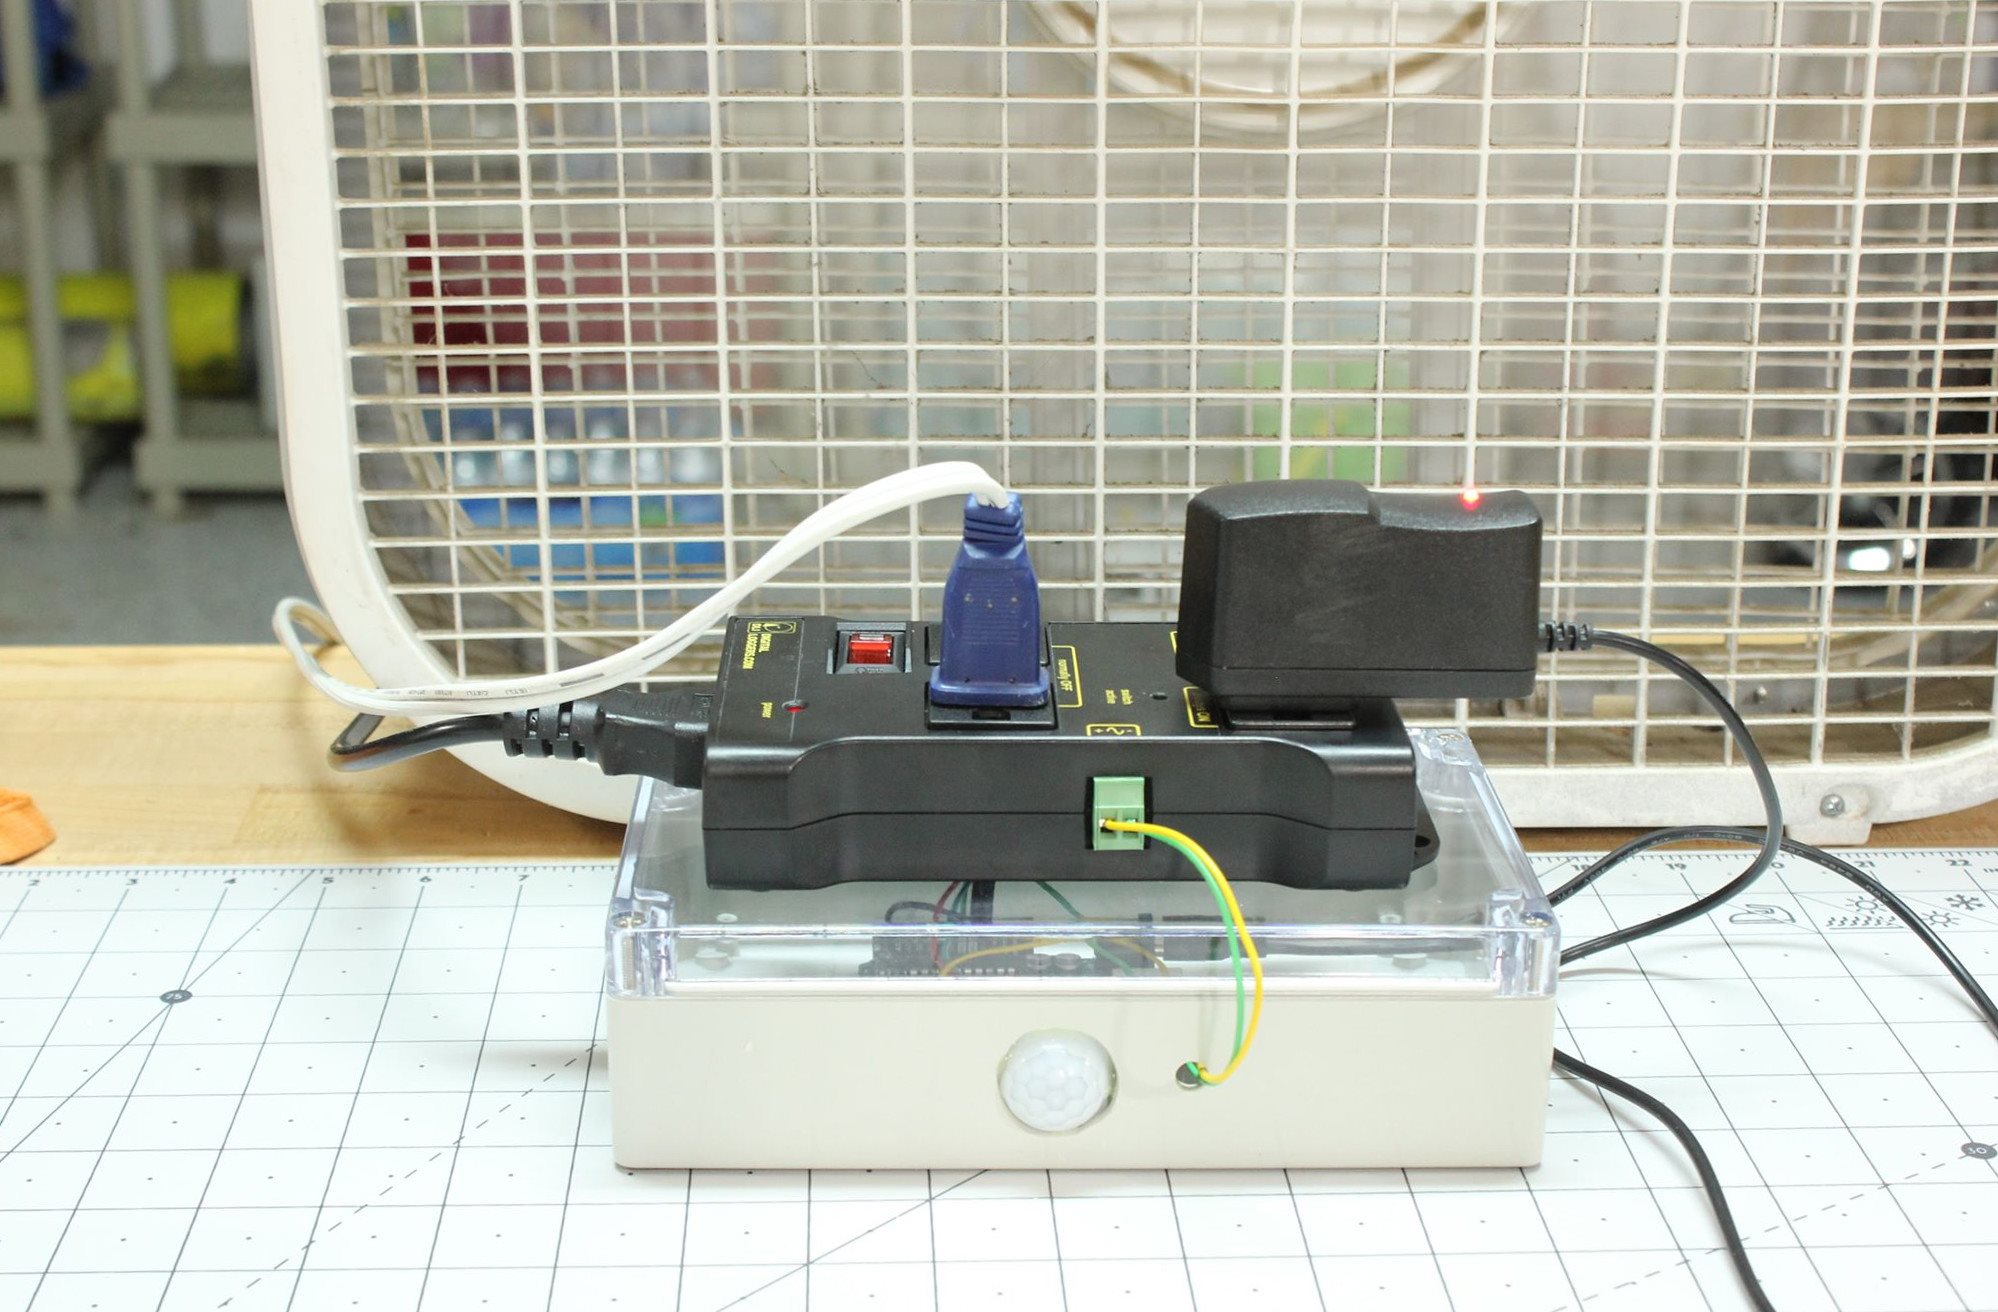
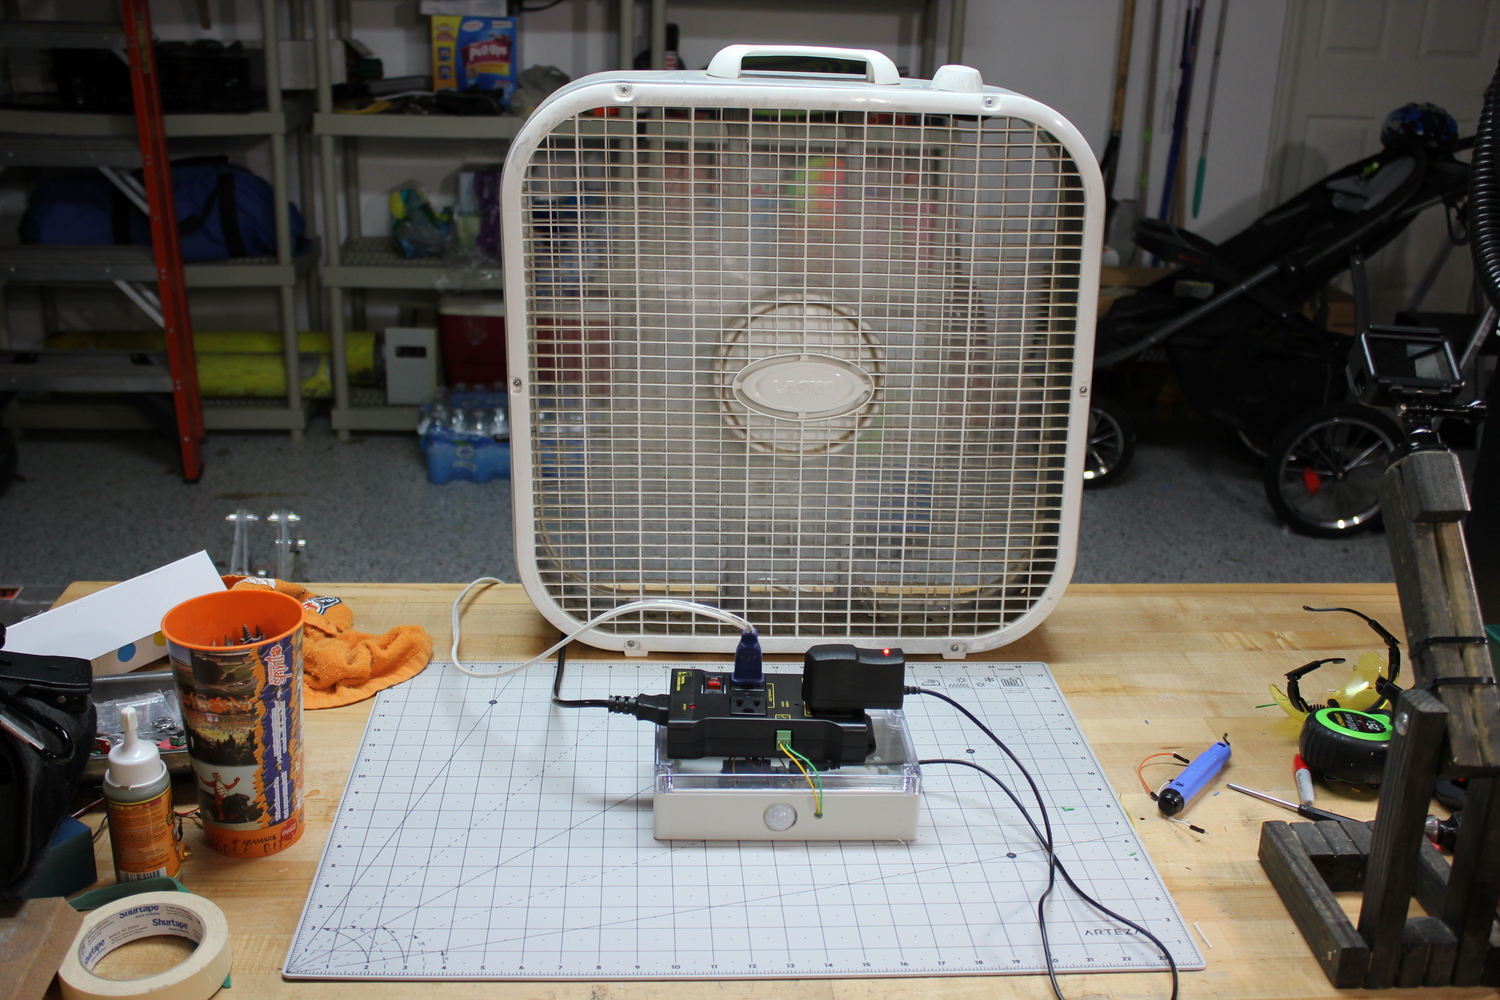
- Plug the fan into one of the two “normally OFF” sockets on the power relay. With everything connected, it’ll turn on automatically. You can even plug a light or another device into the other normally OFF port to make it motion-activated as well.
Optional: Build an enclosure
The setup will work as it is, but you probably don’t want a bunch of loose wires hanging around. There are a plethora of ways to mount your electronics, from Tupperware to a custom wooden box, but I happened to have a plastic electrical enclosure on hand. It has a plastic top that would seem ideal for motion sensing, but I’ve found clear plastic can interfere with infrared light.
What you’ll need:
- Drill press (or a handheld drill)
- 1-inch spade bit
- Hot glue gun
- 1/2-inch drill bit (optional)
- 1/4-inch drill bit (optional)
- Drill a 1-inch hole for the sensor. This is the only hole that needs to be close to spot-on, as it’s where the white semi-dome will protrude.
- Drill holes for the power cable and hookup wires. Use the 1/2-inch bit for the power cable hole and the 1/4-inch bit for the hookup wire pass-throughs. You can also use whatever you have available that’s close, or even the spade bit if you’re OK with a loose fit.
- Hot glue the Arduino in the center of the enclosure.
- Hot glue the motion sensor to the hole you drilled for it.
- Feed the wires through their respective holes and attach them to the Arduino and the power relay.
- Reattach the enclosure’s top cover.
You can just leave the power relay on top of the enclosure, ready to use with your fan or whatever appliance you’re looking to trigger. Make sure the adjustment knobs for sensitivity and on-time for the motion sensor are facing up so you can modify how sensitive your device is and how long it stays on to signal your Arduino.
While great with a fan, this programmable switch you’ve created will work with other devices, too. So whether you’re looking to activate some lights, scare burglars who enter your tool-cave with a siren, or simply keep yourself cool, it’s a great gadget to have at your disposal.
