What’s better than one glass of beer? Four glasses. Beer flights are a fun way to try out a variety of flavors in manageable quantities, and if you’re a home brewer they can help you present your latest concoctions in style. They’re also an opportunity to showcase what an amazing woodworker you are—and even if you’re not, this project is simple enough that people will think you are.
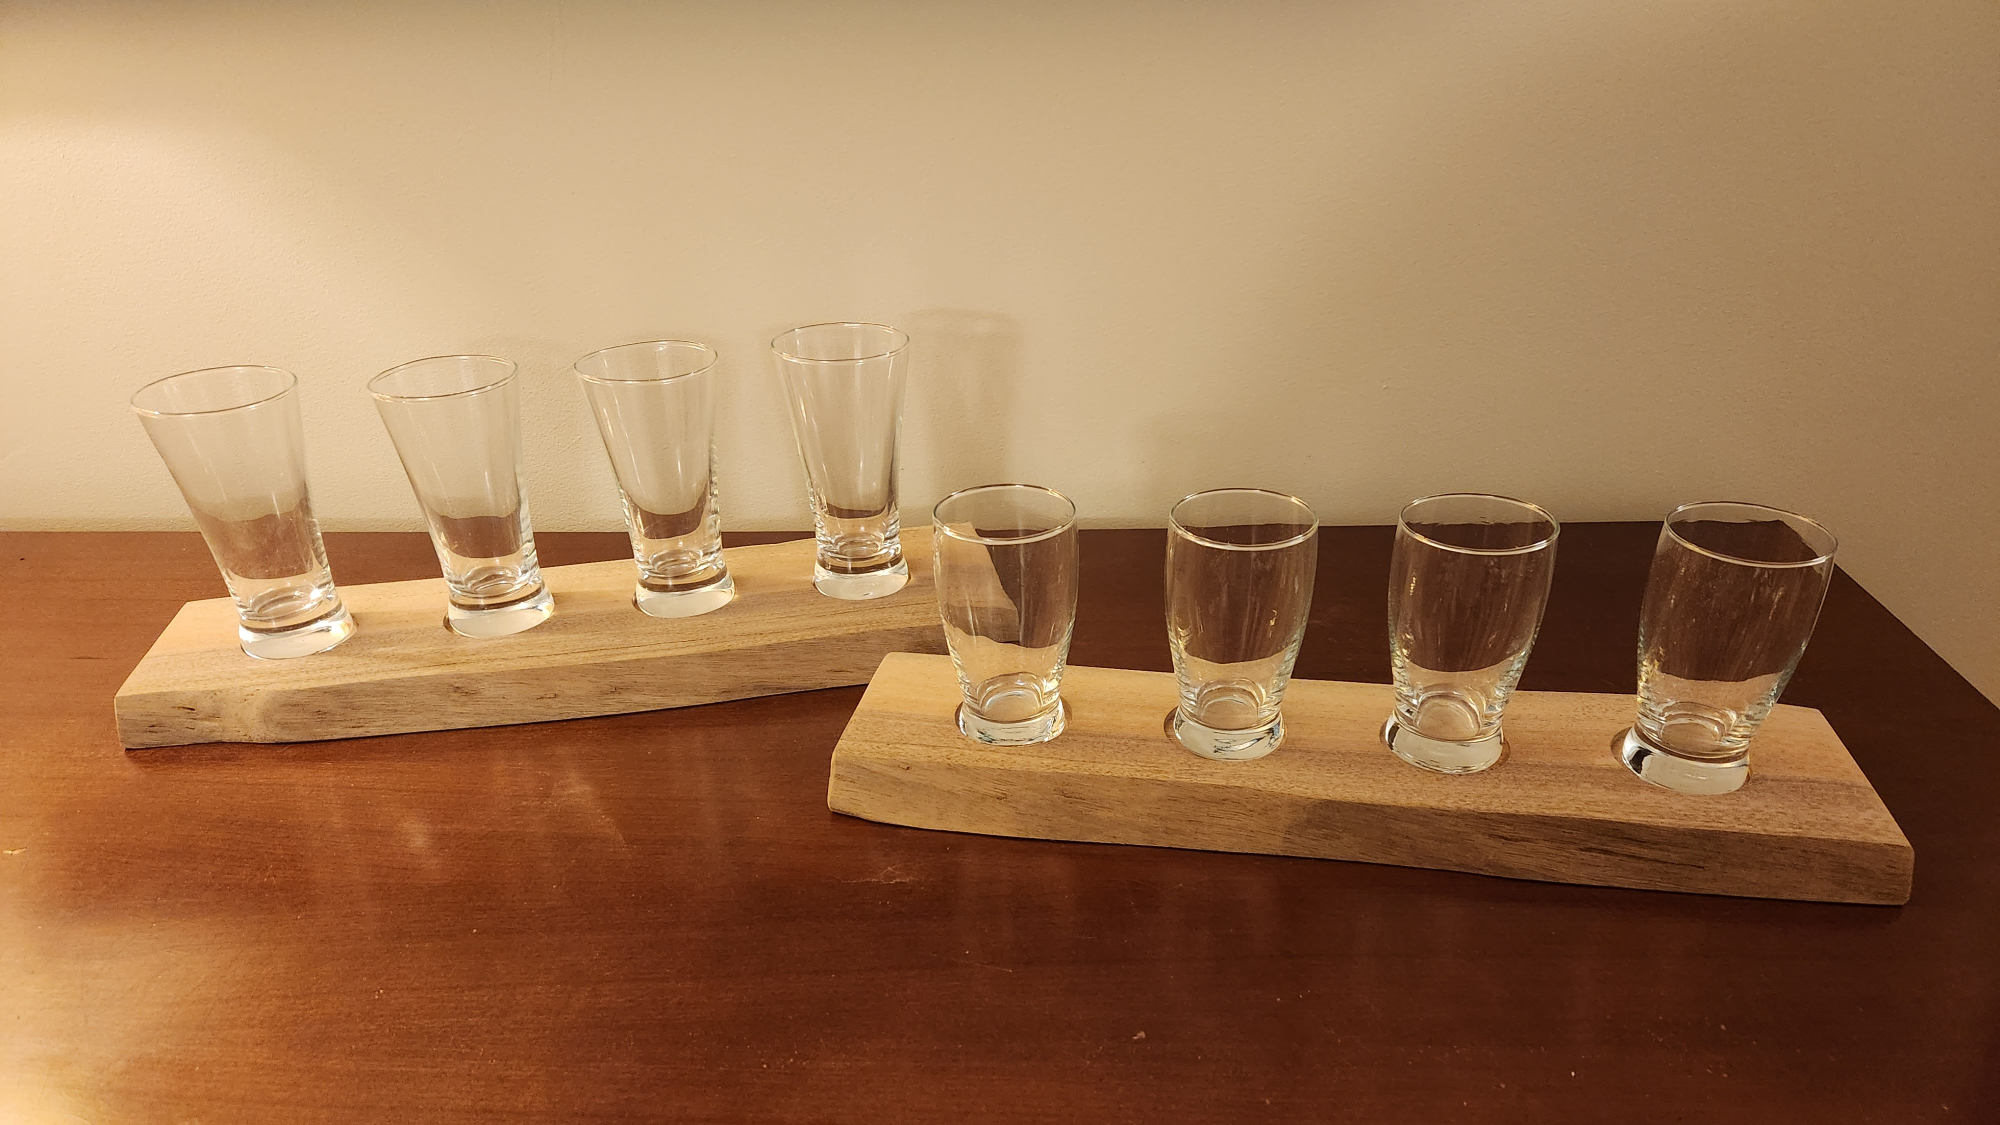
At its most basic, a beer flight board is a plank of wood with some shallow holes to hold the glasses, but there are a few ways to upgrade this easy DIY project. You can use your router or table saw to create fancy edge decoration, build it from multiple kinds of wood glued together in a pretty pattern, or play with burning or inlaying a design. For mine, I used live edge boards to make the trays, which will be large enough to hold four 5-ounce glasses.
Live edge boards are sawn the full width of the tree, so the natural, wavy edges remain. They usually come with the bark attached. Keeping that edge can bring a natural feel to any project—some of my favorite tables have live edges. And although it looks elaborate, there’s nothing complicated about working with live edges.
Of course, if you don’t have a live edge board, or want a different design, you can use any kind of wood you have available, as long as it will fit the number of glasses you’re looking for.
Warning: DIY projects can be dangerous, even for the most experienced makers. Before proceeding with this or any other project on our site, ensure you have all necessary safety gear and know how to use it properly. At minimum, that may include safety glasses, a facemask, and/or ear protection. If you’re using power tools, you must know how to use them safely and correctly. If you do not, or are otherwise uncomfortable with anything described here, don’t attempt this project.
Stats
- Time: 1 to 2 hours
- Material cost: $20 to $50
- Difficulty: easy
Materials
Tools
- Chisels
- Wire brush
- Measuring tape
- Jointer
- Planer
- Miter saw
- Table saw
- Crosscut sled
- Drill
- 2-inch Forstner bit (or whatever size fits your glasses)
- Orbital sander
- Sanding discs (80-, 120-, 150-, and 220-grit)
- (Optional) plunge router
- (Optional) pattern flush trim router bit
- (Optional) ½ -inch scrap board, approximately 4 by 14 inches
How to build a custom beer flight board
1. (Optional) Clean up the edges. If you’re working with live edge wood, you’ll have to remove the bark and smooth the edges. This is generally the first step any time you work with this type of wood. The easiest way is with a chisel: slide the tip of the tool between the bark and the wood and pry. The bark should fall right off—just be careful not to gouge the wood. You can also use a screwdriver or pry bar if the bark is particularly stubborn.
Once the bark is gone, strip off all remaining fibers to get down to bare wood. If you leave behind the strands that held the bark onto the tree, they can ruin your eventual finish. An orbital sander is the fastest way to smooth these edges, though it can remove some of the natural contour and charm of the edge if you’re not careful. A wire brush and hand sanding with 80-grit paper is a less aggressive option, though it takes longer.
2. Mill your board to size. Beer flights are meant to sit flat on a table, counter, or bar, so it’s important that you actually mill the board. The best way to mill wood is to flatten one face and edge on a jointer, then flatten the opposite face in a planer. Finally, trim the board to width on a table saw and to length with a miter saw.
For boards with two live edges, like mine, you don’t need to bother with the edges—leave them natural.
If you don’t have a jointer and planer, you can flatten with your sander or a hand plane, or buy wood that is pre-flattened.
To comfortably fit four glasses, I milled my boards to 14 inches long, about 4 inches wide, and ¾-inch thick.
3. Measure the hole spacings. Where to put the holes depends on the size of the glasses you’re using and the look you’re going for. My cups had 2-inch diameter bases, but bulged out to about 2.5 inches at the top. I had to make sure to leave room for the bulge, along with space between them.
On my 14-inch-long beer flight board, I centered the glasses 1 ¾ inches from each end and 3.5 inches from one another. This left plenty of space between them.
4. Cut the holes for the glasses. These holes should be slightly larger than the base of the glass, and about a quarter of an inch deep. The easiest way to cut them is with a Forstner bit and a drill—a drill press is even better if you have one. However, the problem with a Forstner bit is that it leaves behind an ugly (in my opinion) dimple in the very center of the hole. If you don’t mind that dimple, by all means build it that way. Many people do.
[Related: How to brew beer at home in a week]
But if you’d rather have a flat-bottomed hole, use a plunge router and a patterning bit. If you’re brave and skilled enough, you can try to freehand the hole. I am not, so I used a plywood template. Drill holes the size you want all the way through a piece of half-inch plywood, spaced the same as you want them on the final tray. Then clamp or use double-sided tape to affix that board to your beer flight, with the hole positioned where you want it.
Set the depth stop of your plunge router to a quarter-inch below the flight wood, and route out the holes, running the bearing of the patterning bit along the edge of the plywood. This produces perfectly flat, uniform holes, and you can reuse the plywood on any other flights you make with the same spacings.

5. Sand until you have visions of the desert. Sanding separates good from great in woodworking. Use a random orbit sander to work through the grits: 120, 150, and 220. Then comes the really hard part: hand-sanding the holes. These don’t have to be perfect because people likely won’t touch them much, but you do want to sand away any unsightly drill or router marks.
6. Raise the grain and sand again. When wood gets wet, the fibers absorb water and swell. After sanding, this causes a rough finish to emerge the first time the wood comes in contact with water (or spilled beer). Beat the swelling to the punch by lightly wetting every surface of your beer flight boards and then hand-sanding the whole thing again with 220-grit paper. This will eliminate the raised grain that can ruin the feel of a good finish.
7. Apply the finish of your choice. Most finishes will work fine here, aside from shellac, which can be dissolved by alcohol. I chose spray-on polyurethane, for several reasons. One, it’s durable and reliable. Two, the spray makes it easy to completely coat both the holes and the live edge. And most importantly, I had half a can left on my shelf from another project that I needed to use.
Make sure to follow the manufacturer’s instructions on your finish of choice, including any sanding requirements, to achieve the best finish possible.
8. Drink and enjoy. There are few better ways to celebrate finishing a new project than with a drink (or four.) Hopefully you added in a sub-step somewhere along the way to go to the store and pick up a variety pack of beer so you can show off your brand new beer flight as it was meant to be used.