If you’re interested in woodworking, good dust collection is a must-have. Breathing wood dust can cause health problems including respiratory issues and cancer, according to the US Occupational Safety and Health Administration. Most homeowners and woodworking hobbyists, however, have neither the space nor the budget for a full-blown dust collection system. Instead, many of us rely on a regular old shop vac. On its own, a shop vacuum does a decent job, but it’s not really designed for dust collection.
One way to improve a shop vac’s ability to capture sawdust is with a dust separator. This is basically a 5-gallon bucket with a low profile or cyclone style separator lid. The shop vac’s hose connects to the lid, and then a second hose runs from the collector bucket out to any tool with a dust port. Heavier dust particles fall into the bucket, while the super-fine dust is pulled into the shop vac filter. This reduces the strain on the filter, allowing it to do a better job removing airborne particulates with less frequent cleaning.
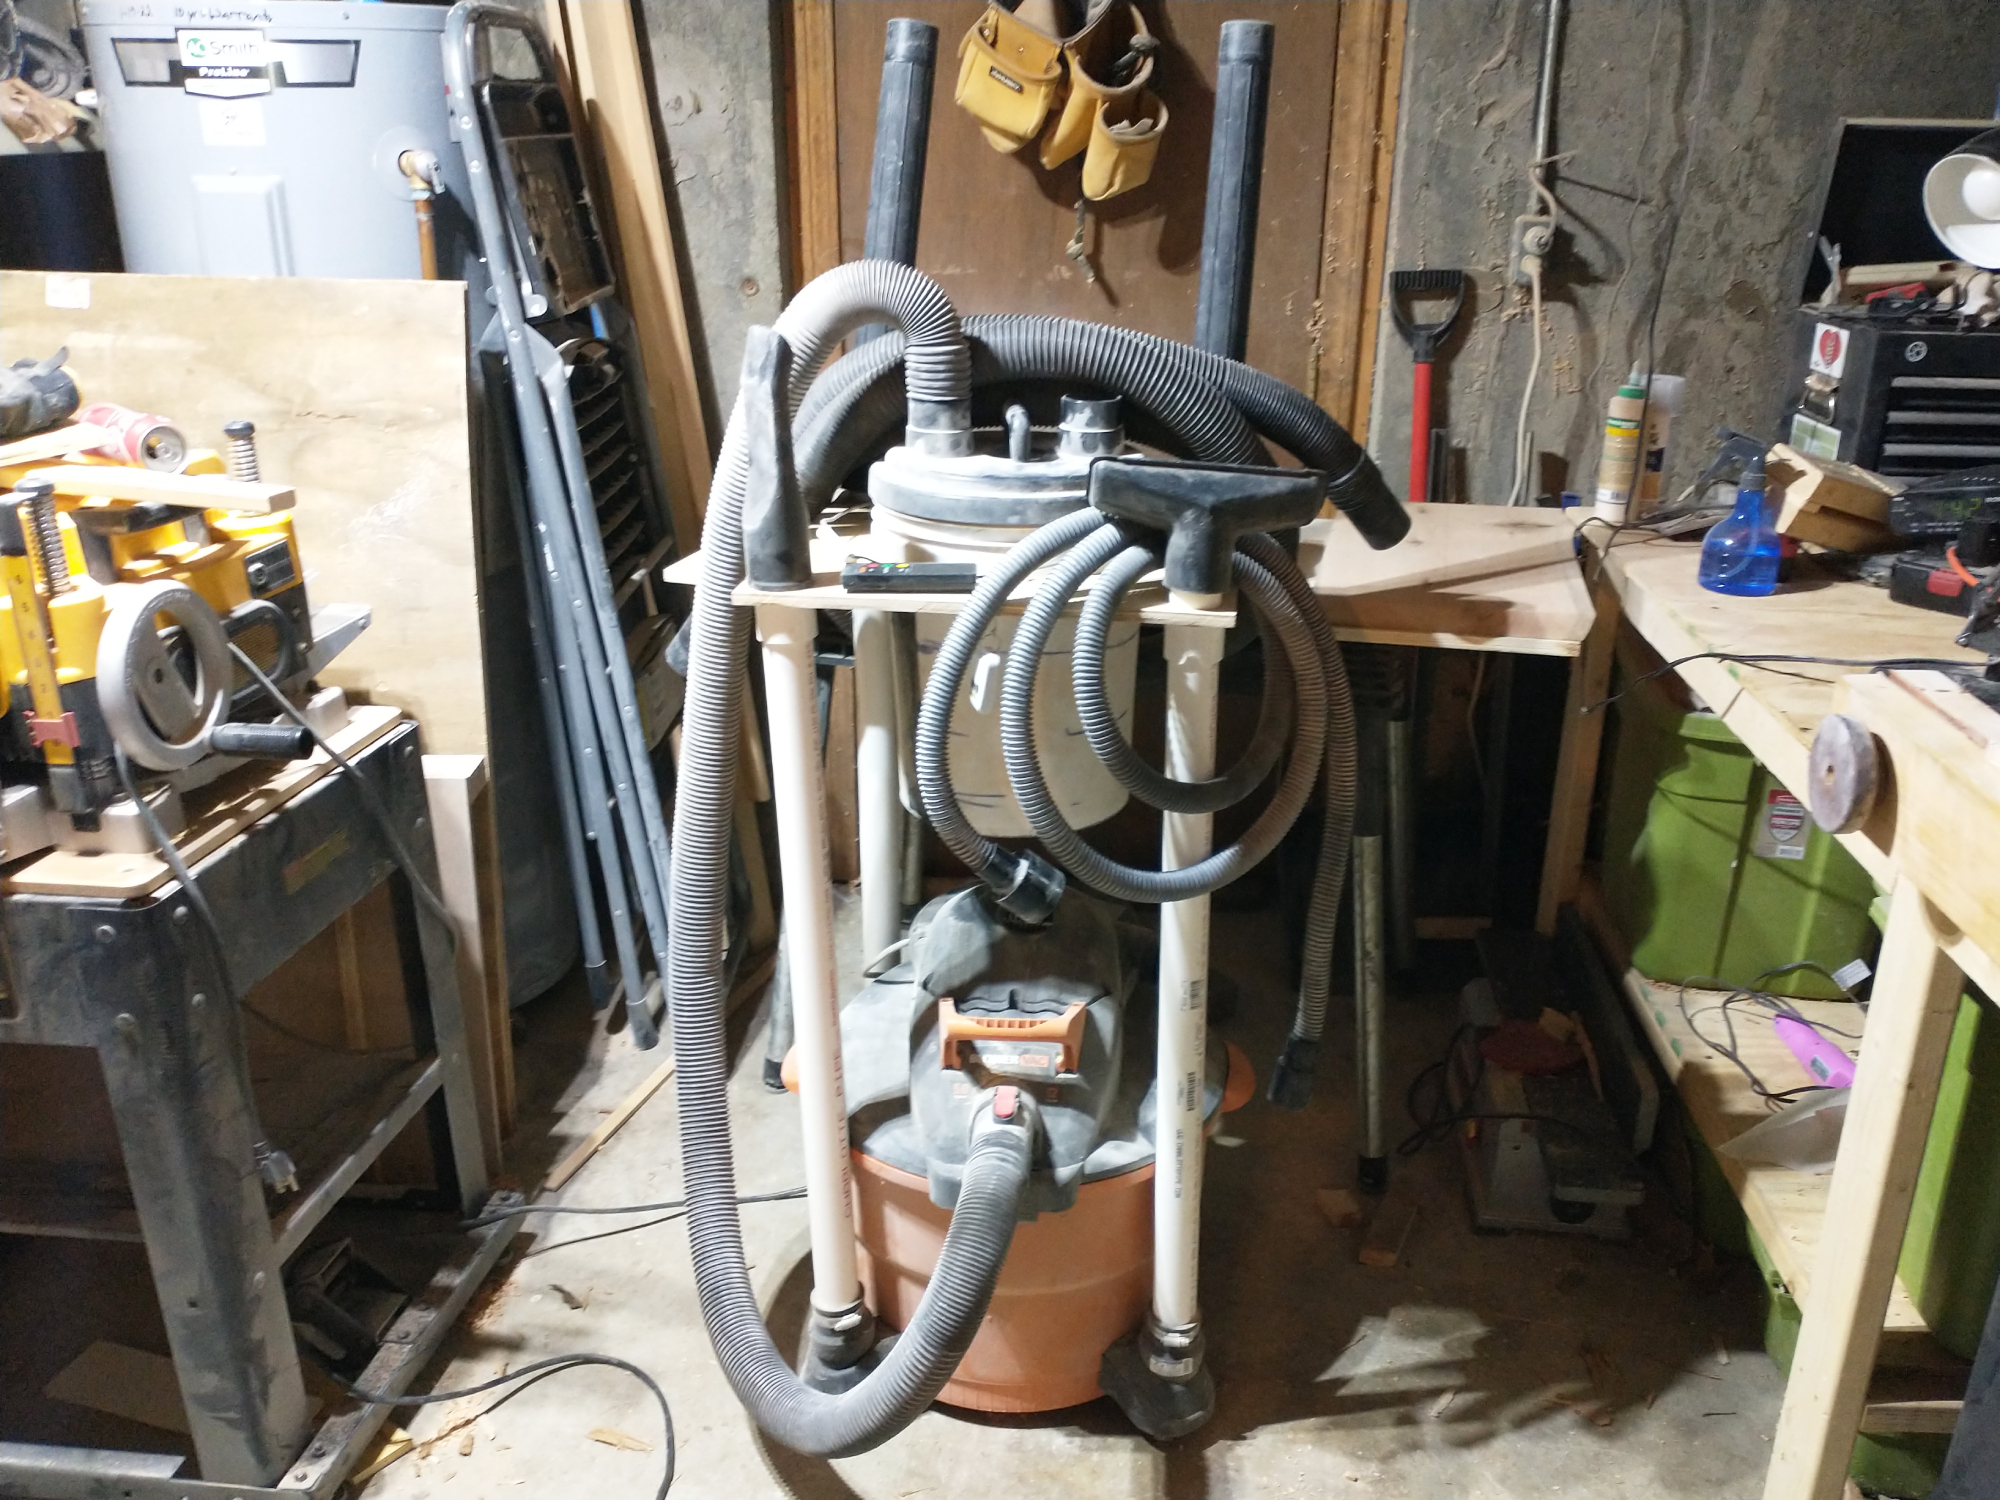
Unfortunately, this setup can lead to an absolute mess of hoses around the shop. After a couple of years of tripping, I decided to build a stand to control and contain the entire system. My solution is built from PVC pipe and plywood, and uses the wheels of my shop vac for mobility. It holds all of my vacuum attachments, and gives me a place to coil my spare hose. Finally, I can easily remove and empty the 5-gallon bucket when it’s full.
If your vacuum doesn’t have wheels, also called casters, with accessory storage holes on top of them, you’ll need to build a different kind of stand.
Warning: DIY projects can be dangerous, even for the most experienced makers. Before proceeding with this or any other project on our site, ensure you have all necessary safety gear and know how to use it properly. At minimum, that may include safety glasses, a face mask, and/or ear protection. If you’re using power tools, you must know how to use them safely and correctly. If you do not, or are otherwise uncomfortable with anything described here, don’t attempt this project.
Stats
- Time: 1 to 2 hours
- Material cost: $50 to $100
- Difficulty: Easy
Tools
Materials
Adjust sizes as needed to fit your shop vac:
- 2 (10-foot) pieces of 1.5-inch PVC pipe
- 4 (1.5-inch) PVC couplers
- 4 (2-inch-to-1.5-inch) reducing couplers
- 1 (2-by-2-foot) piece of ½-inch plywood
Instructions
1. Cut the PVC pipe to length. Add the height of the vacuum to the height of the lip of the bucket you’re using as your dust canister. Then add approximately 8 inches to put some space between the bottom of the bucket and the top of the vacuum so you can get the top of the shop vac off without removing the bucket. For my setup, the pipes needed to be about 36 inches long. These will be the stands that hold the plywood shelf your dust collector rests in
Cut the pipe with a reciprocating saw if you have one, or a handsaw if you don’t. After cutting the long stands, cut four more shorter pieces, each about 6 inches long. These are what the shelf will actually slide onto in order to sit on the couplers atop the long pipes.
[Related: Save space by building this simple cutting board rack inside any door]
File the cut ends of the plastic clean of frays and burrs so you can easily slide the pipe into the couplers later.
2. Fit the rubber reducing couplers into the wheel slots. My shop vac casters have accessory storage holes on top of them to hold the hose extensions and nozzles. The 2-inch rubber reducers fit perfectly into these holes. My recommendation when shopping for reducers is to bring one of the vacuum extension pieces with you to the store, and test-fit the reducer over that.
- Pro tip: If you can find PVC reducers that are deep enough to sit flat in your accessory holders, get those because they’re cheaper and more stable than rubber. I checked three hardware stores in my area, but all the PVC reducers they had were too shallow, so I bought rubber ones. These are secure, but they’re more expensive and allow a bit more movement in the stand.
3. Insert the PVC stands into the reducers. The long PVC pipes should slide into the top of the reducers. Push them all the way down against the top of the casters for stability. Then tighten down the stainless steel clamps with a flathead screwdriver. The pipes will lean a bit, but they should stay upright.
4. Measure the plywood bucket holder. To find the overall size of the board, measure the distance between all of the pipes from the outside edges. Enlisting a second person to keep the pipes standing straight will make this easier—I did it alone, and it was very annoying. Add 2 inches to that length so you have a 1-inch overhang outside the pipes. In my case, the pipes on each side were 17 inches apart, so my plywood needed to be 19 by 19 inches.
- Pro tip: Don’t assume the vacuum wheelbase is square, though it probably is. Also, don’t measure the wheelbase itself—measure at the tops of the pipes. The body of my vacuum pushes the stands out slightly, so they are half an inch or so wider than the actual wheelbase.
5. Cut the plywood to size with a circular saw. None of these edges need to be perfectly square, so freehanding the cut is fine, though you can use a straightedge if you’re more comfortable.
6. Measure and cut out the PVC pipe holes. The plywood needs four holes, one in each corner, to hold the pipe stands. With the 1-inch plywood overhang, the center of each pipe’s hole will be 1⅞ inches from the corner of the board, and then 1⅞ inches into the board perpendicular to that edge. If you chose a different size pipe or overhang, add the length of the overhang to the radius of the pipe to find the center of the hole.
The pipes should fit snugly into the holes so that the plywood will rest on the coupler you’ll add in Step 7. In my case, a 2-inch Forstner bit cut the perfect hole—just large enough for the pipe to easily slip in and out of, but not wider than the coupler. If you don’t have a Forstner bit, you can use a jigsaw.
7. Measure and cut the hole for the 5-gallon bucket. Center the bucket on the plywood, then trace the bottom with a pencil. If your bucket is tapered, as many are, you’ll need to widen this circle to accommodate that taper. In my case, I added about a quarter of an inch to the radius so the solid lip of the bucket would rest on the plywood. This added measurement will depend on your particular bucket.
It’s better to make the hole too small at first than too big.
Drill a small hole in the middle of that circle. I used the same 2-inch Forstner bit that I drilled the pipe holes with because it was already in the drill. Insert the blade of your jigsaw into this hole and cut out the large circle. When you’re done, the bucket should slide right in and rest on its lip. If the fit is too tight, use the jigsaw to widen and adjust the circle as needed.

8. Assemble the full stand. Slide the couplers onto the top of the long PVC pipes already attached to your vacuum. Push them down firmly so the pipes seat all the way into the fixture. Then insert the four shorter pipes you cut in Step 1 into the tops of the couplers, seating them firmly.
You can use PVC pipe glue to permanently connect these fixtures, but I didn’t. I want the flexibility to change and adjust the stand as necessary without having to buy all new components. And the friction fit has been strong enough so far.
Slide the plywood over the top of the four pipes to rest on the couplers. Then put the bucket into the center hole. Attach the hoses to your dust collector per your system’s appropriate configuration. I keep all the hose extensions and attachments on the four extruding pieces of PVC pipe for storage, since those components can no longer fit onto the wheel slots. I also wrap my extra hoses around those extensions.
9. Add any additional accessories you need. You can customize this stand to suit your needs. For example, you can add hooks to coil hoses or even boxes to hold additional accessories. I added a 2-inch screw to the back of the plywood to coil the power cord for easier access, as well as a hook to the front of the stand to hold the remote outlet switch for my shop vac—an accessory I recommend everyone buy for their system. Once you get a handle on your dust problem, you won’t want to reach around the stand to turn the vacuum on and off anyway.
