A table saw is the cornerstone of most woodworking shops, and it’s well-known for making rip cuts, bevels, and crosscuts. What many people don’t know is how versatile this tool can be with the help of jigs and sleds to enable more advanced cuts. There are all kinds of sleds you can make for your saw, but a great one to build early in your carpentry career is a jointing sled.
Jointing is the process of flattening one edge of a board until it reaches a perfect right angle to a face, allowing tight seams and accurate fits. However, a jointer can be an expensive tool, and one that takes up precious room. Building a jointer sled can save you money and space, and still get you the nice, square edges you need for quality builds. If you don’t have the time to make a jointer sled, you can achieve the same result with nothing more than a 2- to 4-foot level.
If you haven’t worked with properly jointed wood before, it will change the way you build. The best comparison I’ve found is when I switched from a department store guitar to a Gibson Les Paul. My woodworking improved almost overnight.
But before we get started, understand that both the level method and a DIY jointer sled will only properly joint the edge of a board that already has a flat face. There are several methods to flatten the face of a board, including a planer sled, a router sled, or just buying pre-flattened wood.
How to joint wood without a jointer by using a level

Using a level is a fast, easy way to edge joint boards on your table saw, no building required. All you’ll need is a level that’s longer than the board you’re trying to joint. I use my 4-foot level most of the time.
1. Place your level on the table saw, flush against the fence. Then place the board you want to joint on the table saw, against the level, with the flattened face down. If one edge is concave, put that against the level. Your goal is to keep the wood from moving or rocking at all—you can use a hand plane or sander to shape the wood as needed.
2. Set your fence to the proper width. Once the board is stable, adjust your fence so the saw blade will trim off a sliver of the edge of the board—typically about a blade’s-width, though it ultimately depends on how bowed or misshapen the wood you’re starting with is. Before jointing, place the jig and board at the front and then at the back of the blade—as if you’d finished cutting—to ensure that you’ll trim the full length of the board. Any uncut section of the edge won’t actually be flat, and you’ll need to make a second cut to fix it.
- Warning: Only raise your saw blade so its teeth barely extend above the top of the board you’re cutting. This will help protect you in case you slip and come in contact with the blade.
3. Make your cut. With the board away from the blade, turn the saw on, and then slowly push the level and board forward, keeping them moving at about the same speed. Holding both together can be a bit tricky, though. I use a GRR Ripper Pushblock on the board itself while my other hand pushes the level. Try to keep the board from moving along the length of the level, or you might get a slight taper in your edge.
Once you finish the cut, turn the saw off and admire your perfectly flat, completely square edge.
How to make a jointer sled
There is nothing wrong with the level method, but if you’d like a solution that’s a bit more secure and permanent, consider a jointer sled. This simple jig clamps your board in place so you won’t have to worry about pushing two objects through your table saw at the same speed. I’m not comfortable trying to safely maneuver two objects next to a spinning blade, so I prefer this to the level method.
As a bonus, you may be able to use this sled as a tapering jig.
Stats
- Time: 1 to 2 hours
- Cost: $40 to $60
- Difficulty: easy
Materials
- 1 quarter-sheet of ½-inch plywood (can be larger if you need a longer sled)
- Wood glue
- ¾-inch wood screws
- Toggle clamps
Tools
Instructions
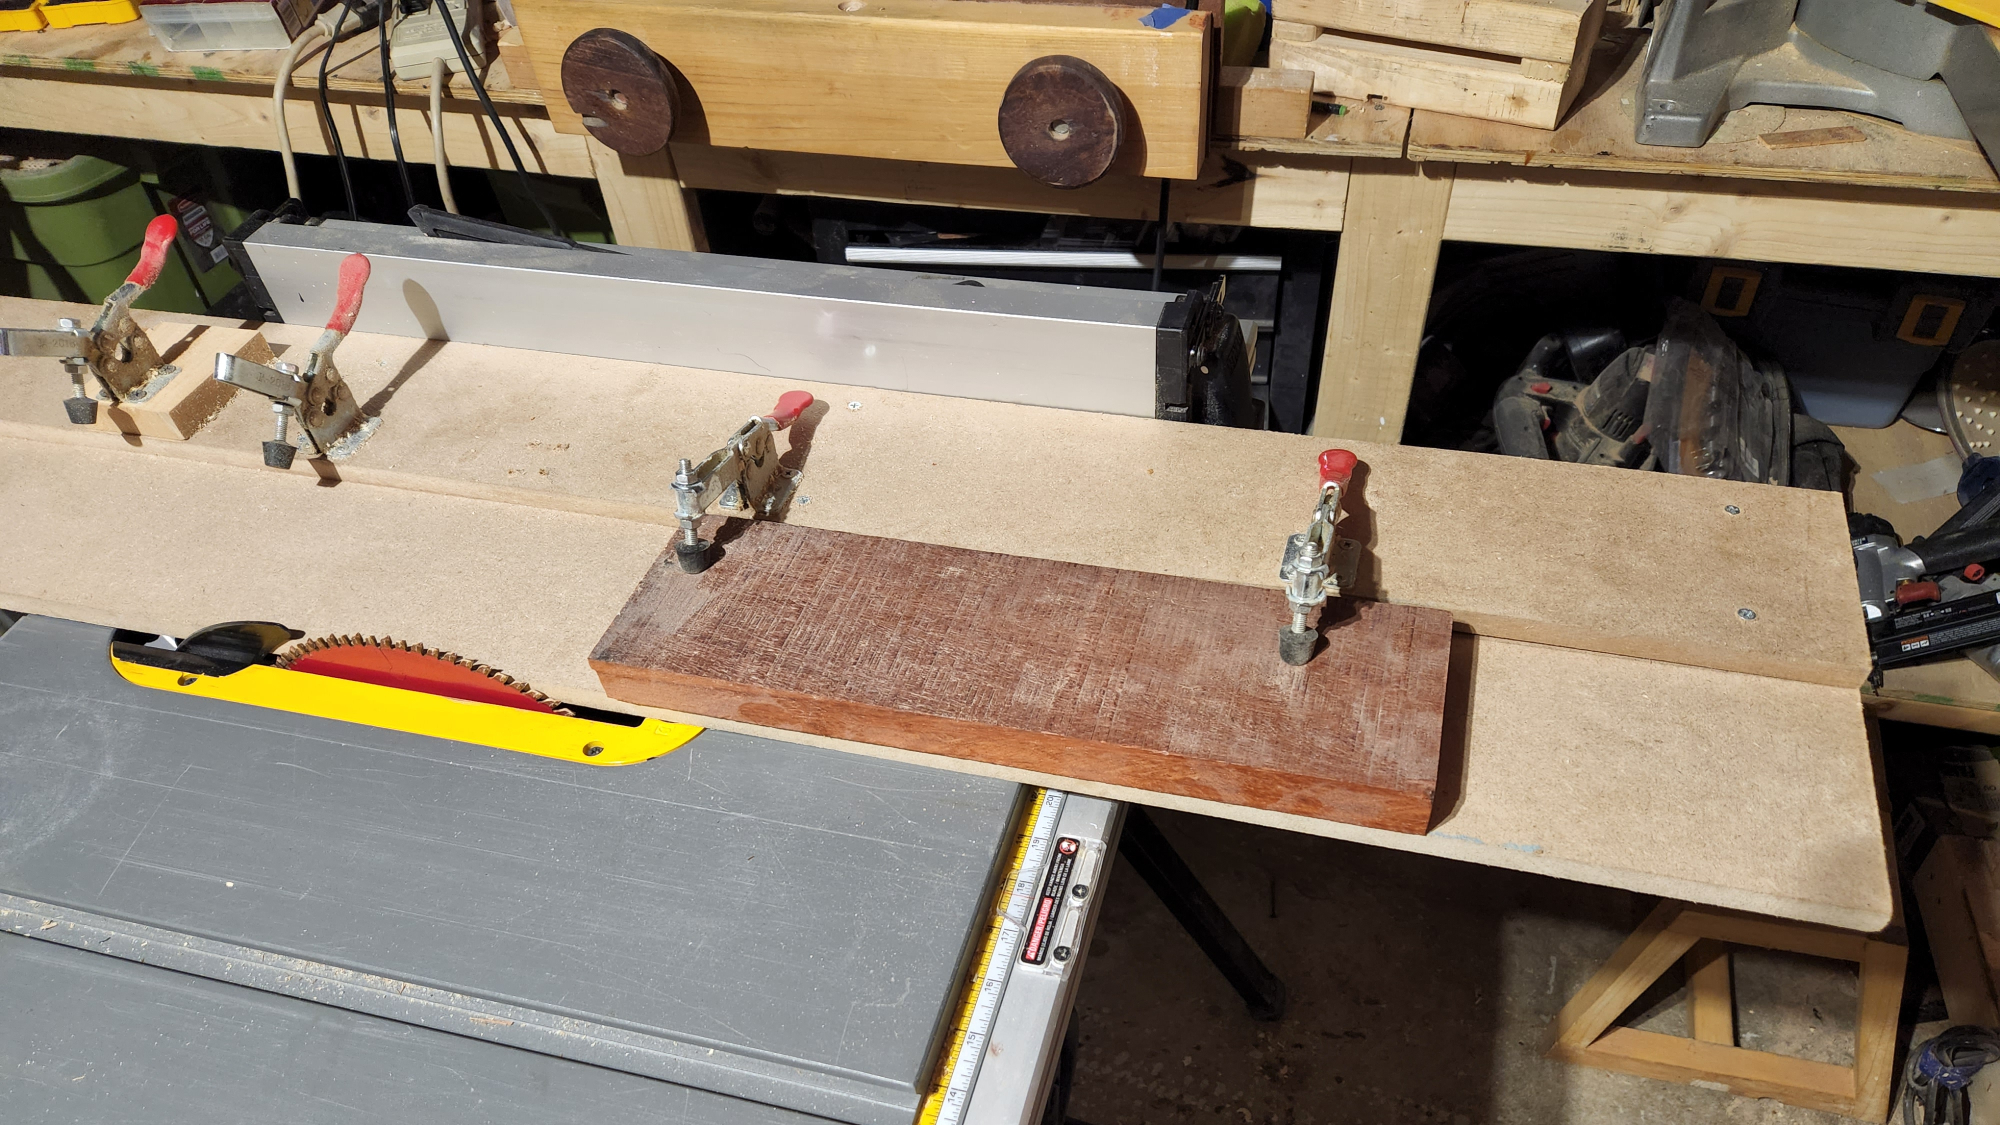
1. Cut two 4-foot-long strips of plywood. The width of each can be whatever works best for you. My sled is 10 inches wide, so I cut a 10-inch-wide strip for the base of the sled. The wider this strip, the wider the boards you can joint. I cut the other strip—the riser board that will hold the toggle clamps—to about 5 inches wide, but you can make it any width that will still fit your toggle clamps. My dimensions can joint 3- to 9-inch boards pretty easily.
2. Glue the 5-inch board to the top of the 10-inch board. First, line the narrower board up with the right edge and overhang it a 16th of an inch or so. Don’t skip this overhang, as it will help you square the sled in the next step. Try to keep it fairly consistent across the full length of the sled. Use a few clamps to hold it in place.
3. Screw the riser board in place on top of the base board with ¾-inch wood screws. Keep the clamps on until the glue is dry enough to work with according to the manufacturer’s instructions, typically about two hours
4. Trim both long edges of the sled. This is where the overhang comes into play. Adjust your fence to cut a blade’s-width of wood off of your sled. Then run the sled through with the doubled-up edge against the fence. The overhang will ride along the fence, and you’ll cut the other edge perfectly parallel to it. Once you’ve finished, turn the board 180 degrees so the freshly cut edge is against the fence. Adjust the saw to trim off another blade’s-width of material, and cut the double-stacked edge so that the top and bottom piece of plywood are flush. This will ensure you don’t have any variation on that edge, which will keep your future cuts perfectly straight.
5. Screw the toggle clamps in place. How many you use depends on the length of the boards you plan to cut. I started with three, spaced somewhat evenly, 6 inches from each end. Screw these onto the riser board, flush with the left edge so they reach as far as possible. You can always add or move the clamps if you need to in the future.
[Related: Tune up your table saw the right way]
6. (Optional) Add another set of raised toggle clamps. I found that there were a few boards I wanted to joint that my initial set of clamps were too short for. To solve this, I added another set screwed into plywood risers. All I did was cut a few scraps of ¾-inch plywood, glue them to the double-stacked board, and screw the new toggle clamps to the new risers. This second set lets me joint boards that are about 2.5 inches thick, up from 1.5 inches or so.
7. Start jointing. To use the sled, set your table saw to the same width as the sled. Then clamp the board you would like to joint onto the sled, with the flat face down and the left edge overhanging the blade. Finally, run it through your table saw, making sure to keep the right edge of the sled tight against the fence the whole time.
If the board you are jointing is wider than the base of the sled, move the fence to the right until the blade is lined up with where you want to trim. Check that you will cut along the full length of the board by lowering the blade to less than half an inch and running the sled over with the power off.
I try not to have more than half of the board overhanging the sled, just for stability purposes and my own comfort in how safe the cut is.
And there you have it: A perfectly flat edge. From here, you can flip the board 180 degrees to trim it down to finished width and cut a parallel edge on the other side. Then either hop over to your miter saw or pull out your crosscut sled to square the two remaining ends. Welcome to the next level.
