We may earn revenue from the products available on this page and participate in affiliate programs. Learn more ›
Tablets are taking over the portable-computing market, but that doesn’t mean the netbooks that they’ve replaced are useless. It’s possible to jam the processing power and battery life of most netbook models into a smaller, touchscreen-equipped package. The project is very straightforward: Remove a few parts, add a touchscreen overlay (about $80; MyDigitalDiscount), reseal the device in its new tablet form, install a driver, and calibrate the screen. And if you use an old netbook you have lying around (or buy a used one), it costs a fraction of the price of a new tablet.
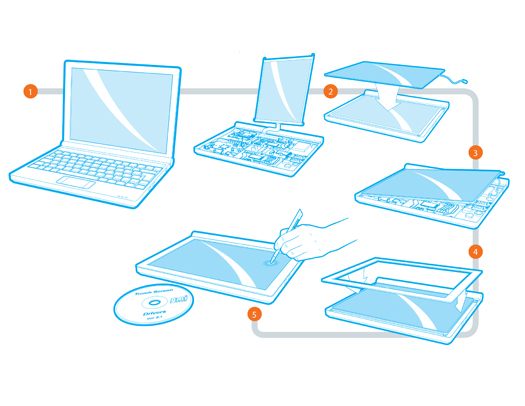
STEP 1
Disassemble The Netbook
Remove the bezel and backing from the display so the LCD panel and its cables are exposed. Then remove the keyboard and trackpad from the netbook. (This may involve removing screws from the base of the netbook and prying off the top case with a flat tool like a putty knife.)
STEP 2
Flip the LCD Panel and Apply the Touchscreen
Flip the netbook’s exposed LCD panel around to place it over the area where the keyboard and mouse used to be, taking care to avoid damaging the panel’s cables. (For some models, you may need to unplug these cables and plug them back in.) Next, remove the paper on the back of the touchscreen overlay to reveal the adhesive, and place it on top of the LCD panel.
STEP 3
Connect the Touchscreen
If the netbook has an internal USB port on its motherboard, connect the touchscreen overlay’s USB cable to it. External USB ports can be used as well, but this will cause a cable to stick out of the device. Note: This step may differ with certain models, so be sure to consult the instructions that came with the touchscreen overlay that you purchased.
STEP 4
Reattach the Bezel
With everything in place, reattach the bezel to the front of the converted netbook. Some models will fit, but most will require an adhesive. If there is too much space between the bezel and the base of the netbook tablet, fill it in and seal the two parts together with Sugru ($18; sugru.com). Let the device dry for 24 hours.
Note: If parts of the bezel cover the touchscreen, remove them before reattaching the bezel.
STEP 5
Install The Touchscreen Drivers and Calibrate the Display
Connect a keyboard and mouse to the newly modified netbook tablet, and install the drivers that were included on the disc with the touchscreen. Because these drivers come on a CD, you may need to copy them to a flash drive using another computer or hook up an external optical drive to your netbook tablet. Once the drivers are installed, run the calibration tool and use a resistive stylus to calibrate the touchscreen overlay. (I recommend using a retractable stylus like the kind made for the Nintendo DS, which are inexpensive and easy to find online.) This process, which involves pressing and holding different spots on the screen, takes only about a minute.
WARNING: Do not cover any areas the netbook uses for ventilation. Unvented heat can damage the device and injure the user.
Time 1 day
Cost About $100
Difficulty 3 out of 5
