I recently told my grandfather I was making a clay pot from scratch. Not in a class, and not with store-bought clay or a kiln. Straight up digging mud from a river.
“It’ll never work,” he told me. Challenge accepted. After all, humans were making pottery thousands of years before community centers started teaching the skill. I made a pot, and you can too.
Materials:
- Clay-rich dirt
- Firewood
- Sawdust
- Water
Tools:
- 2 buckets
- 1 cloth (like an old sheet)
- 1 shovel
- 1 strainer (or a window screen)
- 1 concrete slab (optional)
Make your own clay
You can’t make pottery without clay. Luckily, Earth is covered in the stuff, and you’ll likely find it in any dirt that gets slippery when it rains. A good spot to look is by a river, where the moving water will have washed away any sand, leaving clay behind.
So go get some. For me, this meant walking behind a local high school with a shovel and a bucket. Hopefully, you’ll look less sketchy.
Once you’ve got a bucketful, pick out as many rocks, branches, and other inconveniently non-clay things as you can. Then, mix water into your soil, breaking up the dirt until you have a nice mud slurry.
Let the slop settle for a minute or two, then pour it into another bucket. The clay will stay in the water, while the sand and rocks should sink to the bottom of the first bucket. Toss them and rinse out the first bucket.
Your second bucket is still probably full of branches and other organic matter, though. To fix that, pour the clay slurry through a strainer and back into the now-clean and empty first bucket. You may want to repeat this a few times (make sure you’re rinsing the empty bucket each time).
Now you’ve got clay water. Leave it in the bucket overnight, giving the clay time to sink to the bottom. The next day, there will be a layer of water on top. Pour it off.
Still, your clay will be quite watery. So pour the slurry—which should be the consistency of mustard—into a sheet, old T-shirt, or any fabric you don’t intend to use again. Tie this makeshift sack closed and hang it up. Let the water drip through the fabric for two days.

When you open the sheet again, the slurry will still be fairly watery, but it’ll be somewhat more solid, too. Open the fabric, but don’t spill the clay. Leave it all in the sun for about a day or so until enough water has evaporated for it to be malleable. Once it feels like clay, you can treat it like clay.
Make your pottery
Now you get to make something tangible. Gather your clay into a ball and mash it repeatedly against a smooth surface like a wooden table. Keep kneading the clay to get rid of any air bubbles inside.
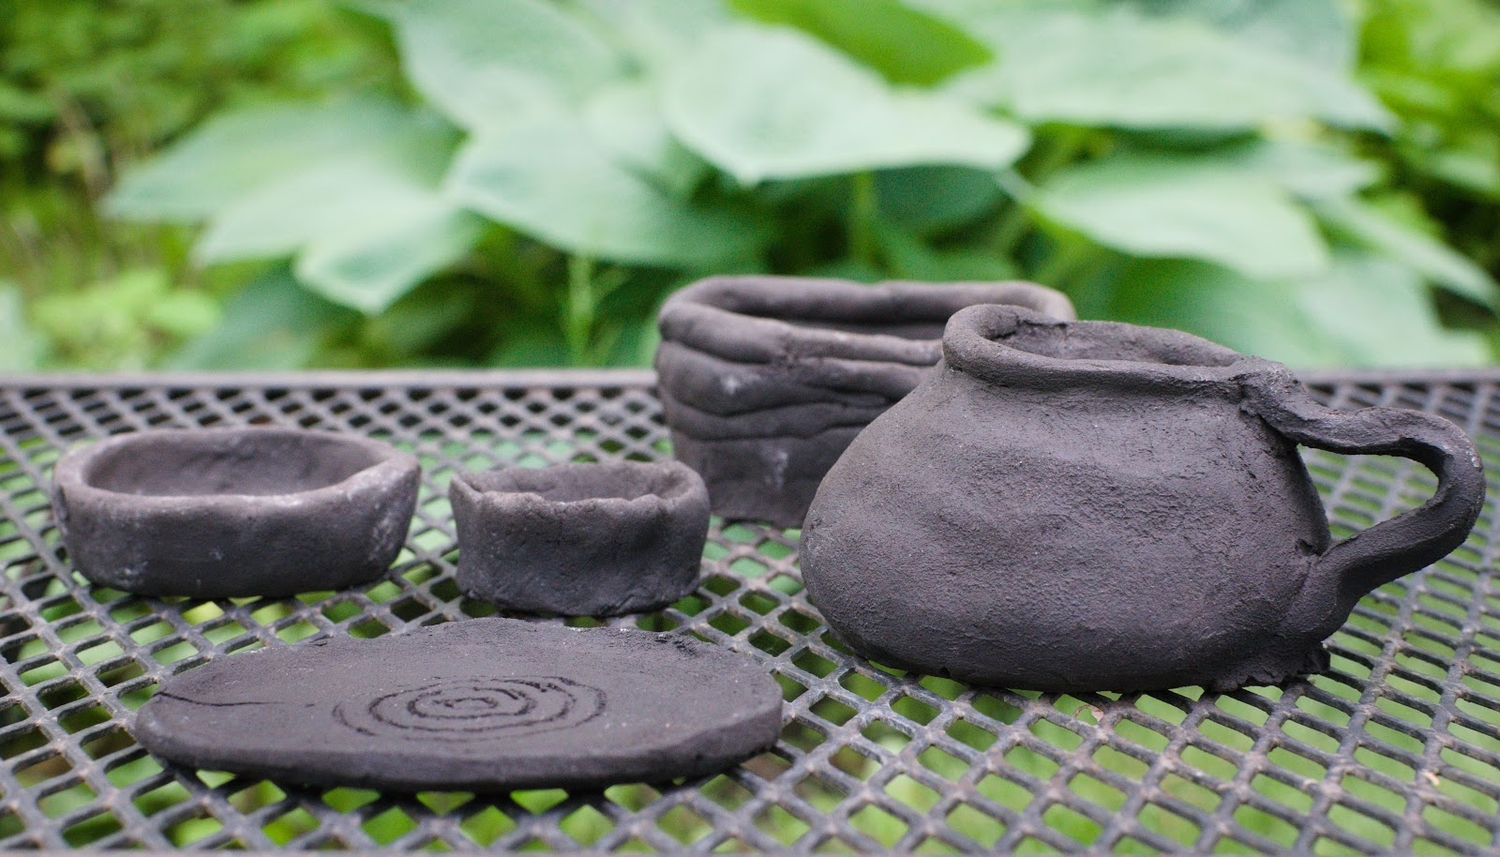
Your clay is ready to use, so think about whether you want to make a pinch pot, a coil pot, ornaments, or something else. Keep the clay width at about a half-inch or smaller—any bigger, and you risk the clay exploding when you heat it later. If you want to make a big piece, keep it hollow.

Let your creations dry out for a week or two. It may be hard to wait, but any moisture could cause them to crack or explode when they go into the fire. When your clay is dry, it’ll have a lighter color and not feel cold to the touch.
Set fire to your lawn
Once the pottery is dry, dig a hole large and deep enough for your clay pieces. Mine was about 10 inches deep.
Pour a layer of sawdust into the hole. Hardware and furniture stores will often give you sawdust for free; I got mine at The Home Depot. Place your clay pieces on the sawdust, a few inches apart.
Then cover them with sawdust, filling the spaces inside and between the pieces. Spread at least an inch of the stuff on top.

Light a fire on top of the pit. Any kind is fine; I won’t tell if you use lighter fluid. Not everything has to be done from scratch. Just be delicate—you don’t want to crush the pottery underneath.
Let the fire burn out, which will probably take an hour or two. Once the flames have died down, you may choose to put a slab of concrete or another fireproof material over the hole to keep the clay warm.
Let the clay cook overnight. The next day, dig through the ashes to find your ceramics. When you wash off the ash, the pottery should look darker and feel harder.
Now, if there’s ever an apocalypse, you won’t run out of pots. Happy digging!
