A good chop saw will enable you to make quick, accurate, uniform cuts. Just line up the wood and drop the blade. Bzzzt. Done. But maybe you’d rather save your cash, or you don’t have a lot of space. Maybe you’re just interested in a challenge. If so, there’s a way to turn the circular saw you already own into a solid stationary tool.
Warning: Even if you’re an experienced professional and build this project perfectly, it could still be dangerous. Please proceed at your own risk. It involves slightly modifying a circular saw beyond its established purpose by bolting it in place and fixing the blade guard in a position where it can’t automatically cover the blade. Because the guard will no longer function as designed, it’s extremely important that you ensure the saw is properly secured and you stand to the side while cutting—as you would when operating a normal circular saw. If you’re unfamiliar with the safe operation of either a circular saw or a chop saw, do not proceed with this project.
Strapping a skill saw into a wooden jig can be useful for slicing up a lot of similar-sized boards, or when you tire of putting your sidewinder down and picking it up between cuts. This jig is adjustable, too, so you’ll be able to set its height for planks of different thicknesses. And if you need to work somewhere else, simply pop the saw off and be free.
Of course, if you’re a professional woodworker or someone who’s planning to do a lot of super-precise cutting, you might just want to buy a factory-made saw. If not, we’ve got a project for you:
- Note: Some steps below include variations that will be important if you’re planning to further modify the jig to add angle-cutting ability. These are clearly noted. But if you’re just trying to get a saw that goes up and down, you can ignore those variations and stick with the basic design.
Stats
- Time: 1-3 hours (labor), 2 days (total, including wait time)
- Cost: $20-$40
- Difficulty: hard
Materials
- 1 (20 inch-long) 1/2 by 4 poplar board
- 2 (3/4-inch long) 5/16-inch bolts
- 2 (5/16-inch) hex nuts
- Lauan plywood
- 3/8-inch T50 staples
- Glue that adheres to both wood and metal
- 2 (8-inch long) fully threaded 3/8-inch carriage bolts
- 2 (3/8-inch) hex nuts
- 2 (3/8-inch) coupling nuts
- 1 (3/8-inch) washer
- 1 deck spindle
- 2-inch screws
- 1-inch brad nails (optional)
Tools
- Circular saw
- Measuring tape
- Square
- Bar clamps
- Drill driver
- 1/2-inch wood drill bit
- 3/8-inch wood drill bit
- 5/16-inch wood drill bit
- 3/8-inch wood chisel
- Hammer
- Staple gun
- Pencil
- Eye protection
- Hand saw (optional)
- Framing square (optional)
Instructions
1. Cut the poplar board. Measure and mark 20 inches from one end of the board. Use the square to draw a line straight across, then use the circular saw to cut along that line. Unplug the saw.
- Tip: Half-inch poplar is thin enough to ensure the saw doesn’t rest too far above the wood you’ll eventually cut with this DIY chop saw, but it’s also strong enough to reliably hold the saw in place. You could go wider than 3.5 inches, but I wouldn’t go narrower—you’ll want as much of the saw on top of the wood as possible while leaving space for a fence around it.
- Warning: You’re going to be using the circular saw as both a cutting tool and a guide. To avoid injury, unplug the saw or remove its battery after each step that involves cutting. That way, if you have to use it as a guide, it won’t be powered.

2. Lay out your saw platform. Now that you’ve cut the poplar board, you’ll have to figure out where to put the saw and how its platform will be laid out. I used a corded Skil saw with a 7 1/4-inch blade, so while the theory behind the platform layout will likely be constant, the actual measurements may differ depending on the particular saw you’re using.
- Orient the poplar board. You’ll want to set this up in exactly the same spot you’d normally use a circular saw. For me, that was the right-hand edge of my work surface. There, it’s out of the way and the blade comes down next to the work area, rather than through it. It’s also close to a power outlet. Line the board up so its front and right edges are flush with the front and right edges of your surface.
- Roughly locate the front locking mechanism. This will be where the saw platform attaches close to the front edge of your work surface. You’ll want to ensure whatever part of the locking mechanism (one of the carriage bolts, or a bar clamp) protrudes above the platform will not get in the way as you operate the saw. Once you’ve figured that out, mark the board where the lock will be. I chose to set my bolt 2 inches back from the front edge, centered, to avoid splitting the poplar.
- Trace the saw’s shoe print. The shoe is the big flat part of the saw that rests atop whatever you’re cutting. Here, much of it will sit on the platform. Lay the saw on the poplar, with its blade off the right-hand side. Ensuring no part of the saw will interfere with the front lock and leaving a one-inch space on the left side of the board for a fence, trace the shoe with a pencil.
- Identify any fastening points. Leaving the saw in place, look for any holes in the shoe that are over the board. Mine had two conveniently located circular cutouts at the front and back. You’ll use these to fasten the saw to the platform, so mark their location with your pencil.
- Roughly locate the rear locking mechanism. This will be the other place where the saw platform will attach to your work surface. It should mirror the front lock. I marked the eventual location of my rear carriage bolt at two inches from the back of the poplar board, centered.

3. Precisely locate the front and rear locks. Precision is important here, so remove the saw and accurately measure out where the locking mechanisms will go. Using your rough marks as a guide, measure the exact halfway point between the long sides of the platform. The distance of each point from the front or back of the platform isn’t that important (as long as you set it back far enough to avoid splitting the wood when you drill), but placing it in the exact center of the platform’s width is crucial—if the front and rear locks aren’t lined up, the platform won’t be square and your cuts won’t be straight.
- Tip: To ensure you drill the holes exactly where you want them to be, press your drill bit into the pencil mark you’ve made, creating a divot that will serve as a guide when you drill.
4. Drill a hole for the front lock. Clamp the platform securely in place, leaving room to drill the holes that will serve as the front and rear locks. Simply drilling 3/8-inch holes on both ends for the bolts will result in a wobbly saw platform, so you’ll have to insert some nuts into the platform and your work surface to make the jig more solid. Start by drilling a front hole that’s 1/8 inch smaller than the nut you’re planning to use. Nuts for 3/8-inch bolts are 5/8 inches wide, so choose a 1/2-inch drill bit for this step. Once it’s in your driver, drill a hole all the way through the saw platform and your work surface where your front locking mechanism will be. Going through both at once will ensure the holes line up properly.
5. Drill a hole for the rear lock. For this hole, use the 3/8-inch drill bit. Drill straight through the saw platform and your work surface where the rear locking mechanism will be.
6. Create a hexagonal hole in the saw platform for the front lock. Unclamp the saw platform and place the 3/8-inch nut for the front bolt over the 1/2-inch hole you just drilled in it. Then, trace it with your pencil. Once you’ve got an outline, take your 3/8-inch wood chisel and carefully remove the excess wood, creating a hexagonal hole that will fit a nut.
- Caution: Do not repeat this step for the other hole on the saw platform. The bolt that goes through the rear hole must be able to move freely, especially if you’re planning to add rotational capability later.
- Tip: The sharper your chisel, the better, as it will make a cleaner hole. If you’ve never sharpened a chisel before, here’s a guide.

7. Chisel hexagonal holes in your work surface for the front and rear locks. Repeat Step 6 for the holes you made in your work surface. You’ll be chiseling more wood out of the rear hole because you used a smaller bit, but in the end, both surface holes will be the same size.
8. Drill the holes that will help fasten your saw to the platform. The key here is creating some way to ensure the saw stays flat on the platform while you’re working. If your saw’s shoe has circular holes, it’s easy. Figure out the diameter of those holes (mine were 5/16 of an inch) and use a bit of that size to drill them out.
9. Ensure the saw fasteners do not protrude past the bottom of the saw platform. I chose the shortest possible 5/16-inch bolts I could find (3/4 inches long) to fill my saw-fastening holes. Then, I turned the platform over and used the 1/2-inch drill bit to clear a space around the 5/16-inch holes to countersink the heads of the bolts so they’d end up flush with the bottom of the saw platform (about 1/4 inch through the poplar board). You will, however, want the bolts to stick through the top of the platform so they will poke through the holes in the saw’s shoe.
- Tip: These countersunk holes don’t have to be precise—you’ll eventually glue the bolts in place, and the glue will fill any gaps. They just need to fit the heads of the bolts.

10. (Optional) Taper the back of the saw platform. Only complete this step if you plan to add angle-cutting ability later. If so, measure 18 inches from the front of the platform and draw a line across the wood. Then, using that line as the base, draw two angled lines toward the back of the platform, placing the rear lock hole as close to the center of the resulting triangle as you can. Then, use the circular saw to cut along the angled lines to remove the back corners of the platform.
11. Cut pieces for a fence around the saw’s shoe. Cut pieces of the thinnest wood you have (I used Lauan plywood left over from my drawer organizer project) to lay along the left and top edges of the outline of the saw’s shoe you traced on the saw platform. I cut a strip about 1 inch wide and 14 inches long to run along the left side of the shoe, and a thicker piece 3.5 inches wide and 2 inches long to fence in the top of the shoe. Unplug the saw when you’re done.
- Tip: Make sure you don’t cut the edges that will touch the saw’s shoe. You’ll want these to be as straight as possible, so ensure that they’re factory-cut edges.
- Tip: The thinner, left-hand fence will be the hardest to cut, so do it first, using the circular saw to rip it off a larger piece of Lauan.
- Warning: Once you cut one edge of the top fence, use a hand saw to cut the other if your hands are going to be closer than a foot from the saw. It’ll be safer than cutting such a small piece with the circular saw.
12. Install a fence around the saw’s shoe. Once you’ve got your fence pieces, staple them in place around the outline of your saw’s shoe. You may even want to put the saw back on the platform as a guide.
- Tip: If you don’t have staples, you can use 1-inch (or shorter) brad nails. Tap them into the fencing material and the poplar, making sure they don’t go through the other side. Once you’re confident the fencing material is secure, carefully use your hammer to bend the nails over until they’re flat.

13. Glue the nuts in place. Tap a regular 3/8-inch nut into the front hole in your work surface, flush or just below the top; one 3/8-inch coupling nut into the rear hole in your work surface, flush with the bottom; and the second coupling nut into the front hole in the saw platform, flush with the top. Once you’ve confirmed they fit, remove them. Then, apply glue according to its directions and re-insert the nuts.
- Tip: I used Gorilla Glue, which asks you to wet one surface with water and glue the other. I wet the insides of the holes and applied glue to the nuts.
14. Glue the fastening bolts in place. Make sure these fit in the holes you made for them, then apply the glue and push them into place.
15. Let the glue dry. Simply follow the directions on the glue bottle. You may choose to wait additional time, just to be sure the glue is super-solid, though. I let mine dry for an entire day, even though it said it would be done in a couple hours.
16. Set up the rear lock. Once the glue has dried, thread a 3/8-inch nut over one of the carriage bolts, as far as it will go. Then, add a washer. Put the bolt through the rear hole in the saw platform and thread another nut until it fits loosely against the wood. Next, thread the bolt into the coupling nut that’s glued into your work surface, but don’t go all the way through.
17. (Optional) Set up the front lock. If you’re using a carriage bolt at the front, thread it through the coupling nut in the front of the saw platform, lining it up with the nut at the front of your work surface as you go. Keep going until it can’t go any further through either nut.
18. Lock the saw in place. Fit the saw over the fastening bolts you glued in place earlier. Once they’re through the shoe, secure the saw by tightening one 5/16-inch nut around each.
19. Cut the guide. This will ensure any wood you chop-saw through has a solid surface to rest against. Cut the deck spindle off at 3 feet. Unplug the saw.
- Tip: If you’re planning on adding angle-cutting abilities, cut a six-inch piece off the three-foot spindle.

20. Install the guide. Measure 10 inches back from the front of your work surface in four places, marking each one: on the right-hand edge, at 12 inches, at 24 inches, and at 36 inches. Using a long straight-edge (either a straight piece of wood or a framing square), draw a straight line through these marks. Put a 2-inch screw near each end (set back about 2 inches) to fasten the guide to your work surface.
- Tip: If you want to add angle-cutting abilities later, install the six-inch piece of spindle 14 inches from the front of your work surface. This will ensure that the saw blade doesn’t cut into it when you rotate the saw platform. Then, install the rest of the spindle at 10 inches from the front of your surface, set back 6 inches from the right-hand side.
- Caution: Be careful the longest piece of the guide stays straight. If it doesn’t not, your cuts won’t be either.
21. Check the guide. You’ll want your saw to cut all the way through at least most of the wood you’ll be cutting, and the guide’s location is a big part of that. I don’t plan to cut many boards thicker than a 2-by-4, so I put a scrap piece of one under the saw platform, against both the guide and the saw blade, then adjusted the nuts and bolts until it was snug. Ideally, the right angle formed by the front edge of the longest piece of the guide and the top of your work surface should be at the edge of, or within, the saw blade itself. If it’s outside the blade’s circumference, the saw won’t cut all the way through.
- Tip: If the guide is in the wrong spot, unscrew it and move it until it is. Then, screw it in place.
22. Finalize the guide. Once the guide is in the right spot, add two more screws along its length, at about 12 and 22 inches.

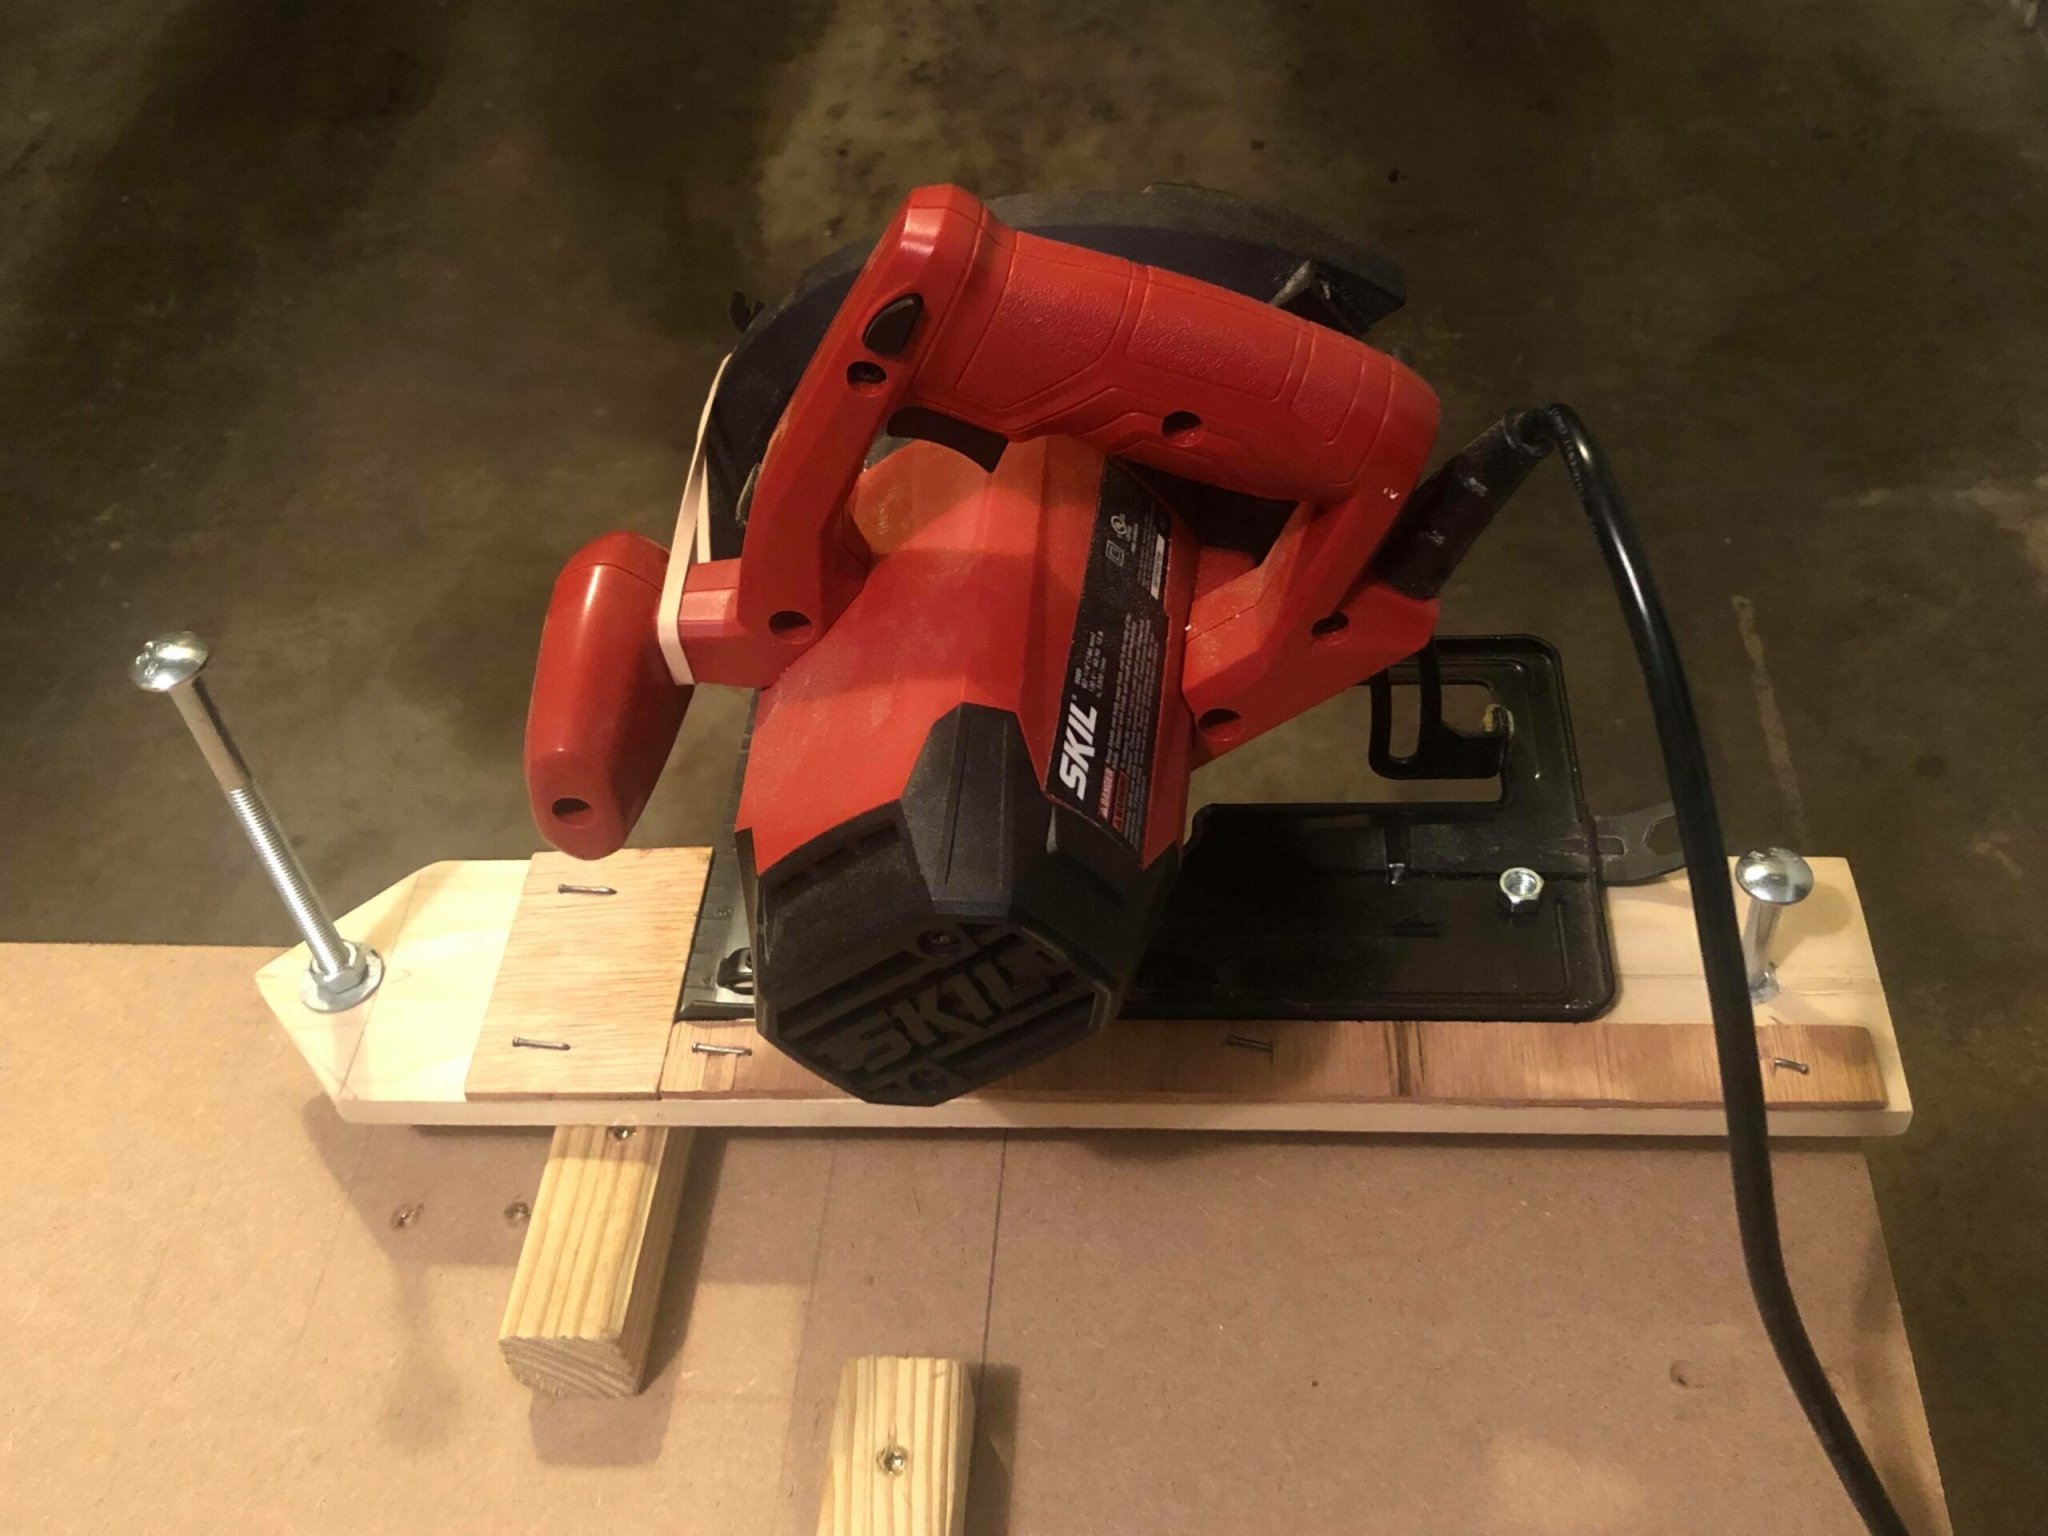
23. Lock the saw guard open. This is generally not a safe thing to do with a circular saw, and even though the saw in this design is bolted to your work surface, you’re still going to want to keep safety in mind. I secured my guard with a rubber band around the guard’s handle and the saw’s front grip, but you could use string, too.
How to use the jig
Adjusting the jig is simple. Without the saw in place, adjust the nuts on the rear lock and the bolt in the front lock until the saw platform rests snugly up against the piece of wood you’re cutting.
Then, lock the saw in place and loosen the knob or level that lets you control the saw blade’s depth. Doing so will allow you to lift it straight up and chop it down.
Once you’ve got the saw lined up on the wood you’re looking to cut, put on your safety glasses, stand to the left-hand side, and get choppin’.
