You know you’re serious about DIY when you purchase your first table saw. To build this floating cabinet you’ll need a fence and a miter gauge, which most new table saws come with.
Warning: DIY projects can be dangerous, even for the most experienced makers. Before proceeding with this or any other project on our site, ensure you have all necessary safety gear and know how to use it properly. At minimum, that may include safety glasses, a facemask, and/or ear protection. If you’re using power tools, you must know how to use them safely and correctly. If you do not, or are otherwise uncomfortable with anything described here, don’t attempt this project.
Stats
- Time: 2-4 hours working, 2-4 hours waiting for glue to dry
- Material cost: $30-40
- Difficulty: moderate
Materials
- 6 total feet of 1-by-6 lumber of your choice—I used oak (pick the flattest boards you can find)
- 1 piece of ¼-inch-thick plywood roughly 14 by 6 inches (pre-sanded if you aren’t painting this)
- 3 (1 ½-inch) cup hooks
- Wood glue
- 3 drywall anchors
- (Optional) 80-150-grit sandpaper
- (Optional) stain, paint, and/or a protective finish like polyurethane, shellac, or lacquer
Tools
- A table saw with a rip fence and a miter gauge
- A hand drill
- Drill bit slightly narrower than the hook screws
- A few F-style clamps
- Measuring tape (or ruler at least 16 inches long)
- (Optional) carpenter’s square
- (Optional) small combination square
Cross cuts and rip cuts
1. Don the proper protective gear. That means, at a minimum, safety glasses and no baggy clothing. I also wear ear protection, and often a dust mask, too. This project makes heavy use of the table saw, which is a powerful beast that deserves the proper respect. Make sure to take the proper precautions when using it and be aware of what can cause kickback.

2. Calibrate your miter gauge. You’ll be using this to make all your cross-cuts (the ones that go across the face of the board). Use a carpenter’s square to make sure your miter gauge is as close to perpendicular to the saw blade as you can get it. You can also screw a flat piece of “sacrificial” wood to the gauge to extend its reach and help stabilize the wood while you cut it.
- Note: If you add the sacrificial wood, make sure it is very flat, or all your calibration efforts will have been for naught.
3. Cut the four horizontal pieces. The first three should be about 13 ¼ inches long. The exact length doesn’t matter, but what absolutely does matter is that they are all exactly the same length. We’re talking more precise than the width of your saw blade, so don’t cut exactly on the line, cut on one side of the line. I mark which side of the line to cut on with an X. The fourth piece (the top platform) should be 16 inches long, but precision isn’t as important for this one.

4. Cut the two vertical pieces. These are each 6 inches long. Again, exact length doesn’t matter, but they need to match each other perfectly or you’ll end up with a modern art structure rather than a nice square cabinet.
5. Let ‘er rip. A rip cut is one that is in the same direction of the grain (down the length of the board). Ditch the miter gauge for now and use the table saw fence to rip two of the 13 ¼-inch boards and the two 6-inch boards down to 4 ½ inches wide. Then rip the last 13 ¼-inch board to 3 ½ inches wide. That last one will be the middle shelf, which has to be narrower because there will be a plywood panel inset 1 inch from the back of the cabinet.
- Warning: Cutting to relatively narrow widths like these will get your hands close to the blade, so be safe and use push sticks, which your saw might have come with (if not, they’re easy to make yourself). A real safety stickler like myself will use a push block with a rubber bottom for a strong grip on the wood all the way through the cut.

Get groovy with some dados

6. Mark the vertical pieces. You’re going to cut some notches in the two vertical pieces, inside of which the horizontal pieces will fit snugly. These are called “dados” when they are oriented across the grain, “grooves” when oriented along the grain, and “rabbets” (or “rebates”) when they are open on one side. You’ll need to cut two dados and four rabbets for this project. They’ll need to be exactly wide enough to fit the horizontal boards, and any gaps will be highly visible in the end product. Mark one of the vertical pieces, then sandwich it next to the other to transfer your lines over. I chose to make the middle shelf slightly above the midpoint, for no particular reason.
7. Cut the dados and rabbets. If you don’t have a “dado stack” (essentially a really wide saw blade that might not even be legal where you live), you can cut a dado by lowering the saw blade to about half the thickness of the board, then taking multiple passes with your miter gauge while moving the board slightly to the side between each pass. Start by cutting the dados and rabbets slightly too narrow and testing the fit. Slowly cut them wider and wider until the horizontal pieces fit without any wiggle room.
- Tip: Save some sawdust for later (the finer the better). You can mix this with some wood glue and mash it into small gaps in your finished joints to cover up any mistakes.
8. Cut a groove for the plywood. The plywood backing will fit inside a continuous groove running along the inside of the top and bottom horizontal pieces, as well as the two vertical pieces. Lower the height of the saw blade a little further, to about a quarter of the thickness of a board. Using the rip fence again, take one pass with the blade a ¾ inch from the fence on all four pieces, then move the fence slightly farther from the blade and take another. Test the width to make sure the plywood will fit. Exact fit doesn’t matter much, so a little wiggle room is OK.
9. Take a step back. Except for cutting and fitting the plywood backing, the body of the cabinet is done. Dry-assemble everything you have so far to make sure all the grooves, dados, and rabbets are in the right place.

Prepare for final glue up
10. Cut the plywood backing. With the cabinet dry-assembled, measure your cabinet for the size of the plywood backing. It should be big enough to fit within the groove, but not so big that it prevents the dado and rabbet joints from fitting together. It doesn’t have to be an exact fit; it just needs to be big enough to be trapped within the groove when the cabinet is glued up. My panel was 12 ¾ by 4 ¾ inches. You will need to make one rip cut (using the fence) and one cross cut (using the miter gauge) for this.
11. (Optional) Sand any interior surfaces. If there are any imperfections on the interior surfaces, you should get rid of them now with some sandpaper between 80 and 150 grit. These surfaces will be hard to reach after you glue everything together.
12. (Optional) Stain the plywood. If you plan on staining the final product, now is a good time to stain the plywood backing, too. Or you can forget like I did and struggle to stain it after assembly.
13. Get ready to glue. After dry-assembling everything to make sure things are fitting nicely, lay everything out in a logical way and think through the steps you will take to glue it together. You’re going to glue everything together except the very top panel (the 16-inch-long one) at once. Depending on the type of glue you use and the ambient temperature, you may not have much time to dawdle.

14. Glue. Place a thin layer of glue in all the dados and rabbets. You won’t need too much if your joints are tight. Ideally, a tiny amount of glue will squeeze out after all the clamps have been applied. You’ll need to clean up any glue that does squeeze out, either by wiping it immediately with a wet rag or scraping it off after a few minutes (but before it dries completely). You can glue the plywood into its groove, but doing so is optional; it’ll stay in the grove on its own. Apply a decent amount of pressure with the clamps to make sure there are no gaps in your joints while the glue dries, but don’t go overboard—too much pressure can crack the wood or leave dents in the wood (especially for softer woods like pine). Make sure to wait at least an hour for the glue to dry before removing clamps (longer if it’s cold in your workshop).
- Tip: Try to position the clamps to close up the glue joints and focus more on closing up the front-facing joints as they will be the most visible.
15. (Optional) Check your angles. If you have a square, it’s good to check everything before the glue dries. However, the plywood backing will prevent the cabinet from getting too skewed, so this step is optional.
Final steps
16. Cut the French cleat. The way this cabinet “floats” on a wall is via a hidden French cleat. Rip and crosscut a piece of remaining lumber to 12 by 3 inches, then angle your table saw blade to 45 degrees and rip it roughly down the middle (exact angle and measurements don’t matter much here), creating two cleats. One cleat will be attached to the cabinet, and the other will be attached to the wall. This way, you can simply lift the cabinet on and off of the wall.

17. Glue the cleat to the plywood backing. Apply some glue to the inside of one cleat and place it on top of the plywood backing. Grab some heavy stuff—I used a car jack and a block of metal—to hold it in place for at least an hour while the glue dries.
18. Pre-drill holes for the wall half of the cleat. On the remaining cleat, pre-drill two or three holes for screws to attach it to the wall. Pre-drilling is necessary because oak is a hard wood and will split if you attempt to drive a screw straight through it.
19. Glue on the top. The last step in the assembly is gluing on the top, again using either some heavy stuff or some clamps to hold it on while the glue dries. Make sure the back of the top is flush with the back of the cabinet. It should overhang about 1 inch on the two sides and on the front.
20. (Optional) Sand and apply stain. Now is a good time to sand the outside faces of the cabinet if you so desire. At minimum, I recommend lightly sanding all the edges to make the cabinet more comfortable to hold. It’s personal preference if you want to paint or stain this cabinet, too. I applied Minwax “espresso” stain to mine, following the instructions on the packaging. After that dried, I applied a few coats of spray-on lacquer for a protective finish. There are literally entire textbooks devoted to wood finishes, but my personal go-tos are spray-on lacquer or wipe-on polyurethane.

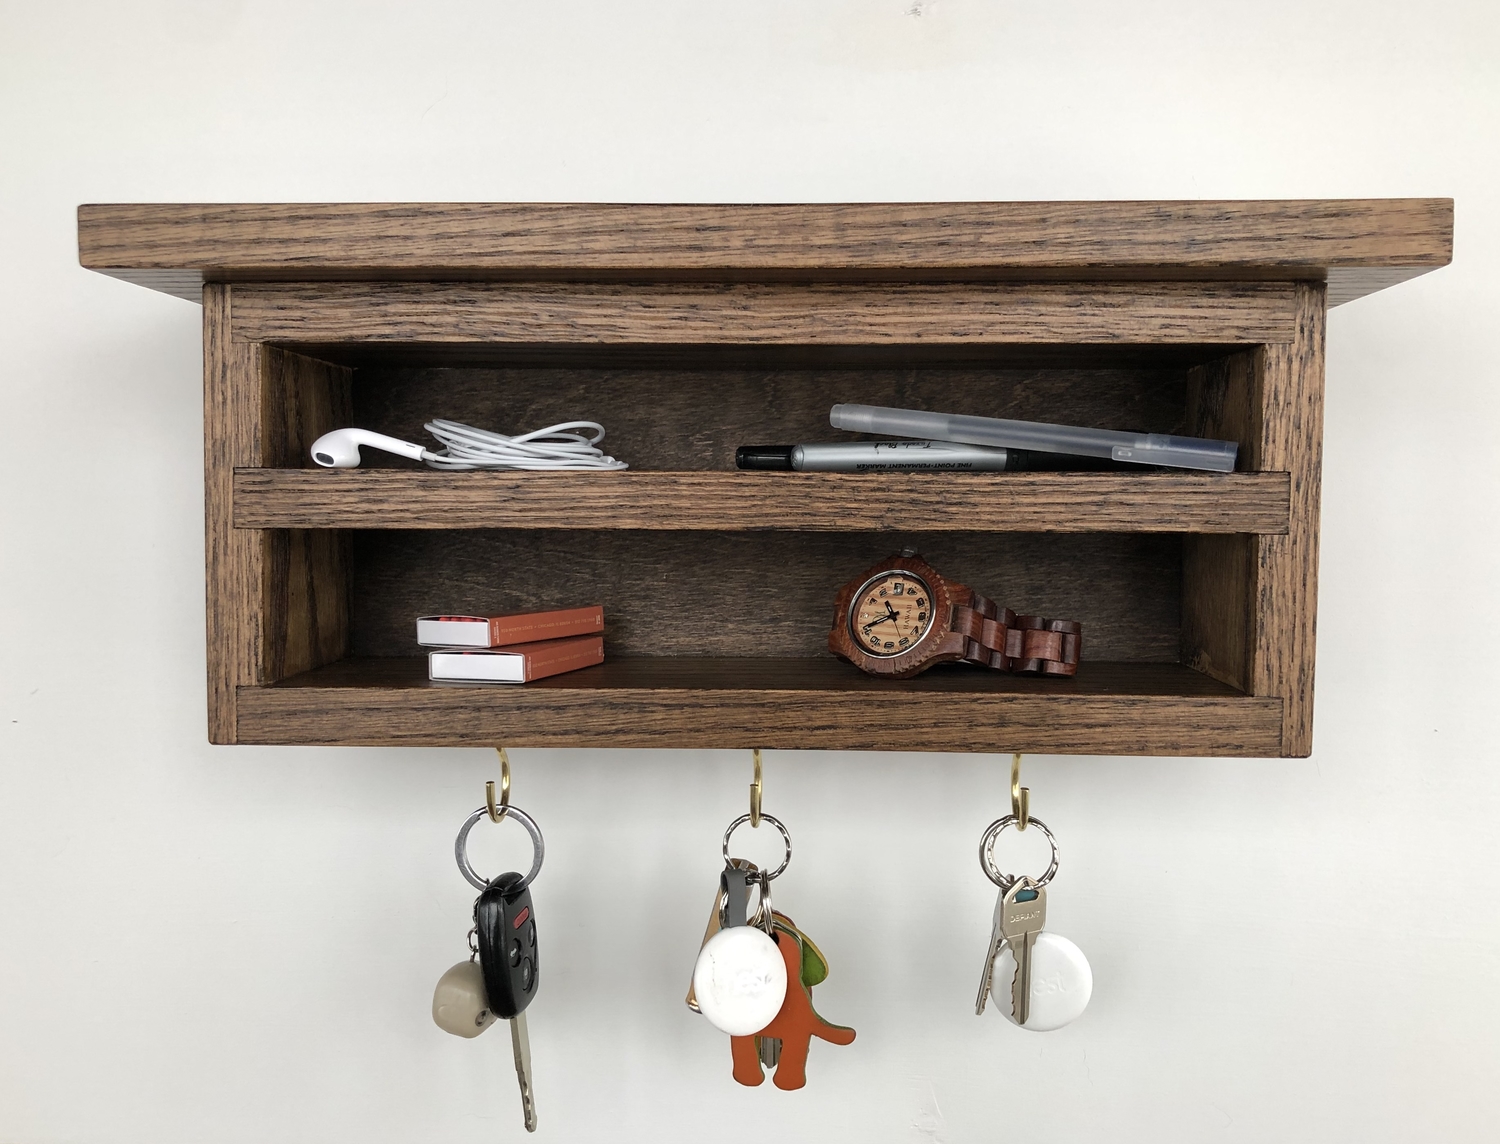
21. Add some hooks to the bottom. Evenly space three hooks and pre-drill holes for them on the bottom of the cabinet.
- Tip: put some tape around the drill bit to show you when to stop so you don’t accidentally drill all the way through the bottom.
22. Hang the cabinet. Unless you’re planning to stand on this cabinet yourself, you won’t need to attach it to a stud in your wall. I used three evenly spaced drywall anchors. Screw the cleat to the wall and simply place the cabinet onto it. It floats!

