
High on the list of my kids’ never-ending curiosity is the weather.
Dad, what are clouds?
Is it going to rain today?
How does the news know the weather?
We’ve talked about equipment, measurements, and pressure. But I realized that instead of answering questions with quick internet searches, it might be more fun to do some research ourselves.
So we built our own weather station with three devices: a weathervane, a rain gauge, and a barometer.
These projects use materials you probably already have at home, and they’re safe so that kids are able to help in the process.
Keep in mind that the main goal is not to get precise weather data, but to show children the scientific principles behind weather, and get them excited about science.
How to build your own weathervane
Stats
- Time: 10 minutes
- Cost: Less than $5
- Difficulty: Easy
Materials
- An empty clear plastic container with a lid (like a peanut butter jar)
- Modeling dough
- Rocks or sand
- A pencil with an eraser on the back
- A straw
- A needle (or pin)
- Cardstock
- Tape
- Glue
Tools
- Scissors
- Colored pencils, markers, or crayons
Instructions
1. Cut a hole in the center of the lid. The opening must be large enough to fit the pencil snugly, so it doesn’t wiggle.
2. Insert the pencil through the hole, point first. When you close the container, the eraser should be on the outside of the lid.
3. Stick a glob of modeling dough about the size of a marble inside the container, at the bottom. Push the pencil into it. The pencil should be as vertical as you can get it.
4. Fill the bottom of the container with rocks or sand. This will weigh it down and keep it from blowing over in the wind.
- Note: You can also put in enough modeling dough to provide weight rather than using rocks. My kids weren’t willing to sacrifice that much in the name of science, though.
5. Draw and cut out a triangle and a square from the cardstock. You’ll be making an arrow with your straw, and the square will serve as its fletching, or fin—though you can really make it any shape you like. The triangle will serve as an arrowhead pointing in the wind’s direction. The only requirement is that it’s smaller than the fin.
[Related: Why is it so hard to predict the weather?]
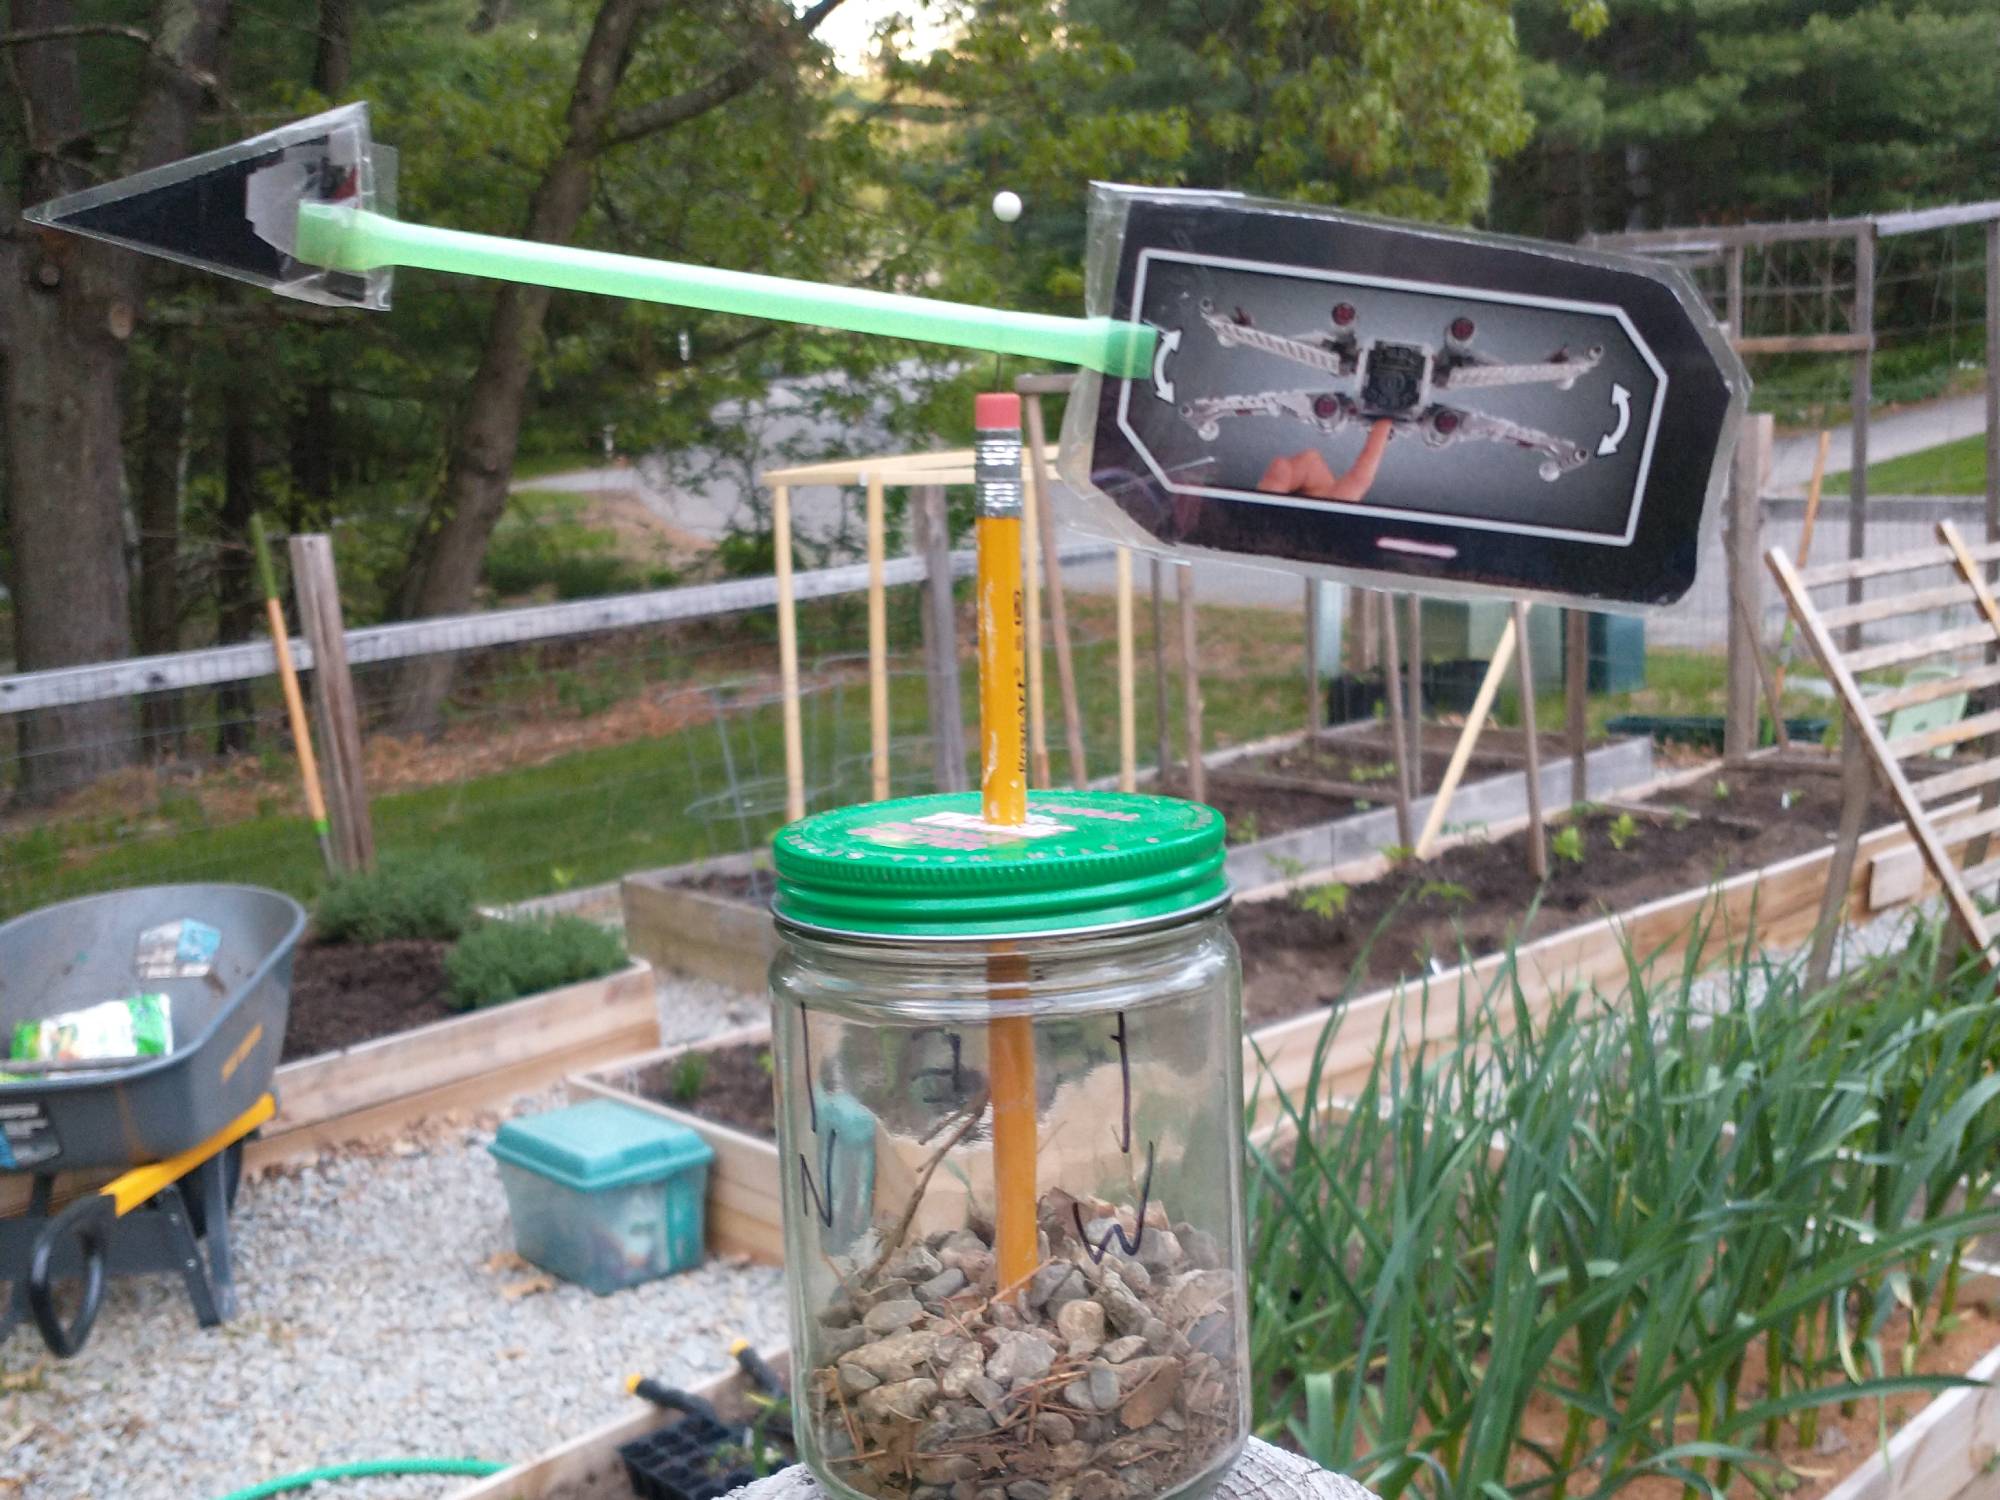
6. Color and decorate the fin and arrowhead. We decided to make ours out of the packaging for a Lego X-wing starfighter, so no additional decoration was necessary. However you decide to decorate, make sure that it doesn’t alter the balance and weight of the vane.
- Pro tip: Once you’re done decorating, you can laminate the cardstock or wrap it in tape to help protect it against the rain.
7. Use scissors to cut ¼- to ½-inch slits in each end of the straw.
8. Slip the arrowhead and fin inside each slit. Make sure the point of your triangle looks away from the straw. Glue or tape the pieces in place.
9. Stick the pin through the straw, cheating toward the fin end. This offset will help keep the straw straight and level. We set ours about half an inch from the fin.
10. Insert the pin into the eraser. The straw should spin freely on the pin, approximately level. If you need to, move the pin to adjust the balance.
11. Draw the points of the compass on the container. Where exactly you do this will depend on where it’s easily visible to you. You can use the lid, but if you’re placing your weathervane higher up, you might want to do it elsewhere. We put ours on a fence post, so we drew the points of the compass on the sides of the container.
How to use your DIY weathervane
Put the weathervane outside in an open area, well off the ground—the higher it is, the better it’ll react to the wind. Use a compass—most phones have one—to orient the weathervane correctly, and keep it as far from obstructions like trees and buildings as you can.
Contrary to what you might think, the arrow will not point in the direction the wind is traveling, but to where it’s coming from. This is because the wind pushes the fin of the weathervane; if your arrow is pointing north, that’s where the wind is coming from.
Track the direction of the wind over time, and talk with your kids about what it means. Notice if the wind is usually blowing in one direction before rain, or how it changes over the course of a day. You should also pay attention to how it is related to temperature. Often in the northern hemisphere, cold air comes out of the north and warm air comes from the south. Finally, you can also ask your children to help keep track of subjective measurements of wind speed, and teach them to record how the wind is blowing on a particular day.
Make your own rain gauge

Stats
- Time: 10 minutes
- Cost: Less than $5
- Difficulty: Easy
Materials
- A large plastic bottle with straight sides (like a soda bottle)
- Transparent tape
- (Optional) Food coloring
Tools
- Scissors
- A permanent marker
- A ruler
Instructions
1. Use scissors to cut the top of the bottle off. Make the cut just below where the sidewall straightens, and keep it as straight and flat as you can.
- Warning: This step is not suited for children, as plastic may be difficult to work with.
- Note: If you need to, wrap an elastic or hair tie around the bottle, and draw a line along it with your marker. This will serve as a guide to help you keep the cut straight.
[Related: Stay-at-home science project: Whip up a storm in a glass]
2. Put the piece you just cut off upside-down and back into the bottle. This will act as a funnel that drains inside. Don’t forget to remove the cap.
- Note: The funnel should hold itself in place. If it doesn’t, you can use tape or a paper clip to keep it secure.
3. Draw a measurement scale on the side of the bottle. Place the ruler on the side of the bottle and use a permanent marker to transfer the markings right onto the plastic. Make sure to align your “zero” mark with the point where the sides of the bottle become straight. Otherwise the odd shapes of the bottle’s base will give inconsistent readings.
- Pro tip: If you have an extra ruler, you can just tape it to the side of the bottle. Make sure you’re using transparent tape so you can see the numbers clearly.
4. Fill the bottom of the rain gauge with water up to your “zero” line. This creates a uniform fill area, but also adds some weight to keep the bottle from blowing over.
- Pro tip: If you can’t see the water line clearly, you can add some food coloring to increase the contrast between the liquid and the plastic.
How to use your DIY rain gauge
Before the rain starts, put your device outside and in an elevated place, a few feet from the ground. This will prevent water from splashing up off a surface and into the bottle. We put ours on a fence post.
You should also make sure there are no overhead trees or other obstructions above your gauge that may interfere with the rainfall.
After the rain, measure the water level and record your data. You can also write down the kinds of clouds you see before and during the storm, as well as compare different rain levels with the readings from your other devices to see if there are any connections.
Remove the funnel to empty the water after each use.
Make your own barometer

Stats
- Time: 15 minutes
- Cost: Less than $5
- Difficulty: Easy
Materials
- 1 metal (or glass) jar
- 1 large balloon
- 2 rubber bands
- 1 thin wooden skewer
- Cardboard (or foam board)
- Tape
- Glue
Tools
- Scissors
- Markers
- Ruler
- (Optional) Hot glue gun
Instructions
1. Thoroughly clean and dry the jar. This will prevent it from growing mold.
2. Cut the neck off of a balloon with scissors and stretch the remaining rubber over the mouth of the jar. Pull it as tight and as flat as you can—you don’t want any sag or dimples in the rubber. Secure it with two rubber bands and tape as needed to make it airtight.
3. Glue or tape the flat end of the wood skewer in the center of the stretched-out balloon.
4. Cut out two strips of cardboard. These should be 2 inches wide, and at least 3 inches taller than your jar. We went double the height of the jar, just to be safe.
5. Draw a line along the middle of one of the strips. Use that line as a guide to glue the other strip perpendicularly, forming a “T”—this will be your measurement stand. Wait until the glue dries.
- Pro tip: Use a hot glue gun to position the cardboard strips more easily. If you do, make sure to keep the glue gun out of the reach of children.
6. Cut out a third cardboard rectangle. This will be the base for your barometer. It should be wide enough for your jar to sit on, and long enough that your skewer ends about 2 inches from the edge. My base is about 5 inches wide and 18 inches long.
7. Glue the measurement stand to the cardboard base. The end of the skewer should sit in front of the flat face of the vertical cardboard strip, without touching it.
8. Mark a line on the face of the measurement stand where the skewer is pointing. This will be your starting pressure reference.
- Pro tip: Cardboard or foam will eventually start to degrade and sag. If you want to build a longer-lasting barometer, you can make the base and measurement stand out of wood.
How to use your DIY barometer
Covering the jar opening with the balloon seals the air pressure inside. As the air pressure outside increases, the extra force pushes down on the balloon, causing the end of the skewer to rise.
When the air pressure outside decreases, the balloon expands, causing the skewer to go down. By marking where the skewer lands on the cardboard each day, you can track the relative air pressure.
If you want to be more precise, you can check your local air pressure and mark those readings. Over time, this will allow you to create a basic scale to estimate this measurement.
[Related: The best weather apps you can put on your phone]
Teach your kids to make predictions of upcoming weather based on barometric pressure. Lower pressure typically means weather will get worse, whereas rising or high pressure typically means clearer skies ahead. If the skewer remains in place, it means the pressure is steady and current conditions will continue.
Over a few weeks or months, have your kids track all of these readings from your various devices, and connect them to what the weather is actually doing. As you gather more and more information, you’ll be able to make forecasts based on the aggregate data. See if your predictions line up with what the weather reports are saying, and ultimately with what the weather actually does.
Maybe your kids’ predictions won’t be as accurate as that from the weather app on your phone. But they’ll sure be cuter.


