A gloriously vibrant, thriving plant (or several) can really transform a space and help make a house a home. In the wrong spot, though, they can be a nuisance—no one likes to carefully shimmy past the delicate leaves of a Hosta to get from the couch to the fridge. Look up: are you using that ceiling space? If not, you should try hanging your plants.
Not only will suspending your greenery in midair keep pots and stray dirt from cluttering counters, floors, and windowsill, but building your own hanging plant shelves is a simple project that requires only an hour or two of work.
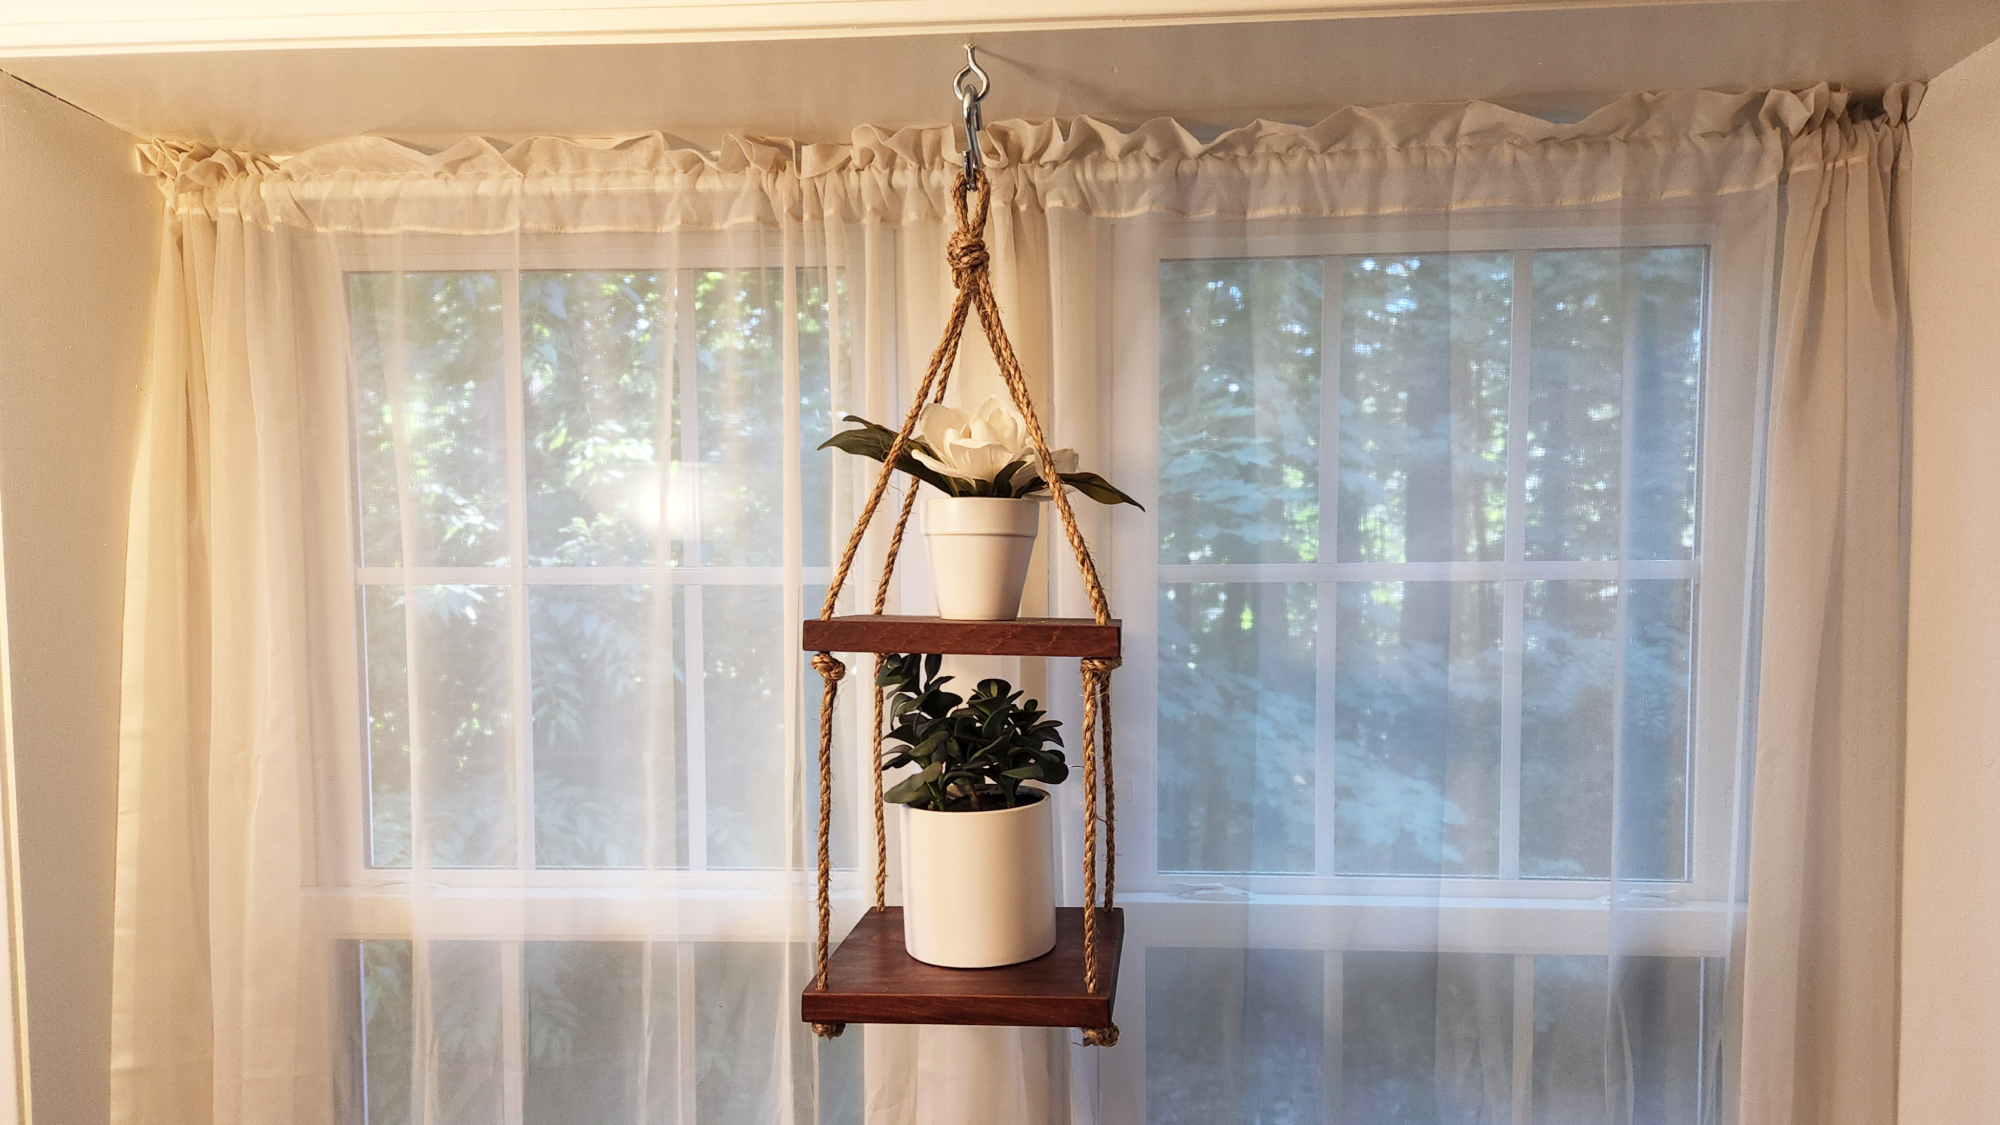
The shelves I made for this story are 8.5 inches square, but you can customize the dimensions to whatever size and number of shelves you need. You can also upgrade the rope to a chain for an entirely new look, or hit the edges with your favorite router bit to give the shelves a unique profile. Mixing wood types, finishes, and adding vinyl designs can take your planter from basic to professional in just a few extra minutes. When you’re done, these hangers will work well in corners and windows, both indoors and outdoors.
Stats
- Time: 1 to 2 hours (plus a few more for drying)
- Material cost: $30 to $50
- Difficulty: Easy
Materials
- 1 (6-foot-long) 1-by-10-inch) pine board
- ¼-inch rope
- 1 S-hook
- Wood stain of any color
- Spar urethane (for outdoor hangers) or polyurethane (for indoor ones)
Tools
- Miter saw (or circular saw)
- Table saw
- Crosscut sled
- Drill
- 5/16-inch drill bit
- Orbital sander
- Sanding discs (80-, 120-, and 220-grit)
- Measuring tape
- Pencil
- (Optional) super glue
Instructions
1. Cut your shelves close to their final length. Using your miter saw or circular saw, cut your board to the approximate final length of your shelves, about an inch longer than the finished size will be. Because I was aiming for 8.5-inch square shelves, I cut these initial pieces to 9.5 inches long. This extra length will allow you to square the shelves by cutting off the excess.
2. Trim your shelves to a consistent width. This isn’t strictly necessary, but I’ve found that store-bought boards are rarely as clean as they should be, so I always trim them down to make the edges a bit nicer. Take about a blade’s-width of material off of one edge of the board with your table saw, then flip the shelf around and trim the opposite edge down to your desired final width.
- Note: You can achieve a far more flat and square edge if you use a jointer or a jointer sled on a table saw. But for free-floating shelves like this, you really don’t need the wood to be perfectly square, so all that’s probably not worth the effort if you bought finished wood.
3. Cut your shelves to their final length. Using your crosscut sled, cut a blade’s-width of wood off of one end of the board to create a right angle to the edge you trimmed on the table saw. Then flip the board over, keeping the same edge against the crosscut fence, and trim the other end to its final length. If you don’t trim both ends, your shelves may be pretty far out of square.
4. Measure and mark where you want your rope to go through each corner of the shelf.. I positioned mine ¾ of an inch from each edge of the board. This left me enough space around the hole that the wood wouldn’t be likely to crack or break.
5. Drill holes for the ropes. Drill a 5/16-inch hole at each mark to hold the ropes.
- Pro tip: To keep the wood from splintering (tear-out) when the bit punches through the bottom of the shelf, drill halfway through the board from the top, then flip it over and drill a matching hole from the bottom. You can line these two holes up by first drilling a very small pilot hole all the way through the board with, say, a 1/16-inch bit, and using that hole to center your 5/16-inch bit.
6. Sand your shelves smooth. Once you’ve cut the boards to their final dimensions, sand them with a random orbital sander or a sanding block. Start with 80-grit sandpaper, then move to 120-grit. Because this project will be polyurethaned and people are unlikely to touch or handle it much, I stopped at 120-grit, but you can go higher if your chosen stain or finish recommends a different final grit.
As the last sanding step, take a piece of 220-grit paper and gently rub it over all the sharp edges by hand, rounding them over. This serves two purposes. First, it keeps people from getting poked or sliced if they touch or bump into the hanging shelves. Second, rounding over those sharp edges and corners reduces the chances that the wood will splinter or break.
7. Stain and finish your shelves. Apply whatever stain you decide to use, according to the manufacturer’s instructions. I chose a dark mahogany because I thought the contrast with the lighter rope would look good. However, choose whatever matches your aesthetic.
Once the stain is dry, apply a protective finish. I used spray-on polyurethane because we planned to hang ours indoors. If your shelves will live outside, consider using spar urethane instead—it will hold up better to the sun and the weather.
8. Cut two equal lengths of rope. I wanted approximately 10 to 12 inches between the two shelves and between the upper shelf and the hanger. However, the knots take up a lot of rope, so you can’t just snip off 24 inches and call it a day. I added 2 inches for the bottom shelf knot, another 2 inches for the top shelf knot, and then 6 inches for the hanger knot. Then I added a couple more inches to be safe.
I wanted a two-shelf planter with the bottom shelf about 24 inches from the hook used to hang it, meaning each of the two supporting ropes would need to be about 35 inches long, running from one corner, up to the ceiling, and back down to the adjacent corner. So I cut each rope to 70 inches to have enough to tie the knots.
9. Tie loops in the middle of each rope.. These loops will attach to the S-hook hanging from your ceiling, and there are probably a dozen different knots you can use. I used a basic mid-rope overhand knot with a loop. This knot is simple to tie and relatively easy to position where you want it on the rope. Tie one loop in the exact center of each rope, keeping the loops approximately the same size. This will make it easier to level the shelves later.
10. Tie the shelf knots and slide on the shelves. With the hanging loops tied, position the shelf support knots. I measured 12 inches from the bottom of the loop knot on each of the four lengths extending from the loops (two on each rope) and marked that with a black permanent marker. Then I inserted the ropes into the holes of the top shelf and pulled them through until the shelf was above those black marks. Again, the strands of each rope should thread through adjacent corners, not the diagonals.
With the shelf sitting above the marks, I tied a basic overhand knot in each strand. The trick is to position the knot just below the black mark on each rope. If you leave the knot loose, you can slide it up and down the rope until each knot is at exactly the same height. Then tighten the knots so they don’t slip, and push the shelf down to rest on top of them.
11. Repeat step 10 with the bottom shelf. While you do this, measure from the bottom of the top shelf, leaving room for knots at the ends of the rope. In my case, the distance that made the most sense with the rope remaining was 11 inches.
12. Install mounting hardware in the ceiling or wall. There are numerous products that will allow you to hang an S-hook, but the simplest is an eye bolt with a diameter wide enough to fit the hook. Pre-drill a hole in the ceiling, ideally into a ceiling joist or the casing of a bay window for strength, then screw the eye bolt into place.
13. Hang your shelf up and adjust it as needed. Once the knots are all secure, hang the entire unit from the S-hook by the rope loops. Loosen and move the knots up and down as necessary until everything sits level. When you’re satisfied, add your plants.
- Pro tip: If you don’t ever plan to adjust the planter, add a dab of super glue to each knot when everything is done. This will ensure the knot remains in place over time, though it also means you likely won’t ever be able to untie it.
