More than seven months into the pandemic, the novel coronavirus is about to change how we celebrate Halloween. In any other year, millions of costumed children would be ringing doorbells in search of as much candy as their pillowcases and little arms could carry, but fewer people are expected to be giving and gathering sweets as COVID-19 cases rise across the nation.
Still, that doesn’t mean you can’t enjoy the sweet and scary holiday right at home. Get in character, grab some ingredients off the shelf, and spend your evening looming over a bubbling cauldron of molten sugar—the scientific tricks behind these homemade treats will have you feeling like a real sorcerer.
Before we start, though, a warning: Candies, in general, have a steeper learning curve than other sweet treats. That means it’s important to gather the right tools, read the recipes thoroughly before you begin, stay focused on what you’re making, and trust your source material, says Stella Parks, author of BraveTart: Iconic American Desserts. Don’t wing it or make last-minute changes and expect the same results.

Fizzy candies
The scientific principle behind this recipe originally published in Saveur, is the effervescent reaction between citric acid and baking soda (AKA sodium bicarbonate)—they start to fizz when they come into contact with water. That’s the tingly sensation you feel once the candy hits your spit-covered tongue. It’s also what makes Alka-Seltzer tablets or even bath bombs fizz when you drop them in a glass or tub.
The chemical reaction from combining water, citric acid, and baking soda creates carbonic acid (H2CO3), which quickly decomposes into more water (H2O) and carbon dioxide (CO2). Typically, the gas would be released into the air during the reaction, causing that well known fizz. But if you can get the sugar in your recipe to cool down fast enough, you’ll trap it so that it only comes out when the candy dissolves in your mouth, causing a sharp but pleasant popping.
Stats
- Time: 20 minutes
- Difficulty: medium
- Yield: 2 cups of candy
Tools
- Baking sheet
- Silpat (or aluminum foil)
- Small saucepan
- Candy thermometer
Ingredients
- 1 cup plus 3 tablespoons of sugar
- 2 tablespoons of light corn syrup
- 1 1⁄2 teaspoons of baking soda
- 3⁄4 teaspoons of Kool-Aid (or another drink mix in the color and flavor of your choice)
- 1⁄2 teaspoon of powdered citric acid
Instructions
1. Prepare a baking sheet. Line it with a Silpat or a sheet of foil. Set it aside.
2. Combine the sugar and corn syrup. In a small saucepan, combine these ingredients with 2 1⁄2 tablespoons of water. Attach a candy thermometer to the side of the pan, and bring it all to a boil over medium heat.
3. Cook the syrup. Don’t stir. Wait until the thermometer reads 300 degrees Fahrenheit (between 8 and 10 minutes).
4. Add the remaining ingredients. Remove the pan from the heat and carefully stir in the baking soda, Kool-Aid, and citric acid.
- Note: At this point, most, if not all, of the water should have evaporated, so you’ll see little to no fizz when you add the baking soda and citric acid.
5. Pour the syrup onto the baking sheet. Do this quickly, in one move. Let it stand to cool completely.
- Note: The faster you pour the mix onto the baking sheet, the faster the candy’s temperature will drop, and the fizzier your candy will be. This means you’ll get a more intense reaction in your mouth later. If you get a lot of fizz while cooking your candy, helping it cool down faster by keeping the kitchen cool or sticking the candy in the fridge will allow you to trap those CO2 bubbles, which will later yield a lot more popping when you eat it.
6. Smash the candy. Put the candy inside a zip-top bag and smash it into bite-size pieces. Store it in an airtight container for up to two weeks.
- Note: The more airtight the container, the better. If your candy is exposed to moisture in the environment, the citric acid and baking soda will start to react and release CO2. As this happens, it will lose its fizzing powers, making your candy a lot less fun over time.
Chewy caramels

Despite its name, caramelization isn’t the main reason why caramel candies have that smooth, brown color they’re known for. Sugar caramelizes at a wide range of temperatures, but when you’re making caramel, the process doesn’t start until all the water has been cooked out of the mixture—about 320 degrees Fahrenheit, Stella Parks says.
Instead, most of the color you see in these chewy treats is the result of the Maillard reaction. This type of browning occurs often in cooking and baking, at lower temperatures than caramelization. When you make caramel, this reaction occurs as you heat the dairy, says food scientist Pat Polowsky.
We used this recipe from The Kitchn, with the site’s recommendation of some added salt to achieve a savory salted caramel taste.
Stats
- Time: 1 hour
- Difficulty: medium
- Yield: about 50 caramels
Tools
- 8-by-8-inch metal baking pan
- Parchment paper
- Small (2-quart) saucepan
- Larger (4-quart) saucepan
- Pastry brush
- Digital thermometer
- Spatula
- Whisk
- Sharp knife
Ingredients
- Cooking spray (or cooking oil)
- 1 cup of heavy cream
- 4 tablespoons of unsalted butter
- ¼ teaspoon of salt
- 1 ½ cups of granulated sugar
- ¼ cup of light corn syrup
- ¼ cup of water
- ½ teaspoon of vanilla extract
- (Optional) 2 more teaspoons of salt
- (Optional) sea salt (for topping)
Instructions
1. Prepare the baking pan. Coat the pan with cooking spray, then line it with parchment paper, letting some of the sheet hang over the sides. Add some more spray to the paper once it’s in. A small amount of cooking oil will also work—it’s more about adhesion than cooking.
- Warning: Don’t use aluminum foil or wax paper. The latter will dissolve into your caramel and foil can crinkle and tear easily. “The caramel gets into all those creases and then you’ve got foil shards everywhere because your fingers can’t pinch it to get it out,” Parks says.
- Warning: Don’t use a glass dish. It could shatter if it’s not tempered, or if it’s tempered and set down on a hard surface, Parks cautions.
- Note: The Kitchn suggested an 8-by-8-inch pan, but the best we could do was an 8-inch round one. At about 50 square inches, it’s a little smaller than the 64-square-inch pan we should’ve used, but it worked fine—the caramel just took a little longer to cool because of its thickness.
2. Melt the dairy. Cut the butter into manageable chunks and put it into the smaller saucepan with the cream and salt. Let the butter melt over low heat, occasionally swirling the mixture to check for solid chunks. When the butter has completely melted, take the pan off the heat, but keep it close at hand.
- Warning: Don’t use the microwave here. Nuked butter explodes too easily, which could cause you to lose some dairy, affecting the candy’s final texture. You may also be tempted to avoid butter bursts by not heating it up as much, which could cause it to cool faster, risking a more volatile reaction when you add it to the melted sugar, Parks says.
- Note: If you’re making salted caramel like we did, add the extra 2 teaspoons of salt now, but save the sea salt for later.
3. Combine the sugar, water, and corn syrup. Without turning on the heat, mix these three ingredients in the larger pan until you’ve got a grainy goop. You can call it “ghost guts” or something. Halloween it up. Then, use a wet pastry brush to clean the sides of the pan until there are no more crystals left above the main layer.
- Warning: Do not use a smaller pan than recommended. When you add the dairy, the mixture will bubble up high, and you don’t want a molten overflow.
- Note: Don’t worry about adding too much water. Candy-making is the process of removing water, so as long as you get to the right temperature, it doesn’t matter how much water there is to start—it just might take longer, Parks says. This reassured us when we realized our silicone brush did not hold water well at all and we’d need to use quite a bit of it.
- Note: If you leave crystals on the sides of the pan, they’ll wash back into everything when you add the dairy, crystalizing the whole thing. Your caramel will be “the texture of the beach,” Parks says. Food can be summery, but not that summery.

4. Attach the thermometer to the pan. If you have a clip-on one, great. If not, you may be able to rig something up using various kitchen and office supplies like we did. You can also take intermittent measurements without having the thermometer constantly in the mixture, but your readings may not be as accurate.
- Note: You don’t need a candy thermometer—just one that works fast (like a digital one) and will measure temperatures at least as high as 330 degrees.
5. Cook the sugar. Turn the heat under the larger pan to medium-high and don’t touch the goop. Let it boil. No toil, no trouble. Eventually, at around 250 degrees, it’ll turn clear and start bubbling harder. At around 320, it’ll begin to darken.
6. Pour in the dairy. When the sugar begins to change color, turn off the heat and slowly add the warm dairy. Carefully whisk the mixture as you go, but stop once all the dairy is in.
- Warning: The sugar will froth and grow large, like a true witch’s cauldron. Be careful.
7. Heat the caramel again. Turn the heat back on to medium-high and let the mixture boil—no need to stir. Once it reaches 245 degrees, you can take it off the heat.
8. Add vanilla. Just toss it in and whisk it around.
9. Pour the caramel into the parchment paper-lined pan.
10. Let the candy cool. Leave it sitting out at room temperature for at least two hours.
- Warning: Don’t try to cool it faster in the fridge. The candy might absorb undesirable odors, or the surface may dry out too fast and get crusty, Parks says.
11. Cut the candy. Lift the cooled caramel out of the pan and put it on a cutting board. Cut it into whatever shapes you like with a sharp knife, or just chow down like it’s a big sticky cookie. Cursed? Maybe, but it’s Halloween. You do you.
- Note: If you’re going the salted caramel route like we did, sprinkle sea salt onto the finished caramel before you cut it.
12. Store the candy. If you have wax paper, you can wrap them individually—The Kitchn says they’ll keep for about two weeks at room temperature. If you don’t, well, you can use plastic wrap or store them in airtight containers on the parchment paper. Ultimately, you’re just trying to keep them from sticking together and being exposed to the air for too long.
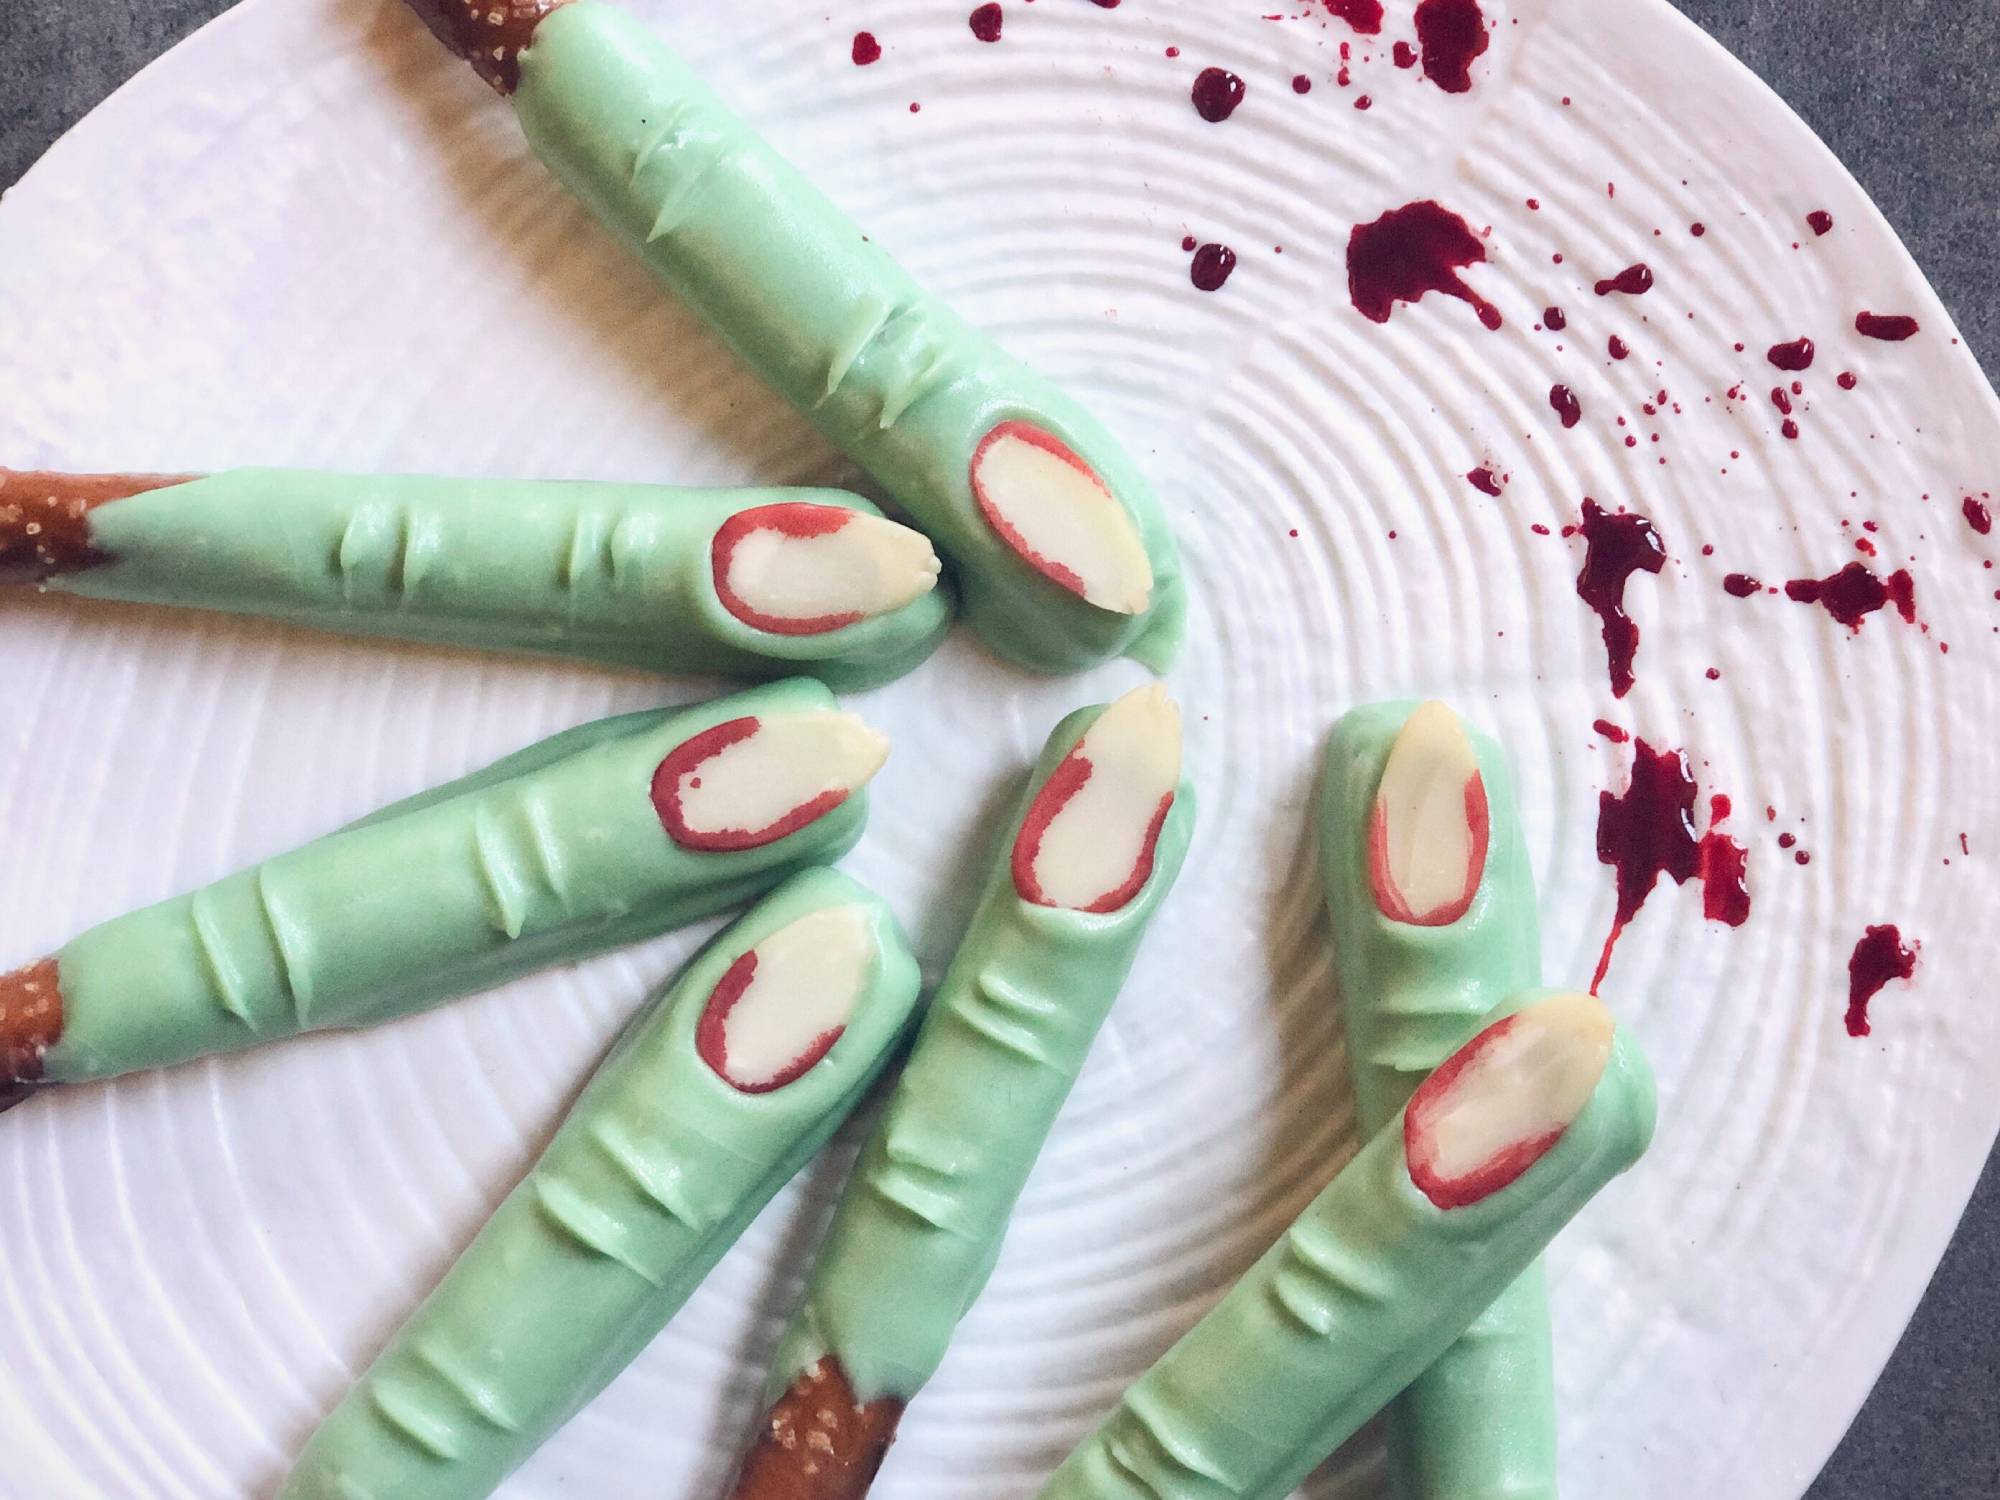
Witch fingers
If you thought microwaving chocolate was the best way to melt it—you’re wrong. Microwaves serve up a steady, powerful stream of heat, so you often end up blitzing your food. When it comes to turning those delicious cacao nibs into liquid chocolate, the best bet is opting for an open flame you can control, like a stovetop. This should result in a smooth mixture that will be easy to dip, dunk, and toss other dry ingredients into.
While tempering—the proper culinary term for the heating and cooling process—the ingredient you want to mold is the cocoa butter itself, says Julia Choi-Rodriguez, pastry chef and founder of Vasta Chocolate in Montclair, New Jersey. The heavy, yellowish extract consists of tiny crystals that bond sugar to fats. The more complex the shapes of these structures, the more heat you’ll have to apply to get the chocolate to soften up.
Stats
- Time: 30 minutes
- Difficulty: easy
- Yield: 20 servings
Tools
- A pot
- Heat-resistant bowl (bigger than the pot to melt the chocolate in a double boiler)
- (Optional) candy thermometer
Ingredients
- 1 pint of high-quality white milk chocolate (chips or chopped-up candy bars)
- 10 pretzel rods
- Green food coloring
- 1 bag of almond slivers
Instructions
1. Bring a few ounces of water to boil in a pot. The exact amount doesn’t matter—just make sure that the bottom of the bowl won’t touch the water, otherwise it will get too hot and burn your mixture.
2. Put two-thirds of the chocolate in the bowl. Then, place it on top of the pot.
- Note: You can replace the white chocolate with milk or dark chocolate, but keep in mind that their structural makeup is different, so your temperatures and prep times may vary.
3. Allow the chocolate to melt, stirring occasionally. Once there are no more solid pieces or lumps, take the bowl off the heat.
4. Stir in the rest of the chocolate to cool the mixture down slowly. Keep stirring until it reaches 80 degrees. If you have a candy thermometer, it might come in handy, but if you don’t, carefully dip a clean finger in—don’t burn yourself—and feel for slightly higher than room temperature. Check on the texture of your chocolate—it should be heavy but still liquid.
5. Add the food coloring. A few drops is all you need for that witchy skin tone.
- Note: Resist the temptation to go for a full-on Frankenstein look and don’t add too much food coloring. Synthetic dyes hold a lot of water, which doesn’t mix well with the fats in cocoa butter.
6. Break your pretzel rods in half and dip them three-quarters of the way into the bowl. Shake off the excess liquid and place them on a piece of parchment paper, then draw little wrinkles on with a toothpick. Press your almond slivers onto the dipped ends so they look like cruddy fingernails.
7. Give the chocolate 15 minutes to set. If you tempered it correctly, it should look shiny when it hardens and snap when you take a bite. Just like a real witch.
Correction: The story previously misspelled the name of Julia Choi-Rodriguez’s chocolate store. It’s Vasta, not Vesta.
