A wine rack will help you keep your reds and whites organized, and if you build it yourself, you’ll get to add a personal touch to your home decor. So get ready for a fun project—an easy-to-moderate build that breathes new life into a nondescript wooden pallet previously destined for the trash. Best of all, you won’t have to fuss over every cut because the beauty of working with reclaimed wood is in the imperfections.
There are a number of ways you can find or buy wooden pallets. Maybe you already have one left over from a furniture delivery, move, or some other project. If not, you can buy one at a home improvement store like Home Depot or Lowe’s. You can also find pallets for free or at a discount on websites and apps such as Facebook Marketplace, OfferUp, and Craigslist, or by asking around at local construction sites.
You may even be able to repurpose the nails from the pallet itself, minimizing or eliminating the need for additional fasteners. When you’re done, think about making another—one pallet can make up to two of these wine racks.
Warning: DIY projects can be dangerous, even for the most experienced makers. Before proceeding with this or any other project on our site, ensure you have all necessary safety gear and know how to use it properly. At minimum, that may include safety glasses, a face mask, and/or ear protection. If you’re using power tools, you must know how to use them safely and correctly. If you do not, or are otherwise uncomfortable with anything described here, don’t attempt this project.
Stats
- Time: 2-3 hours
- Material cost: $5-$47
- Difficulty: easy/moderate
Materials
Wood ($0-$10)
- 1 wood pallet
Fasteners: $7
Finishing supplies: $30
- Sandpaper (60 grit)
- Masking tape
- 1 quart of wood paint (or stain)
- Drywall anchors
- (Optional) 1 can of chalkboard paint
- (Optional) Chalk
Tools
- Hammer
- Measuring tape
- Square
- Circular saw (or hand saw)
- Power drill
- ⅛-inch drill bit
- Level
- Pencil
- Rag (or paper towel)
- Paintbrush
Before you begin
1. Set up your work space. An important part of the job is making sure you have enough room to work with the pallet for the initial cuts. I used an approximately 5-by-6-foot area to put this together.
2. Secure all of the pallet’s existing nails. Using your hammer, make sure all the nails are completely pounded in.

3. Figure out the dimensions of your wine rack. Your wine rack should be 40 inches wide (the full width of a pallet), but you can choose whatever height works for you and your space. Using two of the existing horizontal panels should provide enough support once the rack has been hung, but don’t go any shorter.
I started with a full-size 40-by-48-inch pallet with seven rows of wood panels and decided the height of my rack would be from the top of the pallet to the bottom of the second panel down (about 12.5 inches).
- Tip: It’s easiest to work from one end of the pallet, so if the wood on one side is better than the other, flip it so the good end is at the top. It’s possible to work with a chunk from the middle, but not ideal, and this how-to won’t cover all the potential variables if you go that route.
- Note: Most pallets have one side with more panels than the other. When I measured down two panels from the top, for example, the opposite side had just one. Whatever your pallet or plan looks like, you should make sure the eventual back of your rack has multiple panels and the future front has just one.
4. (Optional) Reinforce the wood panels. If any of the panels you plan to use for your wine rack are loose, reinforce them now. To do so, simply drive some new screws or nails through them into the 2-by-4s that form the pallet’s frame.
Build the rack
5. Mark the height of the wine rack. Measure down from the top of your pallet and use your square and pencil to draw straight lines across the 2-by-4s on each side and the board in the middle.
6. Cut the pallet. Using your circular saw, cut the pallet along the lines you just marked. First, turn the pallet on its side, so the panels are vertical and facing you. Make your first cut. Then, flip the pallet around and cut the other side. For the middle, place your pallet flat on the ground and proceed with your cut. The blade won’t go all the way through, so you’ll have to turn it over to cut the other side. It may feel like you’ve only done a little, but you’re already halfway done.
- Caution: If you’re using a circular saw, make sure you’re wearing eye, ear, and breathing protection and understand how to safely operate this potentially dangerous tool.
7. Prepare the base of the wine rack. Using your hammer, remove three of the wood panels from the unused portion of the pallet. You’ll use one of these for the base. Save the other two for later.
- Tip: If you can remove the panels without damaging the nails, you can use them to attach the base of the wine rack in the next step.
8. Install the base. Turn the section of the pallet you plan to use as a wine rack on its head, so the rectangular base is face-up (as pictured below). Then, take one of the panels you just removed from the remains of the pallet and place it on what will be the bottom of your wine rack. It will be your base. Attach this piece of wood to the rack’s frame using two screws on either end and another two in the middle.

Optional: Build a wine glass holder
In this phase of the project, we’ll create a row of glass holders that hang beneath the rack—enough to fit seven glasses. These next few steps involve several small cuts that may take up to an hour and, while the end result will allow you to store wine bottles and glasses together, this is something you can skip if you’re looking for an easier DIY project.
9. Prepare the cuts for the wine glass holder. Take the wood panels you removed from the pallet in Step 7 and, using your circular saw, make the following cuts:
- Cut two 3-inch-long pieces. Measure and mark 3 inches on one of your spare panels, cut, and repeat. These will be the sides of your wine glass holder and will attach to the bottom of your wine rack.
- Cut eight 4-inch-long blocks. Measure and mark 4 inches on your wood, cut, and repeat until you have eight of these. They’ll hold your glasses in place.
- Cut six 1 ¾-inch-wide blocks. Measure and mark 1 ¾ inches on your wood, cut, and repeat. These will create space between the bottom of the wine rack and the wine glass holder.
10. Sand the wine glass holder pieces and the wine rack base. Using 60-grit sandpaper, rub down all the blocks you cut in the previous step, removing any debris. Now is also your last chance to easily sand the bottom of your wine rack. If you wait until after you install the glass holder, it’ll be hard to hit every surface with the sandpaper. When you’re done, wipe down each piece with a rag or paper towel to remove any dust. Smoothing every surface is critical before painting or staining.
- Tip: If you don’t have a rag or paper towel on hand, you can use a paintbrush to dust after sanding. Make sure it’s a cheap, disposable one, though, not a good one—dust-filled paint does not look good.
11. (Optional) Pre-drill holes. If you’re using screws, you can make the process easier by pre-drilling holes with your power drill and a ⅛-inch bit. Drill two holes in the 3- and 4-inch blocks, centered 1 inch from the top and 1 inch from the bottom, and one hole centered in each 1 ¾-inch block. This will make it less likely that the wood will split or the blocks will move as you’re screwing.
12. Install the 3-inch blocks. Center two screws 1 inch apart (horizontally or vertically, it doesn’t matter) in one of the blocks and attach it to the bottom of the wine rack holder, all the way to one side and flush with the end of the rack. Repeat on the other end.
- Tip: If you don’t have screws, you can use nails here and in subsequent steps, as needed.
13. Attach the 1 ¾-inch blocks. Measuring from the inside edge of one of the 3-inch pieces, use your square and pencil to mark a line at 3 ⅜ inches. Then, place one of the blocks down so the edge closest to the end block rests against the line. Fasten it in place with one screw in the center. Next, measure 3 ⅜ inches from the other edge of the block you just installed and mark another line. Repeat until all blocks are in place.

14. Attach the 4-inch blocks. Take one of these blocks and place it on one end of the bottom of the wine rack, directly on top of the three-inch block you’ve already installed, flush with the outer edge. Attach with two screws, 1 inch from the top and 1 inch from the bottom. Repeat this step on the other end of the wine rack on top of the other 3-inch block. Then, center the remaining blocks on top of the 1 ¾-inch blocks and fasten them in the same manner.
The final touches
15. Sand the wine rack for painting. Using the sandpaper, sand the rack until it feels smooth to the touch with your bare hands. Then, remove all the dust from the wood with a rag or paper towel. When that’s done, prepare your work area for painting by making sure the floors and walls are protected from any potential spills or splatters. If you don’t have a paint cover, you can use newspapers and grocery store flyers to keep things covered.
- Tip: If you don’t have a rag or paper towel on hand, you can use a paintbrush to dust after sanding. Make sure it’s a cheap, disposable one, though, not a good one—dust-filled paint does not look good.
16. Paint the rack. Using your paintbrush, apply the stain or paint of your preference to the front and sides of the rack. There’s no need to paint the back because it’ll be against the wall. Let it dry and apply a second coat. When it’s time to paint the bottom, lay it flat on its back.
- Caution: To avoid an intense odor, make sure to follow the paint or stain manufacturer’s instructions and ensure you’re applying all coats of paint in a well-ventilated area. (Inhaling fumes in a poorly ventilated area can lead to headaches, nausea, and dizziness.)
- Tip: We recommend a disposable paint brush because the wood is still quite rough after sanding and may damage higher quality brushes you’d typically use for interior projects.
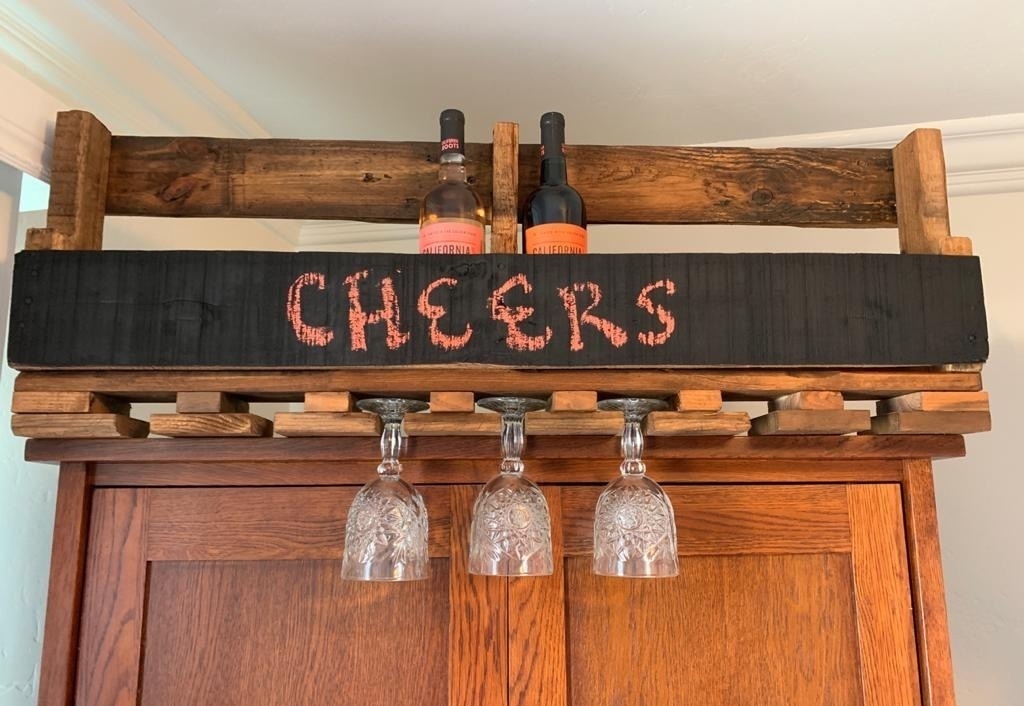
17. (Optional) Create the chalkboard. Once the stain has dried, you can add chalkboard paint for writing your favorite sayings about wine, labeling the contents of the rack, or simply writing little notes to yourself and others. To get started, place masking tape alongside every edge of the bottom panel of wood on the front of your rack. This piece will become your chalkboard.

Carefully spray the chalkboard paint across the bottom panel. Let it dry (per the manufacturer’s instructions) and apply a second coat.
- Tip: You can use newspapers to cover the rest of the wine rack and protect it from the chalkboard spray paint.
Hang your wine rack
18. Drill holes for your wall anchors. Use a ⅛-inch bit to drill four holes into the front of the uppermost panel, two on each side of the center board. The first hole should be 4 inches from the left side of the rack and the second should be 4 inches from the center division. Repeat on the other side. These will be where your anchors go.
- Note: If your wine rack is larger than this one, add as many anchors as necessary for it to be secure.
19. Level the wine rack. Position your rack in its desired location on your wall and use a level to make sure it’s straight. With a pencil, make small lines on the wall underneath and along both sides of the rack. You’ll use these as guides to attach the wine rack to the wall.
20. Mark where your anchors will go into the wall. Hold your wine rack in place with one hand and use the other to drill a screw into each of the holes you made in Step 18. Do not attach fully—these are just to mark where the anchors will go. Remove the screws and you’ll have four holes for your anchors.
21. Install the drywall anchors. Some anchors are attached using a hammer, while others require a drill or screwdriver. Install yours in the holes marked in the previous step, per the manufacturer’s instructions.
22. Hang your wine rack. Line the rack up with the pencil marks you made in Step 19. Drill four screws, one into each of the holes created in Step 18, so they rest inside each of the anchors you just installed.
Now that you’ve completed your wine rack, write something fun on the chalkboard and load it up with your favorite bottles. Cheers!
