Window seats are a great alternative to armchairs and loveseats, but trying to find one the right size can be challenging. Pre-made options are often too small, too big, too wide, or too narrow, and having a professional carpenter build a customized one can be expensive.
The solution? Get hands-on and build your very own window seat.
Stats (for one window seat)
- Time: 2-3 hours
- Material cost (not including cushions): $80-$140
- Difficulty: moderate
Materials
Wood ($80)
- 5 (8-foot-long) two-by-fours
- 1 (¾-inch-thick) sheet of prefinished plywood
- 1 (10-foot-long) piece of 1-by-6 pine moulding
Fasteners ($30)
- 3-inch wood screws
- 1.5-inch wood screws
- Drywall and stud wood anchors
- 1.5-inch wood finishing nails
- 2 (4-ounce) tubes of Liquid Nails
Finishing supplies ($20, not including cushions)
- 1 quart of semi-gloss paint
- Wood filler
- Sandpaper (80-120-grit)
- Cushions and pillows for the seat
Tools
- Circular saw (or hand saw)
- Drill
- Square
- 4-foot level
- Pencil
- Hammer
- Measuring tape
- 3-inch paint brush
- (Optional) framing square
Before you start
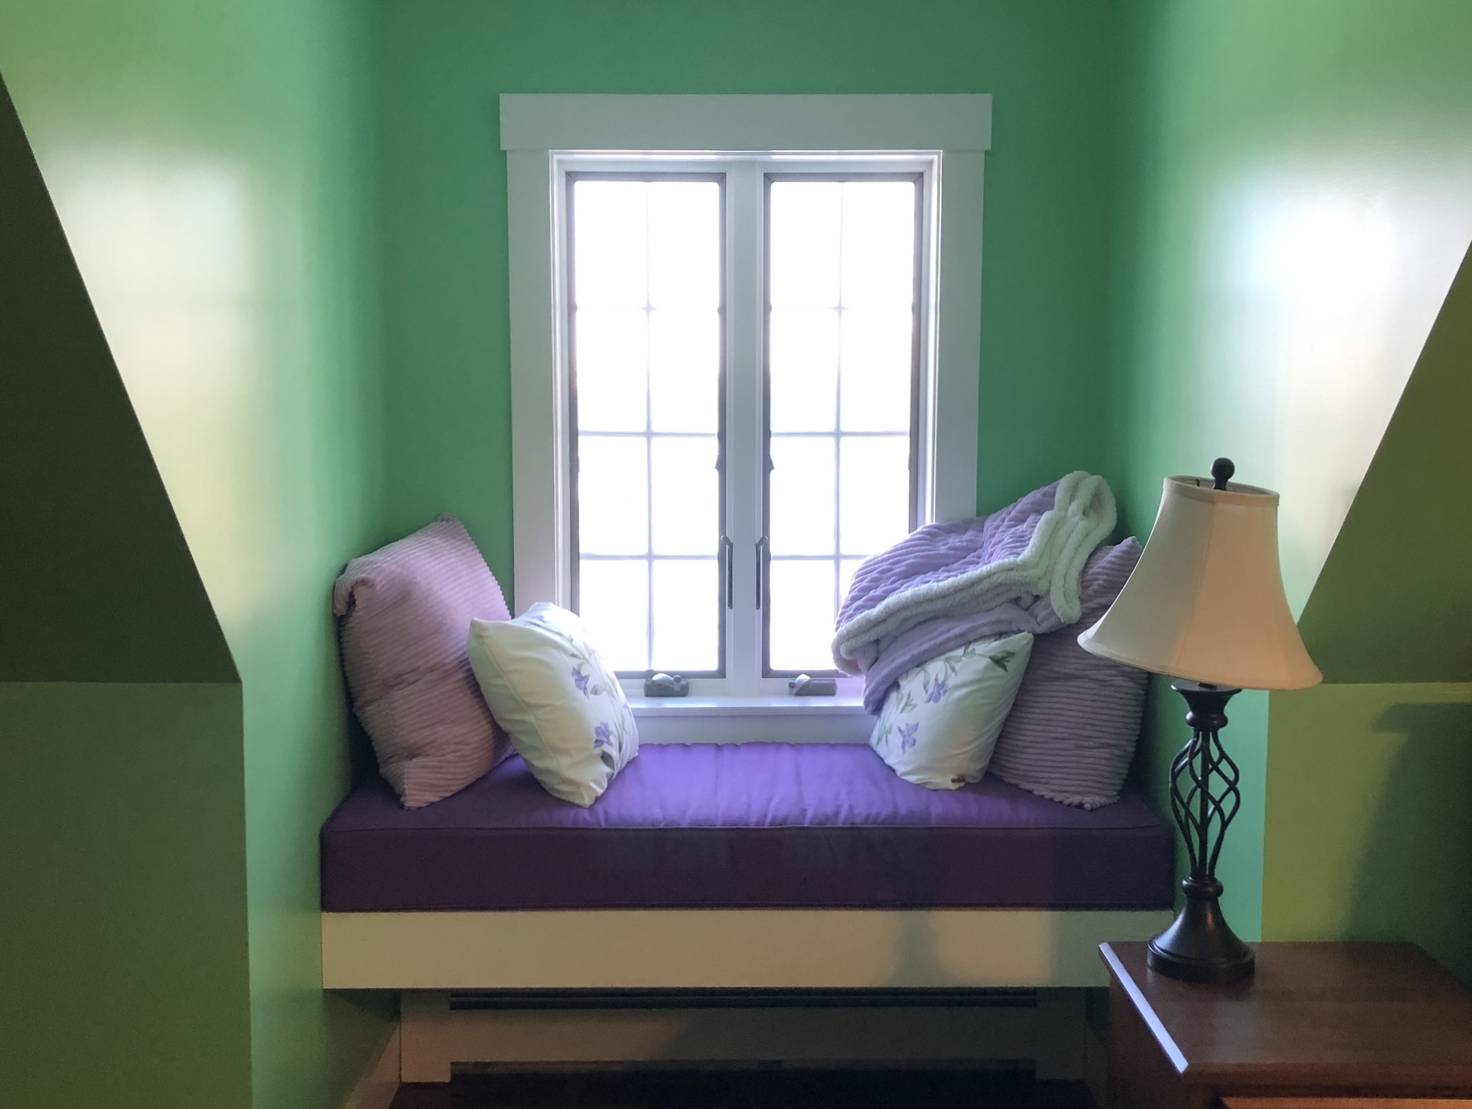
1. Identify where you want your window seat. Measure the window and decide the length of your seat. For example, if your window is three feet wide, you may want to build a five-foot long bench, leaving one foot on either side of the window. As for width, imagine a sofa, which could be between 21-26 inches wide. Most people will sit sideways on a window seat (like they’re lounging on a couch) so the measurements should be similar. I built a seat for a dormer window—one of those cozy nooks that look like they were designed just for curling up with a book—and made sure it fit the exact length of the space. In all, mine was five feet in length by two feet in depth.
2. (Optional) Get your plywood cut in-store. Stores such as Home Depot and Lowe’s offer wood-cutting services for free with your wood purchase, or at a low cost. This is handy if you don’t have a proper table saw setup, aren’t sure how straight your circular saw cuts will be, or just want a precise finish on the wood that will serve as the top of your window seat. I was planning to make two seats, so I got mine cut into two 5-by-2-foot pieces at Lowe’s.
Build the base of your window seat

3. Determine your window seat height. For most windows, leaving 6 to 8 inches between the bottom of the window and the top of your seat frame should prevent your cushions from covering the moulding or blocking the window. Since I selected a 4-inch thick cushion, I decided to place my seat 6 inches below the edge of the window’s moulding. Measure down from the moulding and mark the wall where the top of your seat frame will go. Place your level against the wall along that mark. Then, use your pencil to draw a level line the length of your intended seat frame.
4. Cut the wood for the four sides of the seat frame. Using your saw, cut the two two-by-fours to the desired length of your window seat. I cut mine to 5 feet each. These will be used for the back and front supports of the seat frame. Then, cut the two shorter two-by-fours so they’re each 21 inches long. These will be the sides of the seat frame.
- Caution: If you’re using a circular saw, make sure you’re wearing eye, ear, and breathing protection and understand how to safely operate this potentially dangerous tool.
5. (Optional) Cut the plywood for the seat. If you didn’t get your plywood cut in-store, you’ll have to cut it yourself. If you did, you can skip this step.
First, use a pencil to mark out the size of your seat. If you’d like long guide lines, use a square and the longest straight-edge you can find (either a framing square or one of the two-by-fours) to make straight lines that your saw blade will follow. Try to make as few cuts as possible, preserving the factory-cut edges where you can. They’re almost guaranteed to be straight.
Using a circular saw, slowly cut along the lines. If you notice your saw straying from the guide line, stop cutting, back the saw up a bit, and start again. Don’t try to turn the saw as it’s cutting through the wood. The factory-cut edge should be the front of the seat and your cut should be at the back.
6. Find the studs in the wall where you’ll attach your window seat. There are always studs in the corners of walls and along the sides of windows. Generally, these repeat every 16 inches.
Mark each stud you find with a pencil, so you’ll know where they are when it’s time to fasten your seat to the wall.
- Tip: A good way to know if there is wood behind your drywall is by driving a screw into the wall. If there’s wood there, you’ll feel the screw getting tighter. If not, the screw will poke through the drywall easily and spin in place.
- Tip: If you own a stud finder, you can use it for this project. If you don’t, I don’t recommend buying one unless you know you’ll use it for other projects.
7. Fasten the back of the seat frame to the wall. Squeeze two drops of Liquid Nails every 12 inches along the length of one of the longest, widest sides of one of the two-by-fours you cut in step 4. Make sure you’ve got your drill and 3-inch screws nearby for this step.
With the Liquid Nails side facing the wall, line up the top of the two-by-four with the line you marked in step 3 and place it against the wall. You will need to hold it in place with one hand as you move to the next step. You can use the corner wall for support to help keep it in place.
While supporting the two-by-four with your less dominant hand, take the drill in your dominant hand and drive 3-inch screws through the two-by-four and into the studs you marked in step 5—moving from one side of the window to the other, two screws per stud. Place one screw about 1 inch from the top of the base and and another below it, about 1 inch from the bottom.
8. Install the sides of the seat frame. Line up the two 21-inch two-by-fours flush with the back panel of the base you’ve already fastened to the wall under the window, and repeat step 6.
- Tip: If you’re building a window seat for something other than a dormer window, or you don’t want a wall-to-wall seat, you’ll need to screw these shorter pieces of wood to the longer one against the wall. Then, you’ll need to attach two-by-four legs at the front.
- Tip: If you find a spot where there’s no stud to secure your seat frame to, you’ll need to drill two drywall and stud wood anchors into the wall to help hold the side panels in place. To do so, draw a mark with your pencil in the spot where you want your screws to go, then drive the 3-inch screws into the two-by-four until you reach the other end. Then, place the two-by-four against the line on the wall that you marked and drive the screws in another inch. That will create the marks where your anchors should go. Now, you can take the two-by-four off the wall and install the anchors.
9. Install the front of the seat frame. Attach the remaining 5-foot two-by-four you cut in step 4 to the side panels you just fastened in place. Use three 3-inch screws on each side.
- Tip: If you want to reinforce your seat, use 3-inch screws to install supportive beams from the back of the base to the front (these will act like slats in a bed), spaced 16 inches apart. If your window seat is more than 6 feet long, I would recommend adding supports.
10. Install the top of the window seat. Place the plywood on top of your seat frame and make sure it fits. If it doesn’t, shave off the excess as necessary with your circular saw.
Once the top fits perfectly, secure the plywood in place using 1.5-inch screws about 1 foot apart around the perimeter.
- Tip: Don’t use Liquid Nails here—you may want to remove the top layer one day.

11. Cut the pine moulding. Measure the front of the seat to ensure a proper fit, then mark the moulding and use your saw to cut it to the right length. Mine, for example, was 5 feet long.
12. Install the moulding. Squeeze a few drops of Liquid Nails along the center of the back of the moulding—the side without any primer. Then, place the moulding along the front of the window seat, flush with the top of the plywood for a smooth finish. Hold the moulding with one hand and press it against the wall as your hammer one nail 1 inch from the top of the moulding on one end and another 2 inches below that. Repeat every 16 inches until you reach the other end.
13. Cover the nail holes. Dip the tip of your finger into the wood filler and rub it over one of the nail holes. Repeat until each is covered. Let it dry for 20 minutes.
14. Sand the moulding. Once the moulding is smooth and there are no visible nails or holes, you’re done.
15. Paint the moulding. Use two coats of the semi-gloss paint.
The finishing touches
Now that you have your window seat base built, all you need now is a cushion, some pillows, and a good book to read.
You have a few options for the cushions and pillows: getting them custom-made by a local tailor (as I did), ordering them online from one of the many sites that specialize in customized cushions, or finding ready-made ones that fit your seat’s dimensions.
The next thing you know, you’ll be enjoying a nice cup of tea, taking in the sunrise, or enjoying a cool night’s breeze, all from the comfort of your window seat.
