We may earn revenue from the products available on this page and participate in affiliate programs. Learn more ›
Cables, cables everywhere, and no counter space to put down my drink. If your house is anything like mine, you’ve got a rat’s nest of charging cables clustered around an outlet. We have wires for tablets, phones, watches, cameras, toys, and a bunch that I have no clue what they’re even for. I decided to take control through woodworking and build a charging station that could contain the chaos. I used some pieces of sapele that I had left over from other projects, but you can use whatever wood you have available, or pick up a piece of 1-by-6 at your local hardware store.
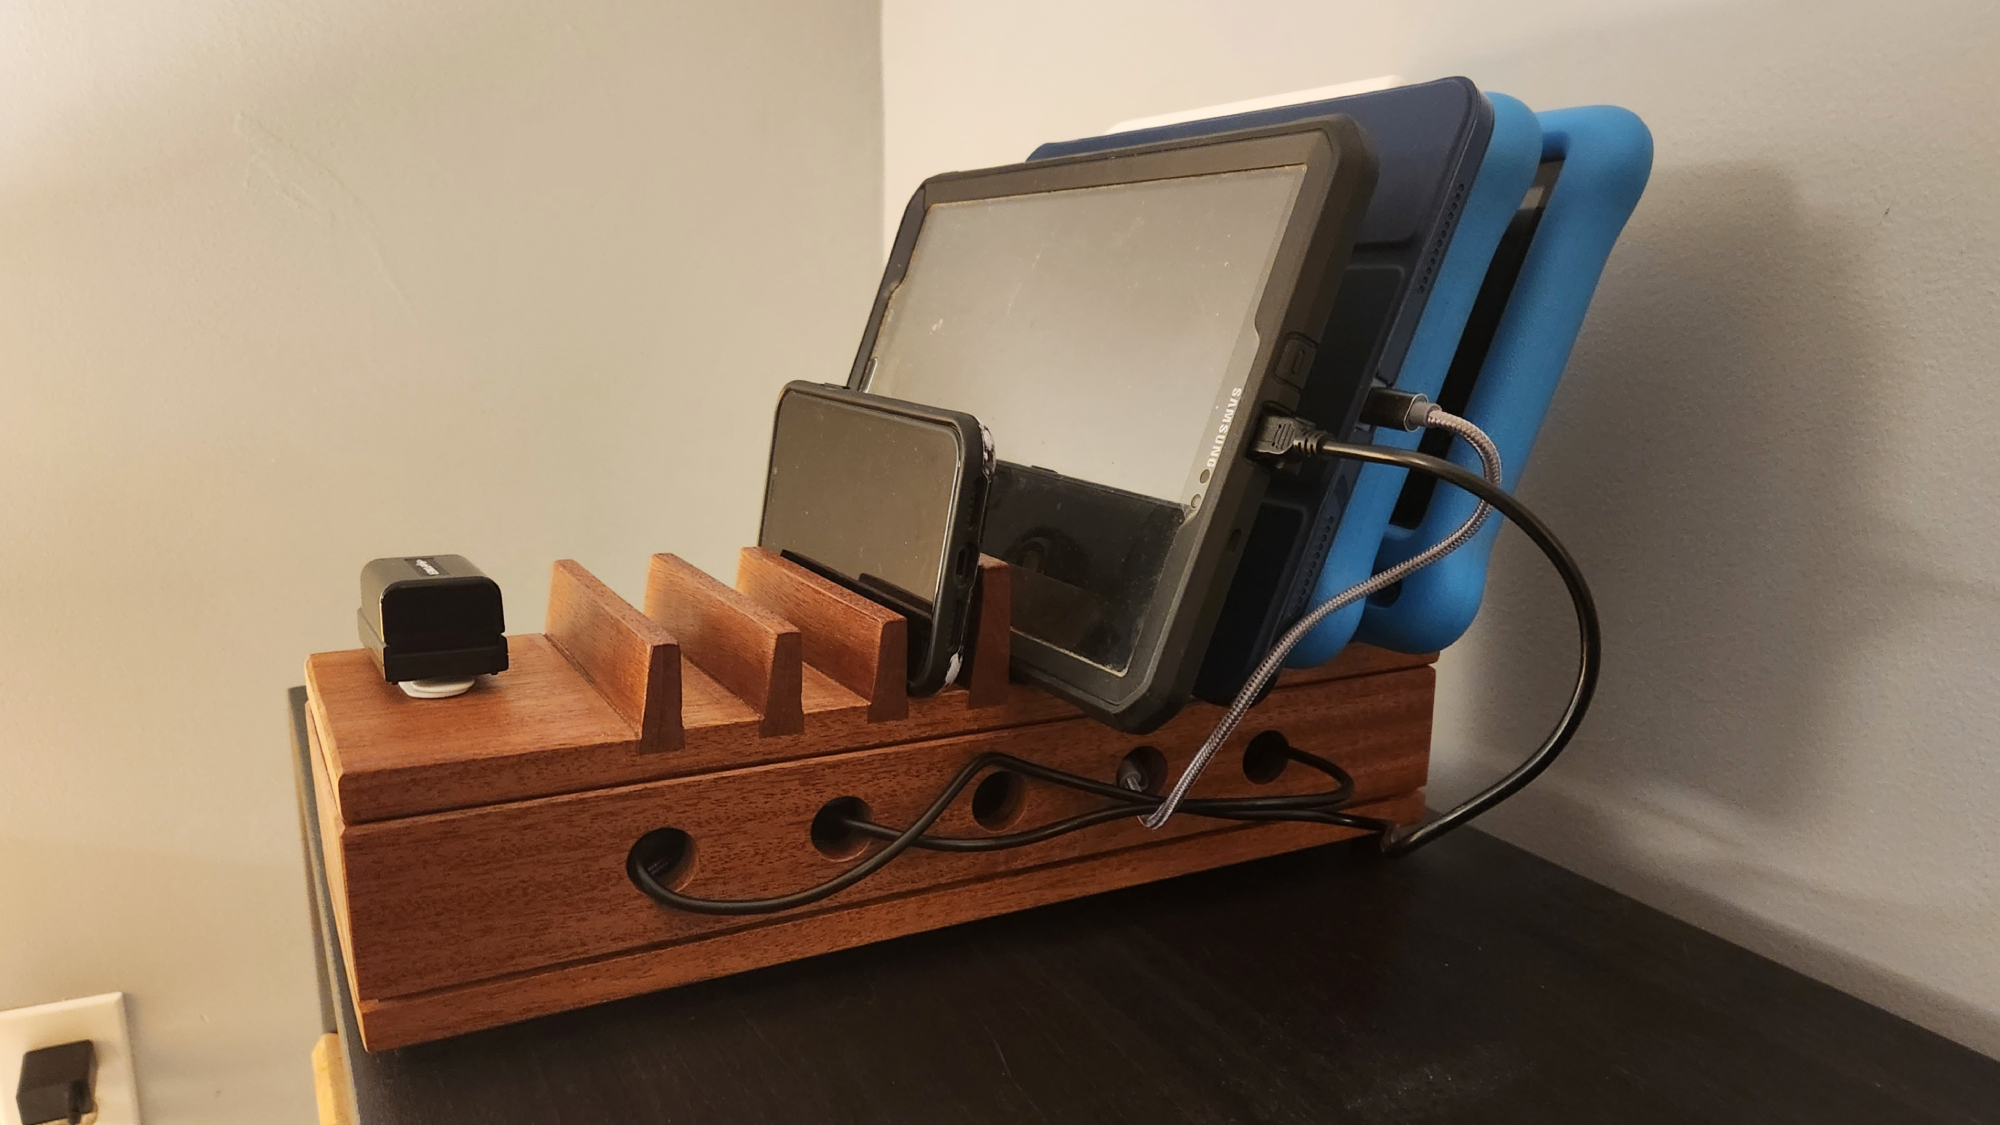
The nice thing about building your own charging station is that you can customize it to exactly what you need. My kids’ tablet cases, for example, are nearly 1 inch thick, which is far bigger than most. The boys are 7, and dropping stuff is a way of life for them, so a thick case makes sense. But many premade charging stations don’t have slots large enough to hold those massive devices. I made sure two of the slots had enough room for their oversized tablets.
While you can absolutely use my design as a template for your own charging station, take some time to catalog your devices and customize it to fit your specific needs.
Warning: DIY projects can be dangerous, even for the most experienced makers. Before proceeding with this or any other project on our site, ensure you have all necessary safety gear and know how to use it properly. At minimum, that may include safety glasses, a facemask, and/or ear protection. If you’re using power tools, you must know how to use them safely and correctly. If you do not, or are otherwise uncomfortable with anything described here, don’t attempt this project.
Stats
- Time: 3 to 6 hours
- Cost: $40 to $75
- Difficulty: moderate
Materials
- 1 (4-foot-long) 1-by-6 board
- 1 power adapter to fit your devices
- Fabric cable ties
- Spray-on polyurethane
Tools
- Jointer
- Planer
- Miter saw
- Table saw
- Crosscut sled
- Tape measure
- Drill press
- Forstner bits
- Orbital sander
- Sanding discs (80-, 120-, 150-grit)
- Wood glue
- Clamps
- CA (cyanoacrylate) glue
- Double-sided tape
- (Optional) brad nailer
How to build a DIY charging station

Control those chaotic wires with this DIY wood charging station #woodworking
1. Mill your boards down to size. There are some projects where you can skimp on milling your boards—box-building is never one of them. Mill all the box parts flat and square so the joints are nice and tight. We have a whole guide on how to mill your own lumber, but there are a few basic steps. First, cut your boards to rough length on your miter saw. This will make them easier to work with and reduce the amount of material you’ll need to remove during the milling process.
Then take them over to your jointer and flatten one face and one edge. If you don’t have a jointer, you can use a flattening sled in your planer and a jointing sled on your table saw. If you don’t have a planer, you can flatten one face with a router sled or a hand plane.
Once one face and edge are flattened and square, run the boards through your planer to flatten the opposite face, use your table saw to trim them down to final width, and grab a miter saw or crosscut sled to trim them to their final length.
When you’re finished milling, you should have 15 boards, all about half an inch thick:
- 2 (5-by-12-inch) for the top and bottom
- 2 (2-by-12-inch) for the long sides
- 2 (2-by-4-inch) for the front and back
- 9 (1-by-5-inch) for the tablet and phone slots
2. Cut rabbets in the top and bottom boards. Rabbets are one of the easiest ways to join the side boards of a box to the bottom. These are just slots along the outside edges of the board, about a quarter-inch deep, that the side boards sit in. This helps align them, provides some mechanical strength, and adds surface area for glue. I cut my rabbets using a half-inch straight-cut bit in my router table, but you can also use a table saw. If you choose the latter, you can either make multiple passes with a single blade or one pass with a dado stack.
[Related: The surprising woodworking tools you already have around the house]
The rabbets on the bottom board should be tight, but you’ll want to cut the rabbets on the cover about 1/16-inch too big to give room to lift the cover on and off as needed. If the top is too snug, it’ll get stuck and be kind of annoying to manage.
3. Cut access holes in the side boards. Before gluing anything together, create access holes for the wires to come out of the box so you can plug everything in. You can do this after assembling the box, but it’s easier before assembly. I used a ¾-inch Forstner bit to cut these.
I cut one hole in the center of the back panel for the main power cord, and five holes in each of the side boards, spaced evenly. Modify the holes to fit the number of cords you’d like to accommodate. I don’t actually need 10 holes, but I wanted flexibility around which side the cables came out of. Plus, five per side looked nicer than three.
4. Sand all the pieces to 150-grit. Anytime you build a box, it’s a good idea to sand all the pieces before assembly. It’s hard to get into all the nooks and crannies once it’s built. I sanded this project to 150-grit with my orbital sander.
5. Glue the side panels onto the bottom. Smear wood glue into all of the bottom-board rabbets and on the ends of the front and back boards, then place all the side boards tight into the rabbets. Use one clamp to hold the front and back together, and a few more to press all of the boards down tight into the rabbets.
As you’re gluing, make sure the boards stay vertical—if they lean in toward the middle of the box, the cover may not fit. You can use brad nails or another fastener like that to hold them in position if you’re having trouble.
6. Cut shallow dados into the cover for the device stands. This is the step where the customization really comes into play. Plan out the position of all of your devices. As I mentioned, my kids’ tablet covers are quite thick, so I needed to create two extra-wide spaces for them.
Mark out the positions of each stand, then cut shallow dados—⅛-inch deep or so—to avoid cutting all the way through the board. Like the rabbets in Step 2, you can cut these with a straight-cut bit in a router, or on your table saw with a single blade or a dado stack. I used my table saw and crosscut sled for this because I feel like I have better control and precision with the sled.

7. Glue the stands into the dados. Smear wood glue into the dados and then press the stands into place. The tricky part is clamping them down, because that’s a lot of clamps in close proximity. You can do this with multiple glue-ups, putting in one or two stands at a time until they dry, then doing another few. I’m too impatient for that, so I placed two scrap boards over the top of all the stands, then clamped those boards down. This allowed me to create even clamping pressure across them all.
You can also screw the stands down from the bottom of the cover if you’re having trouble clamping. I avoided screws because I didn’t want to look at them or fill the holes, and I was somewhat concerned about such small boards splitting.
8. Fill in any holes and gaps. I’m not a good enough woodworker to have every board fit perfectly, so I need to fill in some gaps on most of my projects. You can use regular wood filler for this, but you can make your own by mixing wood glue and sawdust from your project. This matches the color of your wood pretty well, but the drawback is that the glue stains the surface of the wood, requiring a bit more sanding than wood filler.
9. Sand one more time. After assembly, there’s inevitably some glue squeeze-out or rough corners that need to be smoothed over, as well as cleaning up any wood filler mess from Step 8. Give the entire box one more light sanding by hand with 150-grit paper to create a nice surface for the finish, and to clean up any ugly spots.
10. Apply the finish(es) of your choice. Because I love the look of natural sapele, I didn’t apply a stain of any kind to this project. I just used spray-on shellac on the box and cover, sanding between coats, and then rubbed down the final with a brown paper bag to get a perfect finish.
11. Install the power adapter and cord management inside the box. If you’re feeling up to it, you can build a small box inside the larger box to contain the power adapter, but I don’t think that’s necessary. I used double-sided tape to position the charging ports near the back of the box, making sure that the power cord could fit out the rear hole. I also used Velcro cable ties to attach my kids’ camera battery charger to the top so it’s easier for them to access.
12. Plug in and control all the cables. All that’s left is to put all your cables inside and plug them into the power adapter. Use fabric cable ties or twist ties to wrap them up to keep everything organized. Make sure to leave enough of a tail on each one that they’ll be able to reach the device you’re trying to charge—6 to 8 inches did the trick for me. Then just find the right place in your house to put it, plug the power bank in, and start charging devices. No more having to stare at a winding maze of cables on the counter.
