
Humans have been building watchtowers since long before we had the written language to describe them. In the ancient city of Jericho, archeologists found the ruins of a conical 30-foot-tall building that dates back to 8000 BCE. In northeastern Scotland, 2,000-year-old tower-like structures called broches dot the countryside.
By giving people an elevated view of the surrounding landscape, these watchtowers played an important role in history. Military structures allowed soldiers to spot enemies while they were still a long way off; fire lookouts raised spotters above the treetops so they could locate smoke and flames. And in the modern world, aircraft control towers provide a clear view of aviation activity on the ground and in the air.
You don’t need a lofty purpose in order to build your own watchtower. Do it just because they’re fun to make and let you take in a lovely view.
There are many ways to rise above it all. Stone structures take a while to build, but, as the archeological evidence shows, they can last a very, very long time. On the other hand, if you’re satisfied with something a bit more temporary, you can construct an hourglass tower from wood, ropes, and the basic pioneer skill called lashing.
The project earns its name from its shape: The basic superstructure resembles an hourglass. You construct that hourglass form from long poles—called “spars” by those in the know—typically made from thin, strong pieces of wood around 8 feet in length and 2 inches in diameter. Bamboo makes a good material, as it is light, strong, and relatively inexpensive. You can purchase bamboo spars online if you can’t find a local hardware store that carries them.
To hold the spars in place, you’ll have to lash them together with rope, using special knots to make the junctions secure. The lashing construction method requires fewer tools than a hammer-and-nails build, but it does force you to learn a bit about knots before you get started.
You start by lashing spars into two tripods. To stabilize your viewing platform, you must give the lower tripod a wider base than the upper, and make the structure as symmetrical and well balanced as possible. Then you lash the two tripods together. Finally, you must stake the tower securely to the ground to prevent it from tipping over. A staking method called the 3-2-1 technique should do the trick.
Because the tower will elevate you above the ground, you should take care to make it as secure as possible. Be cautious when raising and using the structure, as falling off the platform could be very dangerous. This is a DIY build, so the outcome depends upon the quality of the materials you select and your construction abilities. If any part of the structure fails—say a spar snaps, a rope breaks, or a knot fails—the tower could fall, injuring anyone on or below the hourglass. Ropes will stretch and spars will bend over time, loosening the connections, so inspect your tower frequently and retie the knots if required. As always, take safety precautions, and build this project at your own risk.
Bearing the risks in mind, this sturdy take on the classic watchtower is easy to build, goes up quickly, and doesn’t break the bank. Plus, when you get tired of keeping watch, you can easily disassemble the hourglass and reuse the materials to make something else.
Build your own hourglass tower

Notes on knots
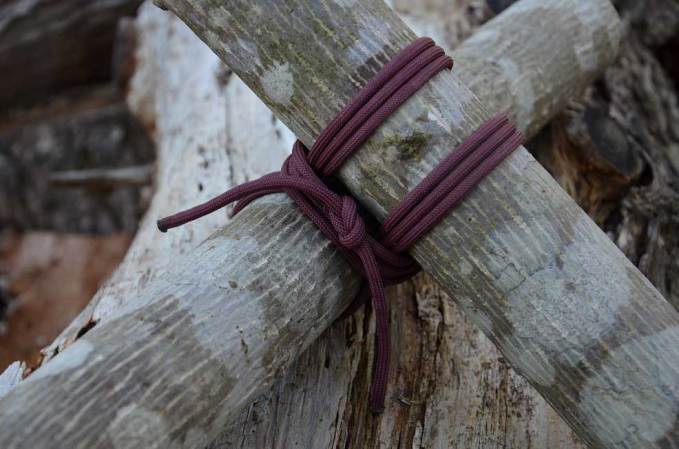
For this project, you’ll rely on knots to securely bind together the lightweight building materials into a strong, rigid structure. Before you get started, you need to know how to tie two types of knots: the clove hitch and bowline. In addition, you’ll connect ropes together with two types of lashings: the square lash and the tripod lash.
If you don’t know how to tie these, don’t panic. They are easy to learn, and once you get the knack, you’ll find them useful in many ways—not just for constructing watchtowers. Follow this guide to essential knots to practice tying clove hitches, bowlines, square lashes, and tripod lashes.
Once you’re comfortable with these knots, you’ll be able to construct not just the hourglass tower, but lashed structures of all sorts.
Tools
- Leather gloves
- Sharp knife or scissors
- Tape measure
- Saw
- Sledgehammer (for pounding stakes into the ground)
Materials
- 400 feet of 3/8-inch-diameter manila rope
- Duct tape
- 6 spars (bamboo rods 2 inches in diameter and 8 feet long)
- 6 poles (bamboo rods 2 inches in diameter and 8 feet long)
- 3 platform rails (bamboo rods 2 inches in diameter and 4 feet long)
- 6 platform base rods (bamboo rods 2 inches in diameter and 2.5 feet long)
- 7 steps (bamboo rods 2 inches in diameter and 1 foot long) OR a stepladder
- 9 wooden stakes (approximately ¾-inches in diameter and 2 feet long)
- 6 wooden windlass poles (approximately ¾-inches in diameter and 1.5 feet long)
Instructions
Before you get started, cut the rope into 15-foot-long pieces. To prevent fraying, attach small pieces of duct tape to each rope length’s ends.

Begin the construction by tripod-lashing three 8-foot spars together. Position the tripod so that there are about 6 feet between the points where each spar touches the ground. When you’re done, you should have three spars left over.
Next, square-lash one 8-foot pole to each side of the tripod, so they hit about a foot up from the ground. When you’re done, you should have three poles left over.

Loosely tripod-lash the three remaining 8-foot spars together. This is only a temporary connection—in order to form the hourglass, we will later undo this particular tripod. Position the temporary tripod so there are about 5 feet between the points where each spar touches the ground.
Square-lash an 8-foot pole to each side of the tripod you just made, so they hit about one foot up from the ground. Make these square lashes strong and secure. You can use a saw to cut away the overhanging pole ends if you want, although it’s not really necessary.
Square-lash a 4-foot platform rail to each side of the temporary tripod you just made, setting each rail about halfway between the tripod lash holding the three spars together and the base of the pyramid. Attach the 2.5-foot-long platform base rods to the platform rails with square lashings. Cut off any overhanging bamboo ends. When you’re done, this temporary tripod should match the image of the watchtower top.

Now comes the tricky part. Turn both tripods so they rest on their sides. Untie the temporary tripod’s tripod lashing and then weave its spars through the other tripod so that each one of the unlashed spars comes into contact with one of the tripod-lashed ones.
At this point, the structure should look like a bit like a pyramidal hourglass tipped on its side. Use a tripod lashing to tie the three free spars back into a point. You may find this tripod-lashing knot slightly more difficult than the previous ones, because the three spars no longer lie flat. Keep working, making sure to pull the turns as tight as possible so the connection won’t slip.
Once the structure is connected, flip it so that the 6-foot tripod is on the bottom and the 5-foot one on the top. Luckily, the bamboo is light, so this shouldn’t be too difficult.
Have a helper hold the upper tripod in place while you add more ropes to secure the pyramids together: Square lash the three points where the spars from one tripod touch the spars from the other. (If necessary, flip the structure back onto its side during this process to make sure the knots are secure.) Eyeball the structure to make certain the hourglass is straight and not crooked. When the structure is true, tighten the square lashes as much as possible and tie them off.

Your tower is beginning to take shape, and you may notice that it’s tough to climb into. So we’ll need either a stepladder or a homemade rope one. To build the latter, cut one of the 15-foot ropes into two parallel pieces. With a series of clove hitches, tie the 1-foot-long bamboo steps to the ropes at 9-inch intervals. Attach the rope ladder to the platform rail with clove hitches.
For each spar of the bottom tripod, loop a rope between the tripod lashing and the middle of a pole of the upper tripod. In the Step 4 image, these are the rope loops marked “A.”
On the top tripod of the hourglass, repeat what you just did on the bottom: Loop a rope between each square lash junction of the tripod lashing and a spar of the bottom tripod.

Next, use the Spanish windlass technique to tighten each “A” rope loop so they have about the same tension: Place a stick between the two ropes in each loop and twist the stick until they’re equally taught. Then place the end of the stick against a pole that will prevent it from untwisting. Do this for the rope loops on the top and bottom tripod of the hourglass.

To keep the structure from tipping over, we’ll use ropes to anchor key points on the structure to the ground. These rope anchors are known as guy lines. Run a rope loop from the three uppermost square lashings to a stake in the ground. In the Step 4 image, they are labeled “B.” Use the 3-2-1 staking method, as shown in the Step 6 image, to prevent the stakes from working loose. Tension the guy ropes with a Spanish windlass.
Add a second set of tensioned guy rope lines between the tripod square lashings and the stakes. In the Step 4 image, these are labeled “C.” Tighten the loops using a Spanish windlass.
Your watchtower is complete. Carefully climb up the rope ladder and enjoy the view!


