
This story was originally featured on Outdoor Life.
In a winter wilderness emergency, there’s no question that finding or building shelter is going to be your top priority (unless someone in your party requires urgent first aid). In the bone-aching cold, hypothermia can begin to take hold within minutes, and in severe weather conditions, the cold can be fatal within a few hours if there isn’t some type of shelter defense from the elements. So when you need to protect yourself from the elements, find yourself wet or poorly dressed in the winter wilds, or you’re just stuck somewhere unexpectedly for the night, you need to be able to build a shelter using accessible materials and the landscape. Thankfully, there are a number of survival shelter designs you can build with a few tools (or none) on the frozen winter landscape. Here’s a quick look at just a few.
An insulated tree well

In woodlands with deep snow, finding shelter can be as easy as locating a naturally occurring tree well. These are gaps or swaths of ground with a lower density of snow under evergreen trees. When the snow collects on the tree boughs (rather than under the tree), it creates a natural pit, which can be easily adapted into a shelter. If possible, dig down to the bare ground and push the snow to create a small wall around the well to block wind. Since a fire would melt the snow covered boughs overhead, your best bet for warmth is packing the well with insulating materials. If you can manage to find a few rocks in the snow, use a fire to warm them and place them in your bedding for heat.
A snow trench

If the snow is solid enough to cut into slabs, you can use a saw to cut blocks out to form a trench and position the blocks like a ceiling to cover it. In the event the snow won’t hold together to build solid building blocks or you are caught without tools, you can still dig out a trench and cover it with a flat roof of poles, tree boughs, and an insulating layer of snow. Either way, the snow trench works well in flat areas and is ideal for a quick one- or two-person snow shelter.
A snow cave

A snow cave may be the only shelter option in areas with deep snow. This is typically the most dangerous shelter to create, as the inhabitants could suffer from low oxygen or even be buried alive if the ceiling collapses. That’s why snow selection is so critical. Select a deep, solid snow bank or drift. Dig into the side of it and form a tunnel into a low spot. This is the “cold well,” which is a place where the coldest air can fall and collect. Then dig up and over creating a shelf or platform to sleep on. This should be the highest part of the shelter. Dig a small hole about 6 inches in diameter somewhere in the roof for ventilation, especially if you plan on blocking the entrance with a doorway like a backpack or big chunk of snow.
An igloo

The most impressive winter shelter is the igloo. This spiraling dome of artfully carved blocks is an engineering masterpiece. When properly built with the right quality of snow (yes, there are different types and qualities of snow), temperatures inside can climb above freezing from mere body heat, even when the world outside is far below freezing. Start with a triangle-shaped block, then move to trapezoidal blocks, all with tapered edges. The final block is the “keystone” piece in the center of the ceiling. An amateur can make a tolerable igloo if they are good with their hands and have a sense of geometry, but they’ll never make an igloo like one made by someone who practices these skills regularly. Like other snow shelters, the igloo works best if it includes a cold well, a door, ventilation holes, and a sleeping platform.
A quinzhee

The quinzhee is a dome-shaped snow shelter, similar in shape to an igloo, but much easier to construct. Snow must be just right to build an igloo, while you can pack together most types of snow for a quinzhee. To build one, start by piling up some moveable gear, like backpacks, under a tarp. Then pile snow over the tarp and gear. Pack the snow down until it’s about 2 feet thick all the way around. Next, insert three- or four-dozen 12-inch-long sticks around the dome. Burrow into the side of the quinzhee and retrieve the tarp and gear. Excavate snow inside the mound until you reach the base of every stick. This will ensure the dome has a uniform thickness. Last, make a fist sized ventilation hole in the roof of the quinzhee.
Add a bough bed

While this is not a shelter by itself, a thick bough bed makes an outstanding addition to any type of shelter large enough to accommodate it. To make a bough bed, you can use leaves, grass, evergreen boughs, or other plant material for insulation. Cedar and pine boughs are common enough in many places, but fir boughs make the softest bed. Spruce can be the least-comfortable evergreen bough, since the needles are so sharp. Start building by creating a bed frame. Roll up two logs longer than you are tall, side-by-side, about 3 feet apart. Fill the void between the logs by laying down the boughs, several at a time. Dead, dry leaves or dead grasses can be a great addition if you have them. In snowy conditions, you’ll just have to work with boughs. Make the mattress so thick that you are still at least 6 inches from the frozen ground or snow surface when lying down. Keep adding armloads of boughs or other vegetation if the mattress compresses too much or isn’t warm enough.
A lean-to

One of the simplest and most frequently constructed primitive shelters is the lean-to. You can set one up in less than an hour with a variety of materials and the basic, one-sided design will give you a haven from some of the wind and rain the wilderness might throw at you. Securely support a long, stout pole between two trees. Cover one side with poles, brush, or branches. Then heap leaves, grasses, palm fronds, or any other vegetation that is available on top. The flaws of this shelter are the fact that it doesn’t hold in any heat, and if the wind or rain changes direction, you’ll no longer be sheltered. Think of it as a house with only one wall and half of a roof. It offers little in the way of insulation; and merely deflects wind and reflects the heat of the nearby fire. When the fire goes out, the warmth goes too. But the advantage to this type of shelter is you can build it fast.
A leaf hut

The leaf hut is a two-sided, wedge-shaped lean-to, with much better weatherproofing and insulating qualities. To build one, select a long, sturdy pole 9 to 12 feet long. Prop it up in the fork of a tree or set it on a rock, stump or two forked prop sticks. Then cover the sides of the pole with tree branches to act as ribs. Place the branches close together at an angle along both sides of the ridge pole so your hut covering won’t fall through. Next, pile vegetation over the framework. You can use anything that traps air like leaves, grass, ferns, moss, pine needles, brush and tree boughs, and the material can be wet. About 2 to 3 feet of vegetation covering all sides of the shelter is enough to keep you dry inside. Finally, fill the inside of the hut with a thick pile of vegetation for your bedding.
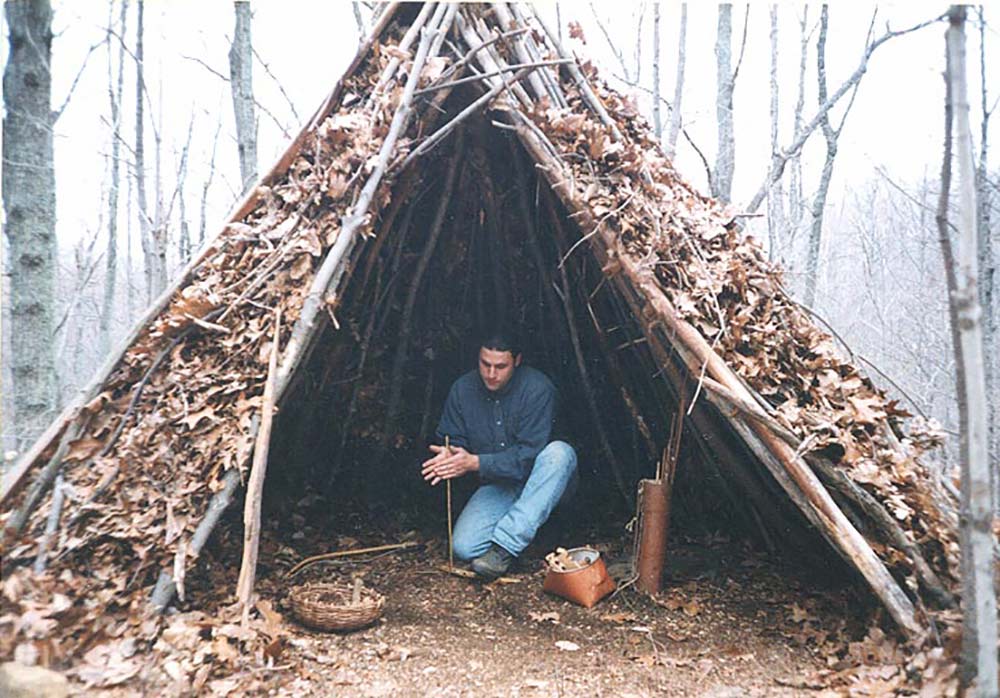
Try a wickiup
The wickiup is a bit like a small tipi made from poles, brush, and vegetation. This shelter style is used around the globe, but has been most frequently documented in the American Southwest. Thick brush, grass, and leaf coverings along with a steep roof can make this shelter suitable for climates with occasional rain. A broader, stockier structure covered with light brush can give you a shady, ventilated shelter for hot, dry climates. Collect several dozen poles, some with forks at the top. Lock a few of these forks together to build a freestanding tripod. Then prop the other poles around the peak to create a cone-shaped tipi frame. Finish with the vegetation layer. If the wickiup is large enough, and the vegetation covering the roof is wet or green material, it may be safe enough to build a tiny fire inside this type of shelter.
