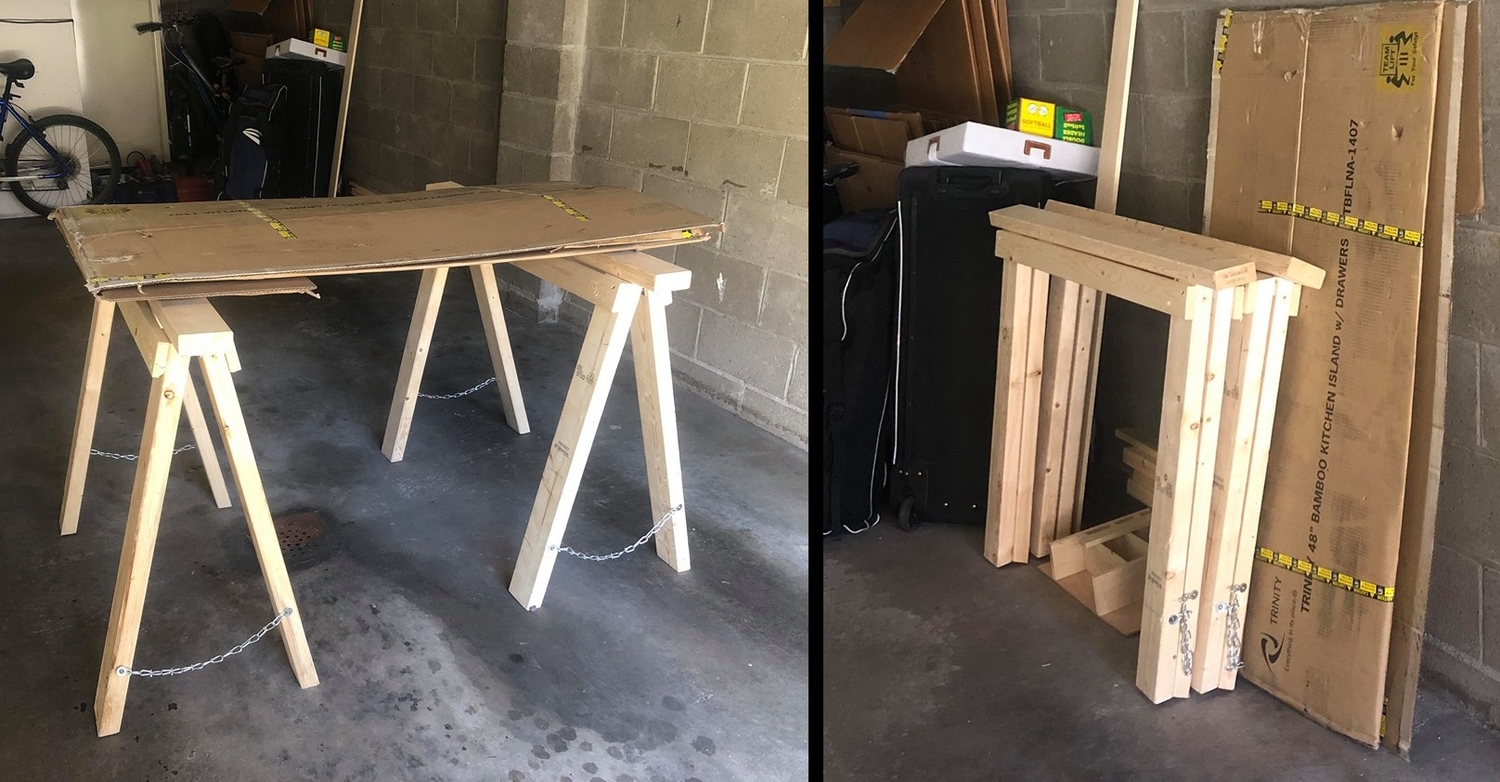
Saw horses are a must-have for every serious DIYer, whether you’re actually using a saw or not. Just set ‘em up, drop something flat on top (maybe a piece of wood or a sturdy, flattened box), and you’ve got a work surface ready for woodworking, wiring electronics, or pretty much anything you’d do on a table. They’re even more valuable if you don’t have a lot of space or a dedicated work area in your home. Plus, they’re easy to make.
Rigid saw horses are the simplest—often nothing more than five pieces of wood nailed together—but they take up a lot of room with their permanently splayed legs. So if space in your house or apartment is at a premium, foldable saw horses are the way to go, even if building them is slightly more complicated. When you’re done working, you’ll be able to close the legs and store them snugly against a wall or in a tight space until you need them again.
Stats
- Time: 30-45 minutes per horse
- Cost: $20-$30 per horse
- Difficulty: easy
Materials
- 5 (8-foot) 2-by-4s
- 2 (8-foot) 1-by-3s
- 4 (3-inch) door hinges with removable pins
- 8 feet of light chain, optionally pre-cut into 12-inch lengths
- 2-inch screws
- 3-inch screws
- 8 (3/4-inch) metal washers
Tools
Instructions
1. Set up your work area. If you’re building saw horses, you probably don’t have a proper workspace, so here’s your chance to improvise. I put a big, flat box on top of two garbage cans.
2. Cut the top boards. These sections of 2-by-4 will be your load-bearing surfaces—your horses’ backs. Most saw horses are between 42 and 48 inches long, but you should pick what works best for you. I cut mine at 42, which is the answer to “life, the universe, and everything.” As you will for every cut you make during this project, mark the wood at the proper length, and use the square and pencil to draw a straight line to guide your saw. Once you’ve made your cuts, use the sandpaper to quickly get rid of any splinters—it’s better than stabbing yourself later.
- Tip: If you’re working alone and don’t have a miter saw, use a hand saw to make your first cuts. Cutting 42 inches off an 8-foot 2-by-4 means all that wood is going to be unsupported, and it will constrict the spinning circular saw blade as it falls, stopping it or kicking the saw out of the wood. That’s useless, at best, and unsafe, at worst. You should be able to manually cut through a 2-by-4 in less than a minute—and if you go fast enough, your cut piece will fall cleanly to the ground.
3. Rough-cut the legs. A comfortable saw horse height is directly related to the user’s height, so the length of these will vary based on your needs. (For example, a 32-inch-tall saw horse is generally fine for a 6-foot-tall person.) To make this step a bit easier, cut your remaining 2-by-4s into four pieces of 40 inches each. That will give you some length to play with.
- Tip: Stand upright and hold your arm by your side. Then, without moving the rest of your arm, flex your wrist until your hand is horizontal, palm facing down. The distance from your palm to the ground is approximately the height your saw horses should be.
4. Figure out the angle you want between your saw horse’s legs. Mine are splayed at 30 degrees, but you might like something different. Anywhere between 25 and 35 degrees should work well; anything narrower will mean taller, less-stable saw horses, and anything wider will take up more space.

5. Cut the tops of your saw horse’s legs at an angle. Once you’ve got your leg separation angle set, you’ll need to cut the top of each leg at an angle that’s half that. Given that my angle was 30 degrees, the cut had to be 15 degrees. Quickly square a straight line across the widest surface of each leg and about 1/4 inch from the end to serve as a guide. Then, set your saw at the proper angle, line the blade up at the line, and make your cut. Repeat for each leg.
6. Figure out the proper length of your saw horses’ legs. This is important to ensure that the saw horses will be the height you desire. I wanted mine to be 32 inches tall, so I subtracted the width of the top board (1.5 inches), to get 30.5 inches from the ground to the bottom of the horse’s back. Essentially, each leg is the hypotenuse of a right triangle, and I’d just figured out the triangle’s height. The problem was, I didn’t know the length of the other two sides. If you’re good at math, you can probably solve a couple equations to get those numbers—but I’m much better with words than I am with numbers, so I used a calculator I found online. It told me each leg should be 31.5 inches long, and it was right.
- Note: If you use the calculator I’ve linked, select the option that allows you to input both the length of the base and the angle. My numbers, for instance, were 30.5 for base and 15 for angle.
7. Prepare to cut the bottoms of your saw horses’ legs at an angle. This is where things get a little tricky. It’s the same angle as the tops of the legs (15 degrees, in my case), but oriented in the opposite direction. Essentially, you’re turning each leg into a parallelogram. If you make the wrong cut here, the leg will be useless.

8. Cut the bottoms of your saw horses’ legs. Lay one saw horse leg on your work surface, widest surface up, with the uncut end off the edge, ready to be cut. Make sure the other end is laying with its angled cut sloping up, like a hill, not down, like a rocky overhang. Measure your desired length, mark a line across the wood, and make your cut. Repeat until all legs are the proper length.
- Tip: It will be hard to measure from the angled end of the 2-by-4, so measure from the uncut end to where the wood starts sloping down. Then, subtract your desired length from the actual length and mark that on the wood. My legs were 39.5 inches from the uncut end to the beginning of the downward slope. So, I marked a line across the wood at 8 inches and made my cut there. Perfect.
9. Attach the hinges. Get two saw horse legs and lay them end-to-end, the angled cuts touching on top, not at the bottom. Knock the connecting pin out of the hinges and center one hinge half on the end of one leg where the two touch. Do the same with the other half. They shouldn’t interlock or hang over the edge of the leg they’re on. They should, however, look like they’re about to fit together like two pieces of a puzzle. Screw them down with the screws they came with.
- Tip: You can knock the connecting pin out by hammering a nail punch or pretty much any thin piece of metal (a screw, perhaps) into the opposite end from the pinhead.


10. Connect the hinges. Lay the legs on their sides next to each other so the hinge halves fit together. Hammer the pin back into the hole it came out of.
- Tip: The hammer won’t fit down between the legs, so once the pin gets most of the way in, finish the job with the nail punch or turn a screw upside down and hammer the pointy end.
11. Attach the legs. Put the 2-by-4 that will be your horse’s back on your work surface and mark a line about three inches from each end. The legs will go inside that line. Grab some 3-inch screws and your drill driver and sink one into each side of the leg closest to you, fastening them diagonally into the wood. Repeat this for each set of legs.
- Warning: Do not screw both legs into the horizontal board: One leg in each pair should be free-floating—only attached to the hinge.
- Tip: If you’re working alone, simply let the legs rest against your chest or shoulder and hold them with your free hand while you put the screws in.
- Bonus tip: It will be hard to drive the screws vertically down in a straight line right at the beginning. Get them started at a more horizontal angle, and once they’ve just bitten into the wood, straighten them out to continue on.
12. Cut the 1-by-3. Measure the length between the outside edge of the legs on each long side of your nearly finished saw horses. Then, cut the 1-by-3 boards to fit.
- Tip: Again, if you’re alone or don’t have a miter saw, use a handsaw for this.
13. Attach the 1-by-3s. Lay a piece of 1-by-3 against the same-side legs of the saw horse, making sure it’s flush against the top and outermost edge of the legs it’s resting on. Use four 2-inch screws to fasten it to the legs (two on each leg). This will keep them sturdy and ensure they move in unison. Repeat this step for every set of legs.

14. Attach the chain. Mark a spot about eight inches up each leg where you will fasten your chain. Put a washer around a 2-inch screw and put it through one of the chain links. Once you fasten it in place, the washer will keep the chain from slipping over the screw. Fully open the legs and do the same on the other leg. If you haven’t cut the chain already, cut it now and repeat this step on each pair of legs.
- Note: The chain doesn’t have to go eight inches off the ground. I chose that height because it’s high enough that I won’t trip on the chain and low enough that it should keep the legs from opening too much under heavy weight.
Done. Now you’ve got a solid pair of foldable saw horses that will allow you to quickly set up a real workspace in your yard or garage. Then, when you’re finished, you can stow them away just as quickly.
