The most basic work surface is just a flat, mostly stable thing big enough to hold whatever you’re working on. But while you might be able to disassemble an old video game console in your lap, a dedicated DIY workspace will make the job exponentially easier.
Still, not everyone has enough space for a full workshop, and some may find it hard to even set aside enough space for a permanent work table. I’m in the latter group, and have been working on top of a flattened cardboard box and two trash cans for several weeks. Things became easier recently when I built myself some folding saw horses, but that wasn’t enough—it was time for an upgrade.
The final product here falls somewhere between an actual workbench and a piece of plywood laid across two saw horses. It’s sturdy enough to hold your project, locks in place so it won’t move while you’re working, and can be easily stored against the wall when you’re done.
Stats
- Time: 30-45 minutes
- Cost: $30-$70
- Difficulty: easy

Materials
- 1 (4-by-8-foot) sheet of 3/4-inch plywood (or fiberboard)
- 2 (8-foot) 2-by-2s
- Wood screws (2-inch)
Tools
- Circular saw (or miter saw)
- Hand saw
- Measuring tape
- Square
- Drill driver
- Dust mask
- Safety glasses
- Pencil
Instructions
1. Choose your surface material. You’re going to be working on top of this for the foreseeable future, so this is an important decision. Two common options are plywood and medium-density fiberboard (MDF).
- Plywood: More expensive than fiberboard, but stronger. Higher-grade plywood is smooth and looks nice, while lower-grade sheets may catch your hands with splinters as you work on top of it.
- MDF: Stronger than particle board, this material has a smooth surface, but because it’s made out of wood fibers, it won’t be able to hold as much weight as plywood of the same thickness. I chose MDF because I wanted a smooth, low-cost surface and because most of my projects are simple woodworking and electronics tinkering, so I am not planning to put too much weight on it.
2. Decide your surface’s size and thickness. The size of your work surface will be dictated by your available space, but unless you’re making something quite small, you’re probably going to end up buying a 4-by-8-foot sheet. The thicker your material is, the stronger it’ll be and the less it’ll bend under any weight. I went with 3/4-inch MDF because it’s sturdy enough for my needs, but depending on your plans, 1/2-inch plywood or something thicker might work well, too.
3. Cut your surface to its proper length. For two saw horses, eight feet was too long and sagged slightly in the middle, so I decided to cut it down to seven feet. There’s a bit of flexibility here depending on how much space you have available, but this design likely won’t work well if the surface is any shorter than five feet long. Measure the length you want along one side of the sheet, mark that spot with your pencil, and use a square to draw a longer line to guide your cutting. Then, run your circular saw across the sheet, following the line.

- Tip: You’re going to have to run the saw the width of the material, so unless you’re confident in your cutting skills, you’ll want to draw a line all the way across. To do so, measure along the opposite side and draw another line with the square. Then, using a long, straight object, such as another piece of wood (or a framing square, if you have one), connect the two lines. If you have neither, you can roughly slice a couple inches off the end of your sheet. The factory-cut edge will serve as an adequate straight-edge.
- Warning: Ripping plywood and MDF creates a lot of dust, so it’s important to do this in a well-ventilated area. You should also wear a dust mask to prevent yourself from inhaling any of the sawdust, especially when working with MDF, which is just a bunch of wood fiber glued together.
4. Cut your surface to its proper width. I considered cutting mine the width of my saw horses (42 inches), but instead opted for 36—it’s the farthest I could reach across the sheet and will allow me to access every inch of my work surface. This step is a duplicate of Step 3, but you’re doing it on the longer side of the sheet.
- Tip: Because you’re ripping a longer distance, there’s more of a chance that your saw strays from your desired cutting line. If that happens, don’t try to push the saw back to the line. Stop cutting, back up a bit, and come at it again from straight on.
5. Prepare to install the saw horse brackets. If you’ve chosen one side of your sheet as your preferred work surface, position it so that side is facing down. Also make sure the front of your surface (likely the long edge you didn’t just cut), is facing you as you begin the next step.
6. Mark the saw horse bracket locations. While facing your sheet, mark a line 12 inches in from the right-hand edge. Mark another line 15 1/2 inches from that edge. If your saw horses have 2-by-4 tops, they’ll fit between those marks. If not, tweak these measurements to fit the tops of your saw horses. Then, with the measuring tape between those lines, mark another one 4 inches back from the front edge. This will be the front of the saw horse bracket. Repeat this step on the left-hand side of the sheet.

- Tip: If you have a spare 2-by-4 block, you can use it as a template to help you understand where the lines should go. It’ll also be useful when you’re installing the brackets themselves.
7. Cut the 2-by-2s. These pieces of wood are small enough to fit around the saw horses and keep them in place while not getting in the way of the saw horse legs or adding too much weight to your work surface. They’ll run from the four-inch marking to the back of your sheet, so if you cut your sheet three feet wide (36 inches) like I did, these will be 32 inches long. Mark a line where you want to cut and use the hand saw to slice off a piece. Repeat this step until you have four pieces.
- Tip: The hand saw is useful here because you’re probably going to have lengthy pieces of wood on both sides of the cut. If you use a power saw, the cut piece will bind the blade when it falls. Using a hand saw avoids that problem.

8. Fasten the 2-by-2s in place. Lay one of your 32-inch 2-by-2s along one of the front-to-back guide lines and fasten it in place with a screw through the top, about two inches back from the front. Make sure the 2-by-2 is straight (double-check measurements and draw new lines if you have to), and do the same on the opposite end, near the back of your sheet. Put two more screws along the length of the piece, each about 12 inches from the screws you put in at either end. Repeat this step until each 2-by-2 is in place.
- Tip: If you’re concerned about your screws going all the way through the sheet on the other side, drive them in at an angle and don’t push them too far below the surface of the 2-by-2.
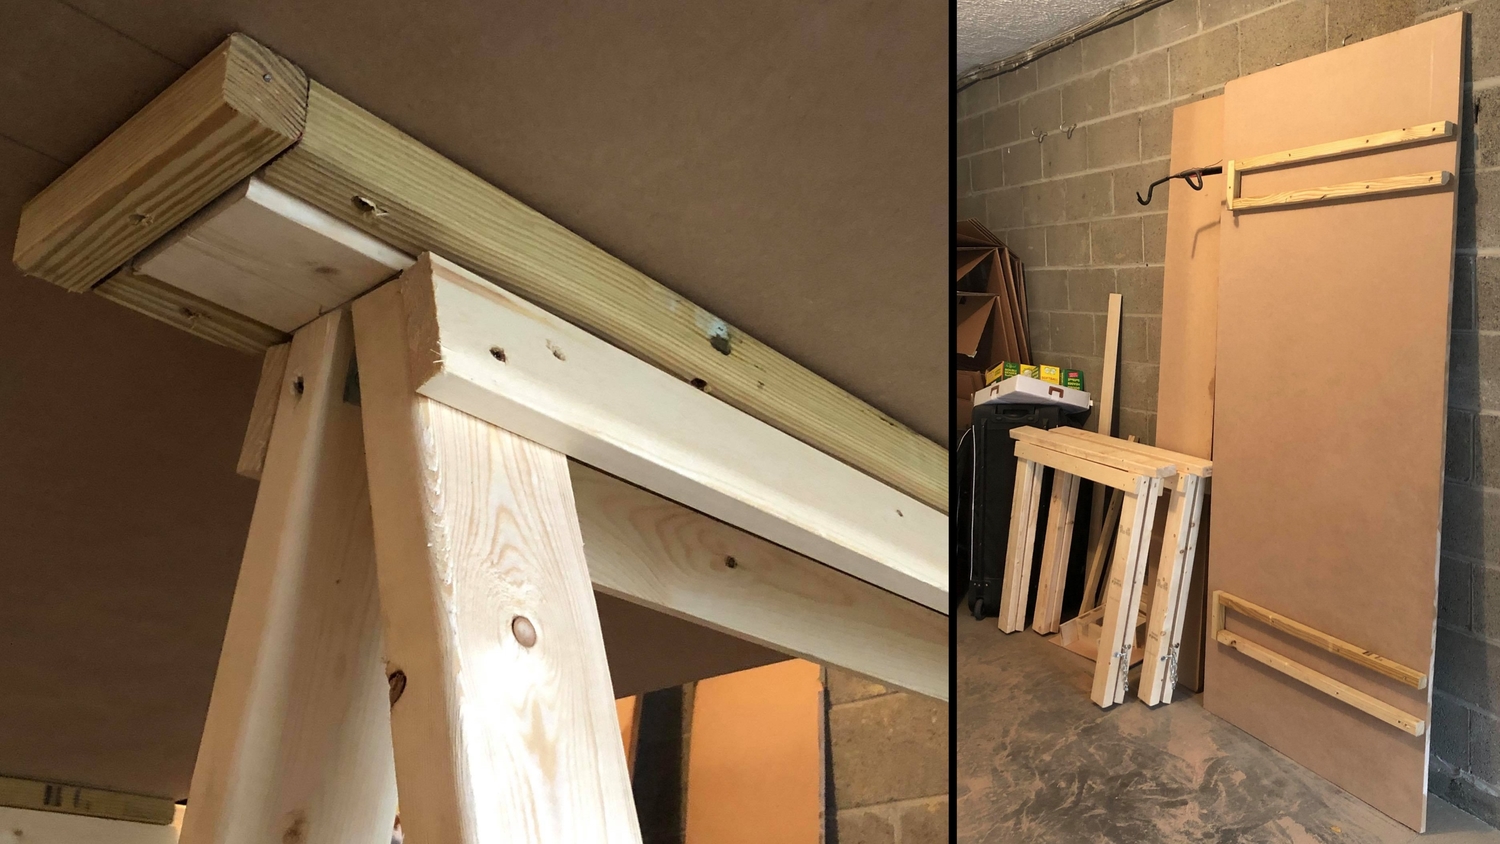
9. Finish the brackets. For the front of the brackets, you’ll want a single piece of 2-by-2, about 6 inches long. You can easily cut these lengths with a circular saw or a hand saw, whatever your preference. Once you’ve got two of these pieces, use them to close off the front of the brackets (the opening 4 inches back from the front of your sheet). A single screw through the middle should do the job, as anything more might split the wood.

10. Flip the sheet over. Once you turn it right-side-up, fit the saw horses into their bracketed slots and you’re good to go. When you’re done working, simply lift the sheet off the saw horses and lean it up against the wall. Cleans up nice.
