Drawers are good. They hold stuff. No, I’m not some kind of weird internet drawer salesman, and this story wasn’t sponsored by Big Drawer. But hear me out: I didn’t buy a single piece of wood for this build. None—it’s all scrap.
Reusing those leftovers meant I could install a drawer under my work area, giving me space to store various tools and supplies without piling them on top where I work. A handy addition, as extra storage is always welcome.
I did buy the drawer slides, though. Odds are, you will, too. There are simple, inexpensive ones, but you can also spend a few extra dollars for more advanced capabilities and increased carrying capacity. I chose soft-close slides that automatically finish shutting the drawer because I knew I’d want to just push it and forget it, without having to worry about it jutting out from under the table.
Stats
- Time: 1-2 hours
- Cost: $10-$25
- Difficulty: easy
Materials
- Drawer slides
- Medium-density fiberboard (MDF) (or plywood)
- 2-by-2 wood spindle (or scrap 2-by-4 pieces)
- Wood glue
- 1 1/2-inch finish nails
- 2-inch wood screws
- (Optional) drawer knob or handle
- (Optional) scrap wood to build your own handle
Tools
- Table saw (or circular saw)
- Miter saw (or circular saw)
- Measuring tape
- Square
- Hammer (or brad nailer)
- Drill-driver
- Pencil
- (Optional) bar clamps
- (Optional) sandpaper
Build the drawer
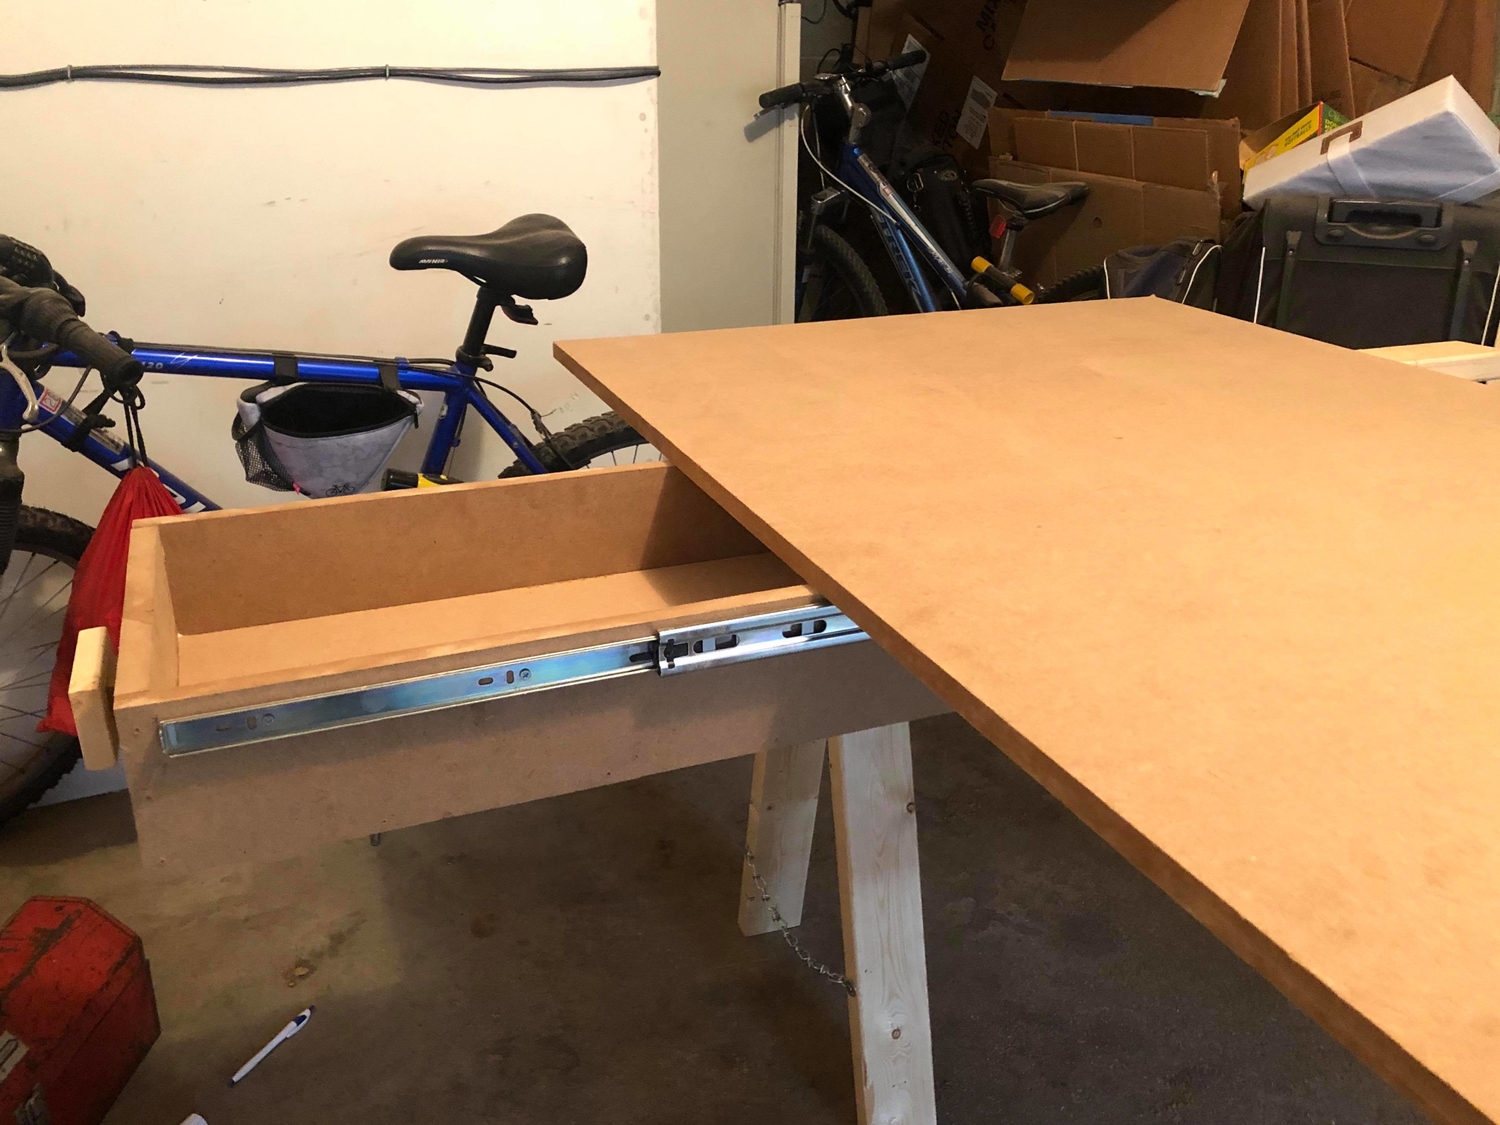
1. Plan the bottom of the drawer. I had a long piece of MDF about 13 inches wide left over from cutting my work surface, so I decided my drawer would be 12 inches wide. Trimming it down allowed me to straighten the edges, which had been damaged while sitting in my garage. I’d also purchased 20-inch drawer slides, so I decided to make the base 20 inches long. Make whatever marks or guide lines you need to ensure accurate cuts in the next step.
- Note: Your available scrap wood may dictate the size of your drawer, but if not, its width is pretty flexible. Its length, however, should be as close to the length of the slide as you can get it. That way, you’ll be able to use as much of the storage space as possible.
2. Plan the sides of the drawer. Drawer slides can only hold a certain amount of weight, and the more your drawer weighs, the less you’ll be able to store in it. I started this project thinking I could have my drawer be 6 inches deep, but that was simply too bulky and I settled on 4 inches. As you plan your cuts for these, you’ll have to take into account the other pieces of wood that make up the drawer. Here’s how mine broke down:
- Front and back: 4 3/4 inches deep, 12 inches long. I knew I wanted to nail the sides of the drawer into the front and back pieces, so I kept these the width of the drawer. But I had to take into account the 3/4-inch thickness of the MDF, so I added it to my 4 inches of drawer depth.
- Sides: 4 3/4 inches deep, 21 1/2 inches long. The depth must stay consistent, but I had to add the 3/4-inch thickness of the front and back pieces so the side boards would cover them.
3. Cut the bottom of the drawer. Use a table saw to cut a rectangle for the bottom of the drawer, using the measurements you decided upon in Step 1.
- Note: If you don’t have a table saw, you can use a circular saw for this, though it will require more patience and time. You’ll need to ensure the saw does not stray from the measured lines you drew in the first step because if your cuts are less than straight, there will be gaps in your drawer.
4. Cut the sides of the drawer. Use a table saw to rip the sides to the proper width (4 3/4 inches for me) and either a miter or circular saw to cut them to the proper length.
5. Attach the back and front of the drawer. Putting the first side on is a little tricky, so I like to start with the back. That ensures any mistakes will likely never see the light of day. Put a line of glue on the back edge of the drawer bottom and push the back of the drawer up against it, making sure the sides are as flush as possible. Then, hammer in 4-5 nails, one every 3-4 inches, fastening the two corners first. Repeat this step for the front of the drawer.
- Note: Nailing the sides of the drawer into the drawer base from the sides, so the nails are parallel to the floor is the best way to do this. If you place the sides on top of the drawer bottom and nail through the bottom into the sides, the nails will be vertical when you install the drawer. That leaves open the (admittedly small) possibility that constant drawer use will eventually loosen the nails and cause the bottom to fall out.
- Note: If you don’t have long bar clamps, a vice, or some other way to hold the bottom of the drawer in place while attaching the front and back, I suggest laying the drawer base on your work surface and pushing it against something solid so it won’t move while you’re nailing. If you don’t have something like that, either, just screw a piece of wood to your work surface to act as a temporary barrier for this job.
6. Attach the sides of the drawer. Turn the drawer on its side and squeeze out a line of glue along the edges of the front, back, and bottom, where the side piece will touch them. Then, put the side in place and hammer nails every 3-4 inches along the bottom and one at the top, bottom, and center of the front and back pieces. Repeat this step for the other side.

7. (Optional) Add a handle. You may be fine with simply grabbing underneath the drawer and yanking it out. Or you may want to at least pretend to be somewhat civilized and add a handle or knob. If you’ve got a spare one, fasten it now. Otherwise, you can make your own. I made mine like this:
- Cut the handle stem. I cut a 2-inch piece off an approximately 1-by-1-inch piece of MDF that had been sliced off one of the drawer sides. Then, I found the center of the front of my drawer, put the small piece of MDF there, and tapped two nails through it to hold it in place.
- Cut the handle. I cut a 4-inch-long piece off a scrap 1-by-3 left over from my folding saw horse project to use for a handle. I centered it over the MDF block I’d just attached to the front of the drawer and hammered two nails through the trim into the block to fasten it tightly.
- Sand the handle. Your hands are going to be all over this, so you won’t want it to be splintery. Take some time to smooth the edges and all surfaces with some sandpaper.
8. (Optional) Sand the drawer. If you’re at all worried about getting stabbed by splinters while using the drawer, sand its edges and surfaces smooth. It won’t take too long and it’s a good way to make it both look and feel good.
9. Prepare to install the drawer slides. I knew I wanted one side of my drawer to be attached to the side of the saw horse bracket on the left side of my work surface. That meant I had to attach another piece of wood for the other side of my drawer. If you already have two spots for the drawer slides, you can skip the next step.
10. Set up a place for your drawer to hang. I had one side all set, but whether you have one or zero, the gist is the same: there must be two pieces of wood with enough space between them for the drawer and its slides. Measure each slide and add their thickness to the width of the drawer. Mark that space on the underside of your work surface. Then, cut a piece of wood so it’s at least as long as your drawer and screw it in place.
- Note: If you can comfortably work under your work space, you can do so. If you’re like me and cannot, turning your workspace over (if possible) is the better option.
11. Install the drawer slides. Many drawer slides come with instructions, so follow them. If not, or they’re unclear, you’ll want to take the slides apart (one piece attaches to your work surface and the other to the drawer). Install the bigger pieces (the ones that attach to your work area) first, ensuring they’re both in the exact same spot on either side of the space you’re going to slide the drawer into. For me, it was easy: I just lined them up with the front edge of the hanging brackets under my work surface and pushed them up against the underside of the surface, too. Attaching them to the drawer is a little trickier, but you still want them to be in the exact same place on either side. I put them as close to the front of the drawer as I could, and 3/8 inches down from the top, as that would ensure a tight, but movable close.
12. Slide the drawer in. You’re done. Start storing. Or send a few videos of you opening and closing the drawer to confused friends and relatives.
