Say the apocalypse happens tomorrow. The good news: You survive! No more credit card debt or miserable commutes. The bad news? Infrastructure has collapsed and there’s no clean drinking water. Most people can’t last a few days without it, so what we need is a reliable way to purify some from toxic soup.
Distillation covers nearly all bases, freeing H2O of salts, pollutants, microbes, viruses, and other nasties. A common method is moonshine-style, using sealed pots, fire, and complex plumbing. Or it can be done more safely and lazily by harnessing the sun.
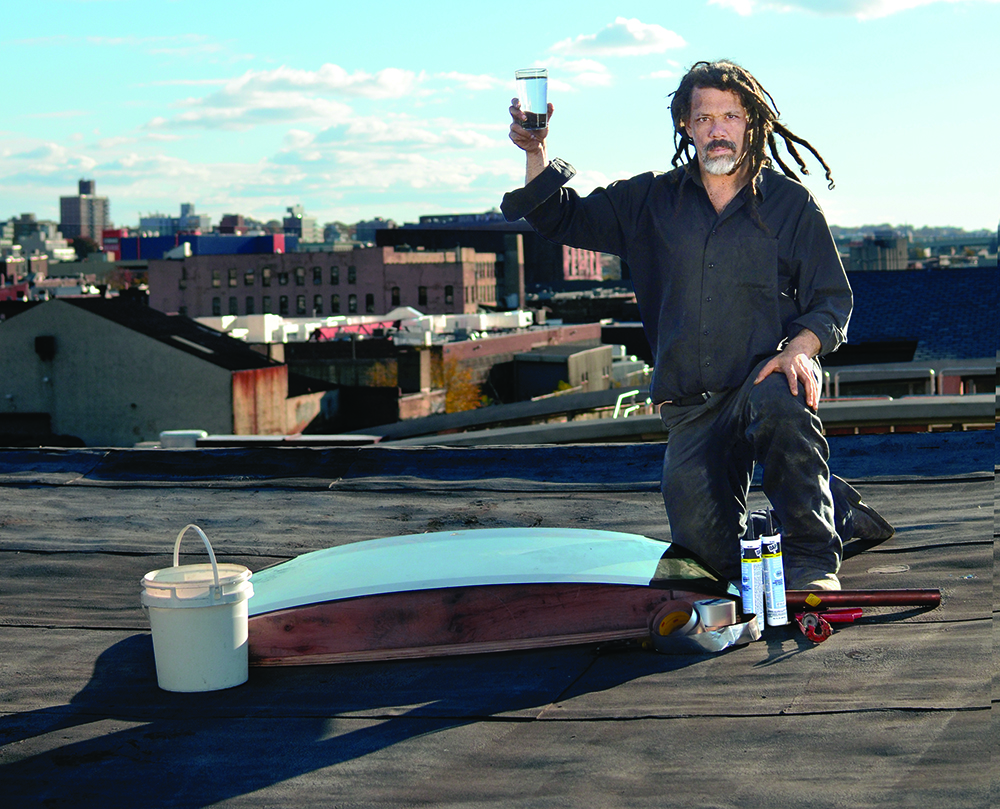
Solar stills elegantly miniaturize the cycle that draws water from oceans and lakes, stores it in clouds, and returns it to Earth as rain. I made the one below using caulk and tools from my workshop, plus a windshield, wooden pallets, duct tape, and simple plumbing I salvaged from a nearby Dumpster.
Suspect water goes into a shallow box; the sun shines through the windshield and evaporates the water—leaving behind a stew of contaminants. When the vapor hits the cooler windshield, it condenses back into liquid, trickles into a gutter, and drips into a bucket.
How much did I trust this theory and pile of garbage to purify water? To the death—or at least crippling diarrhea. I started with a filthy sample pulled from the Gowanus Canal, a Superfund cleanup site. An average cupful contains heavy metals, hydrocarbons, and pathogens.
What emerged from the still hours later was clean, clear, and drinkable—no trip to the emergency room required.

Instructions:
Build your still by following these instructions closely, and then use different parts as needed—the list isn’t strict. Most substitutions should work as long as you honor the essence of what each part needs to do. The glass should allow sunlight to enter and water to condense, so a windowpane or a coffee-table top could suffice. The body, meanwhile, needs to be watertight; for example, a stainless-steel sink might work.
Materials:
• Windshield (cracks are okay, holes are not)
• ½-inch-thick plywood scrap (larger than the windshield)
• Two hardwood pallets
• A dozen 1-inch-long wood screws
• Wood glue
• Silicone caulk (black will hold the heat and extend the evaporation period)
• Copper pipe, ½- to 1-inch diameter (at least a couple of inches longer than the windshield is wide)
• About 5 feet of garden hose
• Faucet (you need its valve, not aesthetic qualities; a ball valve could work, too)
• Aluminum foil–lined duct tape (the kind actually used in duct repair, although regular duct tape will work if it’s rated to withstand direct sunlight and temperatures of 160°F)
Tools:
• Jigsaw
• Screwdriver
• Caulk gun
• Metal shears
• Pliers
• Box cutter
• Hole saw (the diameter needs to be the same as the copper pipe’s)
Steps:
1. Outline. Trace the windshield’s shape on the plywood, and saw it out.
Frame. Pry off enough pallet slats to make a wall on top of the plywood. They will form a basin and support the windshield; note that a wide, shallow still is a more efficient than a tall, deep one. (Incidentally, one pallet slat’s width is the perfect height.)
Body. On one face of the plywood, screw and glue pallet slats all the way around the edge into a tight-fitting border.
Basin. Apply caulk to the inside of the plywood and pallet slats, ensuring all surfaces and joints are sealed. You want the inside of the still to be a waterproof basin. (I found that scraps of wood and paper made light work of spreading a uniform layer of caulk.)
Gutter. The gutter will run inside the still (along a longer wall of its basin), collect condensed vapor dripping off the windshield, and drain the fresh water through a hole in the basin’s wall. Start by sawing the copper pipe to fit a long edge of the windshield, plus a couple of inches extra (the extra will poke through the wall). Measure the pipe against the longer basin wall, and mark the pipe where it will pass through. Snip the pipe down its length with the shears, stopping at the wall mark. Saw halfway through the pipe perpendicular to the slit you just made and not across it (the cut should stop at the slit). Use the box cutter to score the length of the pipe opposite the slit, stopping at the rounded end of the pipe. Using the pliers, bend the flap you just created all along the length of the score. What remains should be an open trough of copper with a flap down its length and one rounded, un-slit end. Use two extra pallet slats to hammer the flap into a flat lip.
Drain. Drill a copper pipe–sized hole through one of the short sides of the caulked basin, near the top of the wall. Poke the rounded end of the pipe into the hole, and set the flat lip of the pipe along the top of the longer basin wall.
Faucet. Opposite the gutter wall, drill a hole about a half inch from the top of the still. Jam the faucet into the hole so that the business end of the faucet is pointing up, and the pipe end extends into the still. Foul water will get poured through the open faucet into the basin.
Glass. Lay the windshield on top of the basin. Use duct tape to hold it in place, and seal any gaps between the glass and basin with caulk, then with a layer of tape on top, and then more caulk. This seal is very, very important, so take your time and make sure nothing can leak out between the glass and the wall.
Hose. Run scrap hose from the protruding copper pipe, down a slight slope, and into a clean collection vessel of your choice. Seal the connections between the pipe, the hose, and the collector with duct tape.
Sealant. Caulk every nook and cranny, and allow at least a full day to cure. The whole assembly needs to be vapor-tight or it will not work. A simple test for vapor-tightness: Close the faucet, and blow as hard as you can into the copper pipe. Can you blow freely without much resistance? Then the still is leaky; lay more caulk, let it cure, and try again. Does blowing get harder and have you seeing little black spots dancing in your field of vision? The bad news: You’ve killed some brain cells. The good news: Your still is ready to use.
Directions:
Set the still in the most direct sunlight possible. Open the faucet and pour in suspect water until it’s a couple of inches deep, then close it back up. The still should be slightly inclined, with the gutter at the lower end to move condensation toward it. (An extra pallet slat or two should be enough to prop up the end with the faucet.)
After a half hour or so—more if it’s a cold day or the sun isn’t too bright—water will visibly condense and run down the glass, drip into the gutter, and into the collection vessel. Discard the first few ounces of water. This is especially important if your source was contaminated with lighter-than-water volatiles, such as gasoline and acetone, because these will come off first.
Leave the still out all day. It should continue to work after sunlight fades, as the stored heat does the last bits of work. Then bask in the fact that the most basic of human needs has been mastered.
WARNING: Solar stills can’t remove all organic solvents, and improper use can introduce contaminants. If you build and drink from one—including this version—you do so entirely at your own risk. (Consider waiting until after the apocalypse to take a swig.)
_This article originally appeared in the February 2014 issue of _Popular Science.
