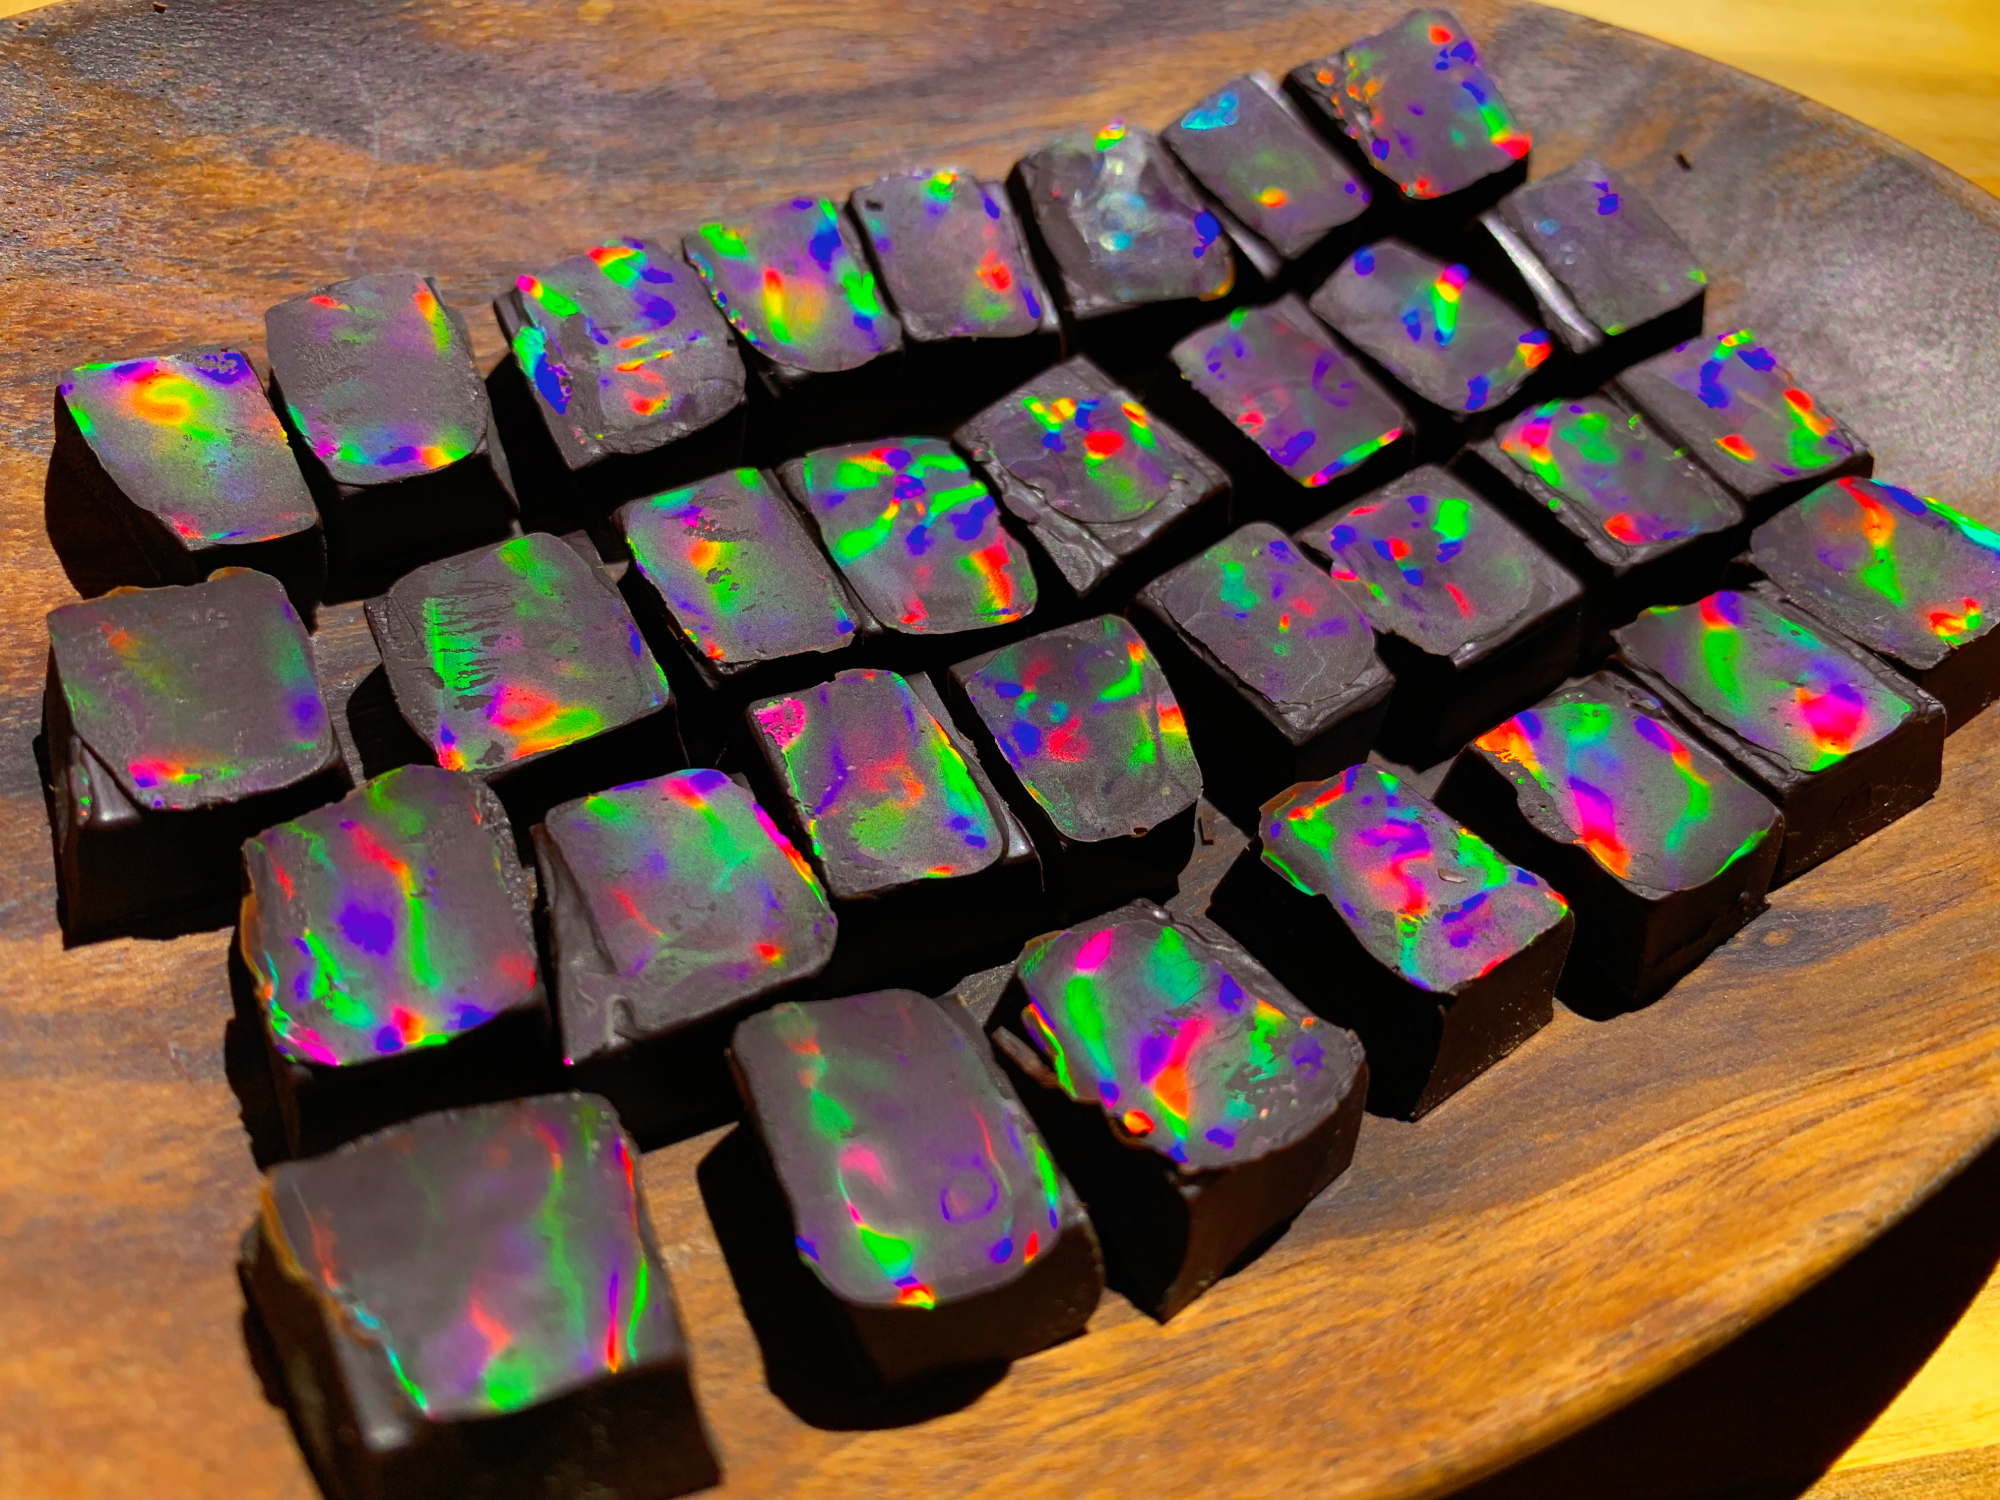
Chocolate is already wonderful, but did you know that it can also be iridescent? In just 10 to 20 minutes, you can shape the surface of a chocolate bar into a shimmering rainbow sheen.
Those multicolored hues aren’t coming from dyes or coatings, either—their source is nothing more than light waves bouncing off minuscule textures on the candy itself.
The key is to use a surface with tiny grooves as a mold for molten chocolate. Think of the rainbow shine of a CD. It has those colors because of microscopic pits that encode data, which are small enough that they also cause light waves to interfere with each other in an effect known as diffraction. You’ll be using a thin, grooved sheet called a diffraction grating as your mold.
When you melt chocolate onto a grating, the chocolate seeps into all the little grooves. When the chocolate hardens and you lift the grating off, the chocolate itself will have the grating pattern on its surface. If you shine white light on the chocolate, you’ll see a rainbow. If you use a laser to shine just one color of light on the candy, the chocolate will diffract light into spots. Technically speaking, you’ve created a simple hologram.
Only tempered chocolate has the fine crystal structure to fit into the diffraction grating grooves and keep its shiny surface when it’s removed. Fortunately, most commercially sold chocolate is tempered, so if you start with a chocolate bar and only melt it a little, it will still harden as tempered chocolate. The grooves in the grating I used are only 20 microns wide (about 1/5 the width of a human hair), and I’ve even gotten it to take the shape of the 0.5-micron pits in the surface of a CD—chocolate is not just delicious, but an impressive optical material!
Fun side note: this can also work on some other kinds of food. In the late ‘80s and ‘90s a company called Dimensional Foods (and a spinoff called Lightvision) managed to cast holograms into lollipops, sushi wrappers, communion wafers, fruit, and matzoh. Unfortunately, the technique never caught on, and Dimensional Foods is no more. I, for one, would welcome a holographic reboot!
Before you start
1. Choose your chocolate. You can use almost any bar chocolate, including baking chocolate. Dark chocolate makes the colors show up best, but milk chocolate and white chocolate will also work. Try to pick a brand (like Lindt) whose squares have a very flat top. I’ve also successfully used the bottoms of individual chocolate chips. Avoid any chunky additives like nuts, as these will mess up the pattern by preventing the chocolate from molding tightly to the grating.
2. Choose your diffraction grating. I used the double-axis grating (13,500 lines per inch) linked in the ingredients list, since it will give you the colors at more angles than a single-axis (linear) grating.
The side of the thin sheet that has the grating structure is the one you’ll want to use for your chocolate (or your mold). The grating side will appear less shiny than the other side, and it’ll make a high-pitched squeaking sound when you rub a finger across it.
You can reuse gratings if you wash them well—no scrubbing, but plenty of hot water and dish soap. You’re trying to get any remaining chocolate or fingerprint oils out of the grooves without scratching the surface. Try not to fold or crease the gratings, since any folds will be permanent.
If you want to be sure that everything touching the chocolate is food-safe (or you want to get fancy—check the advanced instructions below), you can use the gratings to make your own mold out of food-safe silicone. Follow package instructions, and ensure that when you press your grating into the mold, the grating side is facing the silicone. You’ll know it worked if the silicone mold has a holographic shine when you lift the grating off. I’ve tested this successfully with Smooth-Sil 940, but other silicone mixes may work too.
Stats
- Time: 10 to 20 minutes
- Ingredient cost: $35
- Difficulty: Easy to moderate
Ingredients
- A bar of chocolate
Tools
- A diffraction grating
- Hot water
- A pot
- A baking dish that fits over the pot
- A thermometer capable of reading temperatures around 90 to 110 degrees Fahrenheit (32 to 43 Celsius) (infrared is the most convenient, but probe also works)
- A freezer
Instructions
1. Break a bar of good chocolate into squares.
2. Separately, fill a pot with hot tap water. Let the water run until the pot is about 2 inches (5 centimeters) from full, then balance a baking dish over the pot so the water will heat it.
- Warning: Be careful not to get any water into the chocolate at any point, or it’ll seize up and you’ll have to throw it all out and start over.
3. Adjust the temperature and height of the water. Stick with this until the surface of the baking dish is about 90 to 95 degrees (32 to 35 Celsius).
4. Melt the surface of the chocolate. Take a piece of chocolate and rub it in place on the baking dish until the chocolate melts just enough that the entire surface in contact with the dish is molten. Cold hands will help here so that you can maintain your grip on the chocolate piece.
5. Use the grating. Press the molten side of the piece of chocolate onto your diffraction grating (grating side up) and twist or rock it a little to get good contact. Leave the piece of chocolate on the grating.
6. Freeze the chocolate. Once you’ve melted and placed all the chocolate pieces you want, put the grating in the freezer for about 5 minutes to harden.
- Note: You can also leave it at room temperature for 10 minutes.
7. Remove the chocolate from the freezer. Then, lift the chocolate off the grating, being careful to only handle the edges of the chocolate. Any heat from your fingertips will melt the delicate surface structure.
8. Look for colors! They’ll show up best under strong directional light, like direct sunlight or a flashlight.
- Note: You may have to play around with the angle of your light source to get a good view of those glimmering hues.
9. Store the chocolate. For best results, keep it at cool room temperature or colder. If the surface melts slightly, the grooves will go away. (This is, alas, why eating holographic chocolate won’t make you poop rainbows.)
Advanced instructions
If you’d like to get fancy and make custom shapes, you can pour tempered chocolate onto the diffraction grating, as described by jellmeister on Instructables.com.
Tempering chocolate takes much longer (and can be tricky if it’s your first time) but the results can be spectacular. If you’re not sure how well you tempered the chocolate, keep it in the freezer until just before you want to serve it. Poorly tempered chocolate will lose most of its colors within an hour or so at room temperature, but it should stay shiny for several days in the freezer. Well-tempered holographic chocolate will keep for weeks at room temperature.
- Pro tip: You can even make a mold from a CD. First you’ll have to make a small cut on the label side and use a piece of tape to lift the label off. Underneath, there’s a grating that a silicone mold can pick up.
As a parting example of fancy things you can do with the tempered chocolate method, I cut a unicorn out of diffraction grating, taped it to a CD, and used Smooth-Sil 940 to make a mold. Once the mold solidified, I poured tempered chocolate into it and then peeled the mold away to reveal this sparkly unicorn medallion.
Science: sometimes there are holographic chocolate unicorns.

