
We may earn revenue from the products available on this page and participate in affiliate programs. Learn more ›
Everyone’s talking about sous vide, the scientific cooking method that’s making its way from the lab to the home kitchen. The Sous Vide Supreme, which we reviewed earlier this week, is the first turnkey sous vide setup for home cooks. But we DIY kitchen nerds haven’t been idly waiting for an off-the-shelf solution: We cobbled together our own sous vide setups years ago. It can be done by piecing together a few readily available components — or even, for more intrepid tinkerers, by soldering together some less readily available ones. Here’s how.
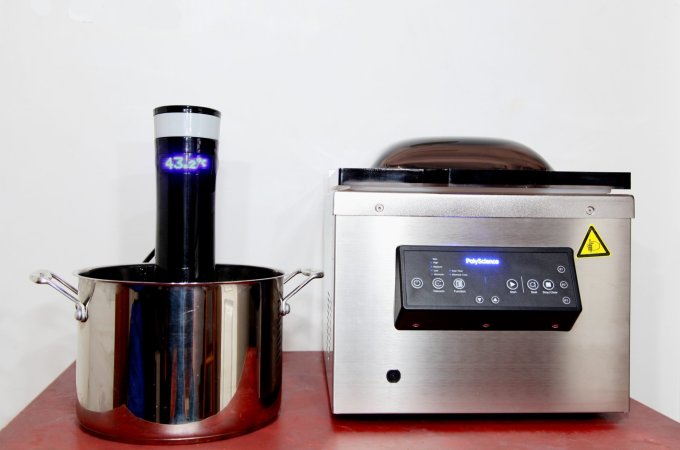
The basic elements of a sous vide setup are simple: a way to seal your food in vacuum bags; a water bath to cook the sealed food in; and a way to keep the water at the precise temperature you want for as long as you want. If you do sous vide in a lavish commercial kitchen, you probably do your sealing with a powerful, high-volume chamber sealer, and cook in a water bath heated by an immersion circulator. These components, originally pilfered from science labs by the first sous viders, have now joined the culinary canon, but they’re still manufactured to precise tolerances and will set you back a few grand, or a lot of weeks scrounging on eBay. It’s possible to whip up magnificent sous-vide meals with significantly less investment, though. Here’s a look at what you’ll need.
Sealing
Vacuum-sealing food before you cook it serves a few purposes. It prevents the edibles from mingling with the water bath, and keeps the flavor concentrated. Inside the bag, the meat can mingles only with its seasonings over a period of hours and become very tasty indeed. The presence of air in the bag can insulate the food, preventing it from reaching its ideal temperature; it can also cause the bag to float in the water bath, which also prevents it from reaching its ideal temperature.

For $50 and up on eBay, you can get a FoodSaver or Seal-A-Meal vacuum sealer which will do a pretty good job. You’ll also need to keep your machine stocked with the special bags it requires, which can add to the cost. A vacuum sealer is good for more than just sous vide, though — you can do accelerated marinations in vacuum bags, store food in the freezer for longer, and generally evacuate air from sealed containers for all sorts of reasons.
If $50 is more than you want to lay out, Reynolds’ battery-powered Handi-Vac is less expensive, but pulls a less powerful vacuum. You can even try sucking the air out of a zip-top bag with a straw, which is free, but weakest of all, and carries with it the possibility of slurping up the juices of uncooked meats.
All of these sealing methods falter when the food you’re sealing is particularly juicy, or sitting in a sauce or marinade. The liquid gets sucked into the vacuum pump and does no good at all to the mechanism. (The latest, priciest FoodSaver models have a “Moist” mode that supposedly handles these situations better.) To get around this issue, I like to turn any liquids I’m going to be cooking into solids first, either by freezing them into ice cubes (I keep a bunch of miniature stock cubes ready in my freezer) or by cooking them with a little gelatin. Either will return to its liquid state when the cooking begins.
Some foods, notably eggs, which are provided with their own natural container, can be cooked without messing with vacuum at all.
Controlling the Temperature
The state of the art in keeping a water bath at a precise temperature is a feedback loop involving a thermocouple temperature sensor in the water that hooks into a proportional-integral-derivative (PID) controller. PID controllers use a rather clever, fine-tunable algorithm to monitor changes in a system and compensate for them. There is a PID controller built into PolyScience immersion circulators and into John’s Sous Vide Supreme. You can harvest PID processors from industrial machinery, buy them from electronics suppliers, or even build your own.
There are a couple of different PID boxes marketed for the home sous vider, by Auber Instruments and Fresh Meals Solutions. All of them include a thermocouple, which goes in the water bath, and an electric outlet, into which you plug your rice cooker, slow cooker or whatever you’re using to heat your water bath. With an LED readout and buttons on the front, you set your target temperature. The PID controller monitors the temperature of the water, and cycles the power to the external heater on and off as often as necessary to keep it at the precise setting you want. The LED displays the current temperature of the water as well as the target temperature — after the bath has heated up, the two numbers should match. The basic Auber Instruments model I’ve used does an excellent job of keeping it right on the number.
Some PID controllers offer extra features, like an integrated timer, which lets you cook at one temperature for a while, then automatically shift to another temperature.
Heating
Since humankind harnessed electricity, we have produced quite a number of ways to use it to heat water. For sous vide, all we want is a simple electrically controlled device that can be turned on and off, and which heats a water bath when it’s on. And we want the temperature of our water bath to be as stable as possible, so the greater the volume and more even the heat, the better. For this reason, large rice cookers are the tool of choice for many DIY sous viders — large dumb rice cookers, that is. The ones with “fuzzy logic” microprocessors that know when to turn themselves on and off are not useful for sous vide applications; we want the one with just one analog switch on the front.
With the same measurement perversity that afflicts electric coffee makers, rice cookers’ capacity is measured in “cups” of cooked rice, where a cup equals 6 fluid ounces of volume. So a “10-cup” rice cooker holds about 1.8 liters of water.
A slow cooker is as good as a rice cooker, often cheaper (especially at garage sales, where ’70s Crock-Pots sell for a song) and its ceramic crock aids in maintaining a steady temperature. Conveniently, a 7-quart slow cooker holds 7 quarts of water.
Since your PID controller can switch on and off any sort of electric heater, you can experiment with other methods too: a pot of water on an electric hot plate; an electric kettle; a $5 immersion heater; a light bulb in an insulated chamber; even a microwave. Let me know how that goes.
The out-of-the-box calibration on your PID controller may work well with your particular heating apparatus — most of the ones designed for cooking use are pre-calibrated for a large commercial rice cooker — or it may not. Some controllers include an auto-tuning feature; with others, you have to manually tweak the P, I, and D parameters to work best with your setup — e.g., when the thermocouple detects that it’s approaching the target heat, how soon do you want it to shut off? Should it overshoot a little? What’s the optimal rate of thermal oscillation for the system? It all depends on the particular thermal characteristics of your water bath and heater. Tuning a PID controlleris an
, and one that I do not claim to fully understand. The manual for the Auber model I have recommends
P=180, I=700, D=40
for a commercial rice cooker or 7-quart slow cooker, but
P=54, I=60, D=15
for a 4-quart model. In practice, I found that the default settings work just fine to control a wide variety of cookers to within a degree. If your recipe requires 0.1-degree accuracy, of course, calibrate away.
Or Just Wing It
The dedicated eBayer can occasionally find a massive bargain on an immersion circulator — the scientific gadget used by the pros, which combines controller and heater in one. These can be very precise in their temperature control, because they swirl the water around as they heat it, to evenly heat the whole volume of water.
Some people have proclaimed success with radically less technology — just holding the bagged food at a steady temperature in the sink with the hot water running, or in a conventional oven. I have not had any success with those approaches, but I’m eager to hear from those who have.
Note that you are risking nasty illness when you cook sous vide in a contraption that doesn’t adequately maintain temperature. Keeping a piece of vacuum-sealed meat at the wrong temperature for 48 hours is a delicious recipe for anaerobic bacteria.
Douglas Baldwin’s Practical Guide is an excellent free resource for aspiring sous viders.
72-Hour Short Ribs
Now that you have your homemade sous vide setup in place, it’s time to get cooking! You might want to have a snack first, though; this recipe takes three days.
Cooking a cheap, tough cut of beef for 72 hours at a low temperature turns all the meat’s chewy connective tissue into tender, mouth-coating deliciousness, as the firm collagen proteins oh-so-slowly denature into softer gelatin. Cooking at a higher temperature would cause the muscle fibers to toughen up; cooking for a shorter time would not give us all the gelatin we desire; 72 hours at 55 degrees Celsius is just about perfect (although, to be honest, if you stop short after 48 hours you probably won’t be too terribly disappointed with the beef’s succulence). Check out our gallery of sous vide delights to get a sense of what you’re in for.
At 55 degrees, none of the Maillard browning reactions that are responsible for intense savoriness occur, so you’ll be lifting a pale, soft piece of meat out of your water bath when it’s done. The browning part we do at the very end, quickly creating a crust on the outside of the meat in a hot hot skillet, while being careful not to let the inside cook any more than it already has. Many DIYers enjoy using a propane or butane torch to finish their sous vide meats instead. I can’t deny that I enjoy wielding a hissing flame too, but I find the end result tends to taste better, less thioly and more evenly browned, with the skillet method.
- 3 tbsp. olive oil
- 1 tbsp. red wine
- 2 cloves garlic, finely minced
- 1.5 tsp. fine salt
- 1 tsp. ground black pepper


