Holiday project: Christmas Card Tower LED Lamp
Put all those holiday cards to good use instead of trashing them.

Do you have a blizzard of Christmas cards carpeting the top of your desk? Convert those cards into a Christmas Card Tower LED Lamp. Note: building the paper card tower is easier than the step-by-step instructions make it sound. Just follow the illustrations and as you complete a couple of cards, it should start to make sense.
Stats
- Time: 2 hours
- Cost: $11.54
- Difficulty: easy
Parts
- Luxeon I blue 1W LED (SparkFun Electronics; $4.95)
- Luxeon aluminum breakout (SparkFun Electronics; $2.95)
- CR2032 battery with legs (BG Micro; $0.65)
- SPST switch (RadioShack; $2.99)
- 2 short lengths of wire
- 12+ greeting cards
Instructions
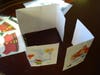
1. Cut all of the greeting cards in half along the fold line. Both landscape and portrait cards will work. Discard unwanted halves. Set aside four card halves for the top row of the tower. Use a decorative punch to make random holes in a couple of the cards. These holes will allow light to stream from the final tower lamp and cast interesting shadows on your surroundings.

2. Create a template for cutting eight slits in each greeting card half. Don’t cut the four set-aside card halves yet. There should be two equidistant half-inch cuts on each side of every card—for a total of eight slits per card.
3. Cut the four set-aside card halves with only six slits per card. Don’t cut slits in one of each card’s long horizontal sides. This side will be the top of the tower.
4. Fold all cards in half—like a book.
5. Slot two cards together along each width. This action will form two corners and one complete side of the tower base.
6. Slot another card into either free end of the two cards joined in Step 5. You now have three corners and two complete sides of the tower base.
7. Finish the tower base and the last two sides by slotting another card into both of the two remaining free ends. Row 1, the tower’s base, is now finished. Continue adding rows by following Steps 5 through 7. Join rows together by slotting the completed row’s upper side slits into the new row’s bottom slits.
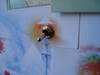
8. Assemble the Luxeon LED and Luxeon aluminum breakout according to instructions in the Luxeon datasheet.
9. Connect the negative (-) leg of the battery to one of the negative (-) pads on the Luxeon aluminum breakout. Solder one end of a short length of wire to a positive (+) pad on the Luxeon aluminum breakout and the other end to one of the switch’s terminals. Solder one end of another short length of wire to the positive (+) terminal of the battery and the other end to the remaining switch terminal. Attach the switch through the side of the card tower.

Turn on the switch and illuminate your friends with your greeting card recycling achievement via your Christmas Card Tower LED Lamp.