Poring through the Popular Science archives on Google, I found a DIY project that’s just as novel now as it was in 1961.
“Take a look at those plastic detergent bottles your wife uses and you’ll find they come in many smart-looking shapes,” was how the article began. A lot has happened in the past 48 years. For one, your wife isn’t the only person using plastic bottles. Also, today they hold a lot more than detergent. With some basic materials and a few hours time it’s possible to cast a sturdy lamp base using an empty bottle as your form.
Although the original version of this DIY used No. 1 molding plaster as the mold material, here we’re using Smooth-On 305 plastic for its durability and strength. It’s substantially more expensive, so if budget is your main concern, plaster is probably the way to go. If you choose that route, simply follow the mixing and setting instructions on the package and use it where you see Smooth-On 305 here.
Look around the house and you’ll find plastic bottles everywhere. The ideal bottle still keeps its shape after all the liquid has been removed. In other words, don’t choose one that’s too thin and flimsy. Bottles with too much surface detail become frustrating during the stage where you have to coat inside the bottle with a thin film of Vaseline. Peel off the label before starting and you’ll find many bottles have been designed with texture to help those born with butter fingers—but they won’t help you with this project.
Lastly, the bottle’s bottom should touch the surface it’s sitting on 360-degrees around in order to form a perfectly flat base.
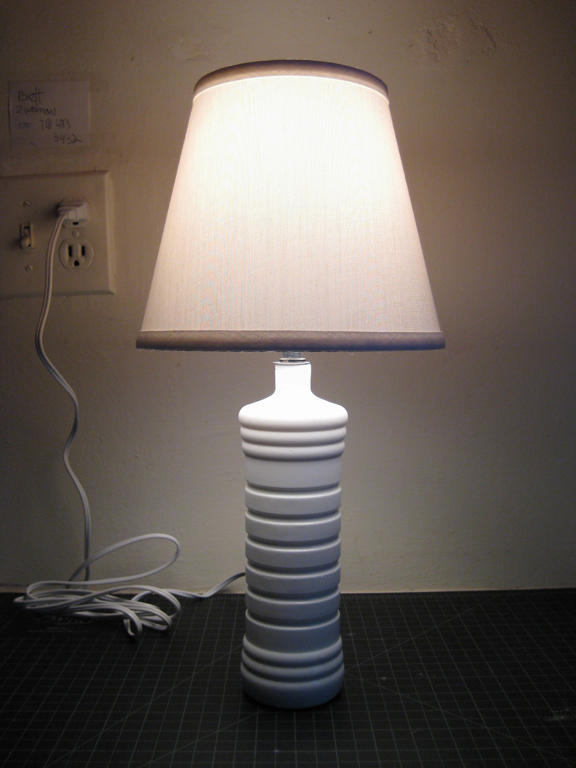
In the video below, you’ll see the entire process in time-lapse form.
You’ll notice I didn’t cut out a hole in the bottom leaving a rim around the edge, but instead cut off an inch or so of the bottom of the bottle. This was done because the bottle was larger than the 32 ounces of Smooth-On I’d be pouring in and I wanted it to rise to the top. As the video continues you’ll notice my measurement was still a little off and the Smooth-On didn’t even reach the bottom of the Advil bottle. This is obviously a huge problem because the point of the Advil bottle is to create a recess for the rod and cord. Once the mold was complete I had a lamp base that had a 1/4-inch rod sticking out the bottom and there was no chance this was going to sit flat on a table. At this point I put on my improvisation hat and decided three adjustable feet could be added to the bottom so the rod and cord wouldn’t get in the way. Oh, and I didn’t have a lampshade yet, so that’s why the mixing bucket was used.

Parts

- Plastic Bottle: free
- Smooth-On 305: $24.95
- Lamp Shade: $11.95
- 3/8a-inch threaded rod: $4.99
- Lamp cord: $3.99
- Lamp socket: $2.99
- Mixing bucket: $1.79
- Washers and nuts: $1.50
- Total: $52.16
Instructions
1. Using an X-Acto blade, cut out the bottle’s bottom (fig. 1) leaving a slight rim to give the mold a rounded edge.

2. Drill a 3/8-inch hole in the center of the bottle cap for the lamp stem
3. Coat the inside of the bottle and cap with a thin, even film of Vaseline (fig. 2). The key here is to use enough (finished mold easier to remove), but not too much (finished mold with a pock-marked, uneven surface).

4. Cut a 3/8-inch hollow threaded rod to the height of your bottle (without cap) minus 1/4-inch. (e.g. If your bottle is 9 inches, rod should measure 8 3/4 inches. With the cap screwed on tightly, thread the rod from the bottom so 3/16-inch sticks out the top (fig. 3). Using a hot glue gun, seal the area where the threads meet the top of the cap (outside of bottle only).

5. Drill a 3/8-inch hole in the center of a prescription or medicine bottle that is about 60 to 75 percent the size of your bottle’s base. This will create a recessed area on the bottom to make way for the cord. Coat the bottle’s bottom and halfway up the sides with a thin, even coat of Vaseline. Holding both bottles with bottoms facing each other, screw the prescription bottle 3/16 of an inch onto the rod so it fits inside the other bottle by approximately 5/8 inches. Place the entire apparatus upside down over a small glass (fig. 4).

6. Mix Smooth-On 305, following directions on package and using proper protection (fig. 5). Carefully pour Smooth-On into bottle until it reaches the rim of the bottle’s base. It’s okay if it spills over a little as you will be sanding down the base once the mold is set. Wait 30 minutes until the mold is set.

7. Remove the cap and medicine bottle by unscrewing from the threaded rod. Remove the plastic bottle while being careful not to damage the mold (fig. 6).
8. Once you’ve removed the bottle, sand the bottom flat and clean up any other rough surface areas using fine-grit sandpaper.

9. Attach a flat washer, lock washer, and nut onto the rod at the base of lamp. Don’t overly tighten.
10. Drill a 1/4-inch hole through the side of the base into the recess at the bottom for the lamp cord (fig. 7).

11. Thread cord through the hole and into the rod (fig. 8). If you want the light switch to be on the cord, be sure to buy a cord with a switch and a socket without. If you want to control the switch from the socket, use an appropriate socket and a cord without a switch.

12. Wire the socket and attach it to the rod at the top of the lamp base (fig. 9).

