
It’s easy to skimp on storage when you’re buying a computer. You think there’s no way you’ll ever need more than 256GB, but there you are, one measly year later, staring at an overflowing C: drive that won’t stop bugging you with reminders that it’s almost full.
If your laptop allows you to open up the bottom and pop in a new drive, upgrading the drive is easy. Don’t toss out that old drive when you’re done, though—you can put it in a USB enclosure and use it as an external drive for backups, extra storage for your gaming PC, or as a way to hand stuff off to your friends.
It’s incredibly easy, as long as you buy the right gadget.
Before you start
We won’t get into the ins and outs of upgrading your drive here, since that’s a guide all on its own. But if you haven’t done so already, you’ll need to copy any important files off your old drive first, or clone your operating system installation with a tool like Macrium Reflect (Windows) or Carbon Copy Cloner (Mac) before you open up your computer and swap the new drive in.
The actual process of switching drives is as easy as it sounds, even if you’ve never dug into a laptop’s innards before. You can google your computer’s model number to find a step-by-step walkthrough. Once that’s done, if your old hard drive is still working—that is, if it hasn’t failed or isn’t filled with bad sectors—it’s time to breathe new life into it.
Find the right USB enclosure

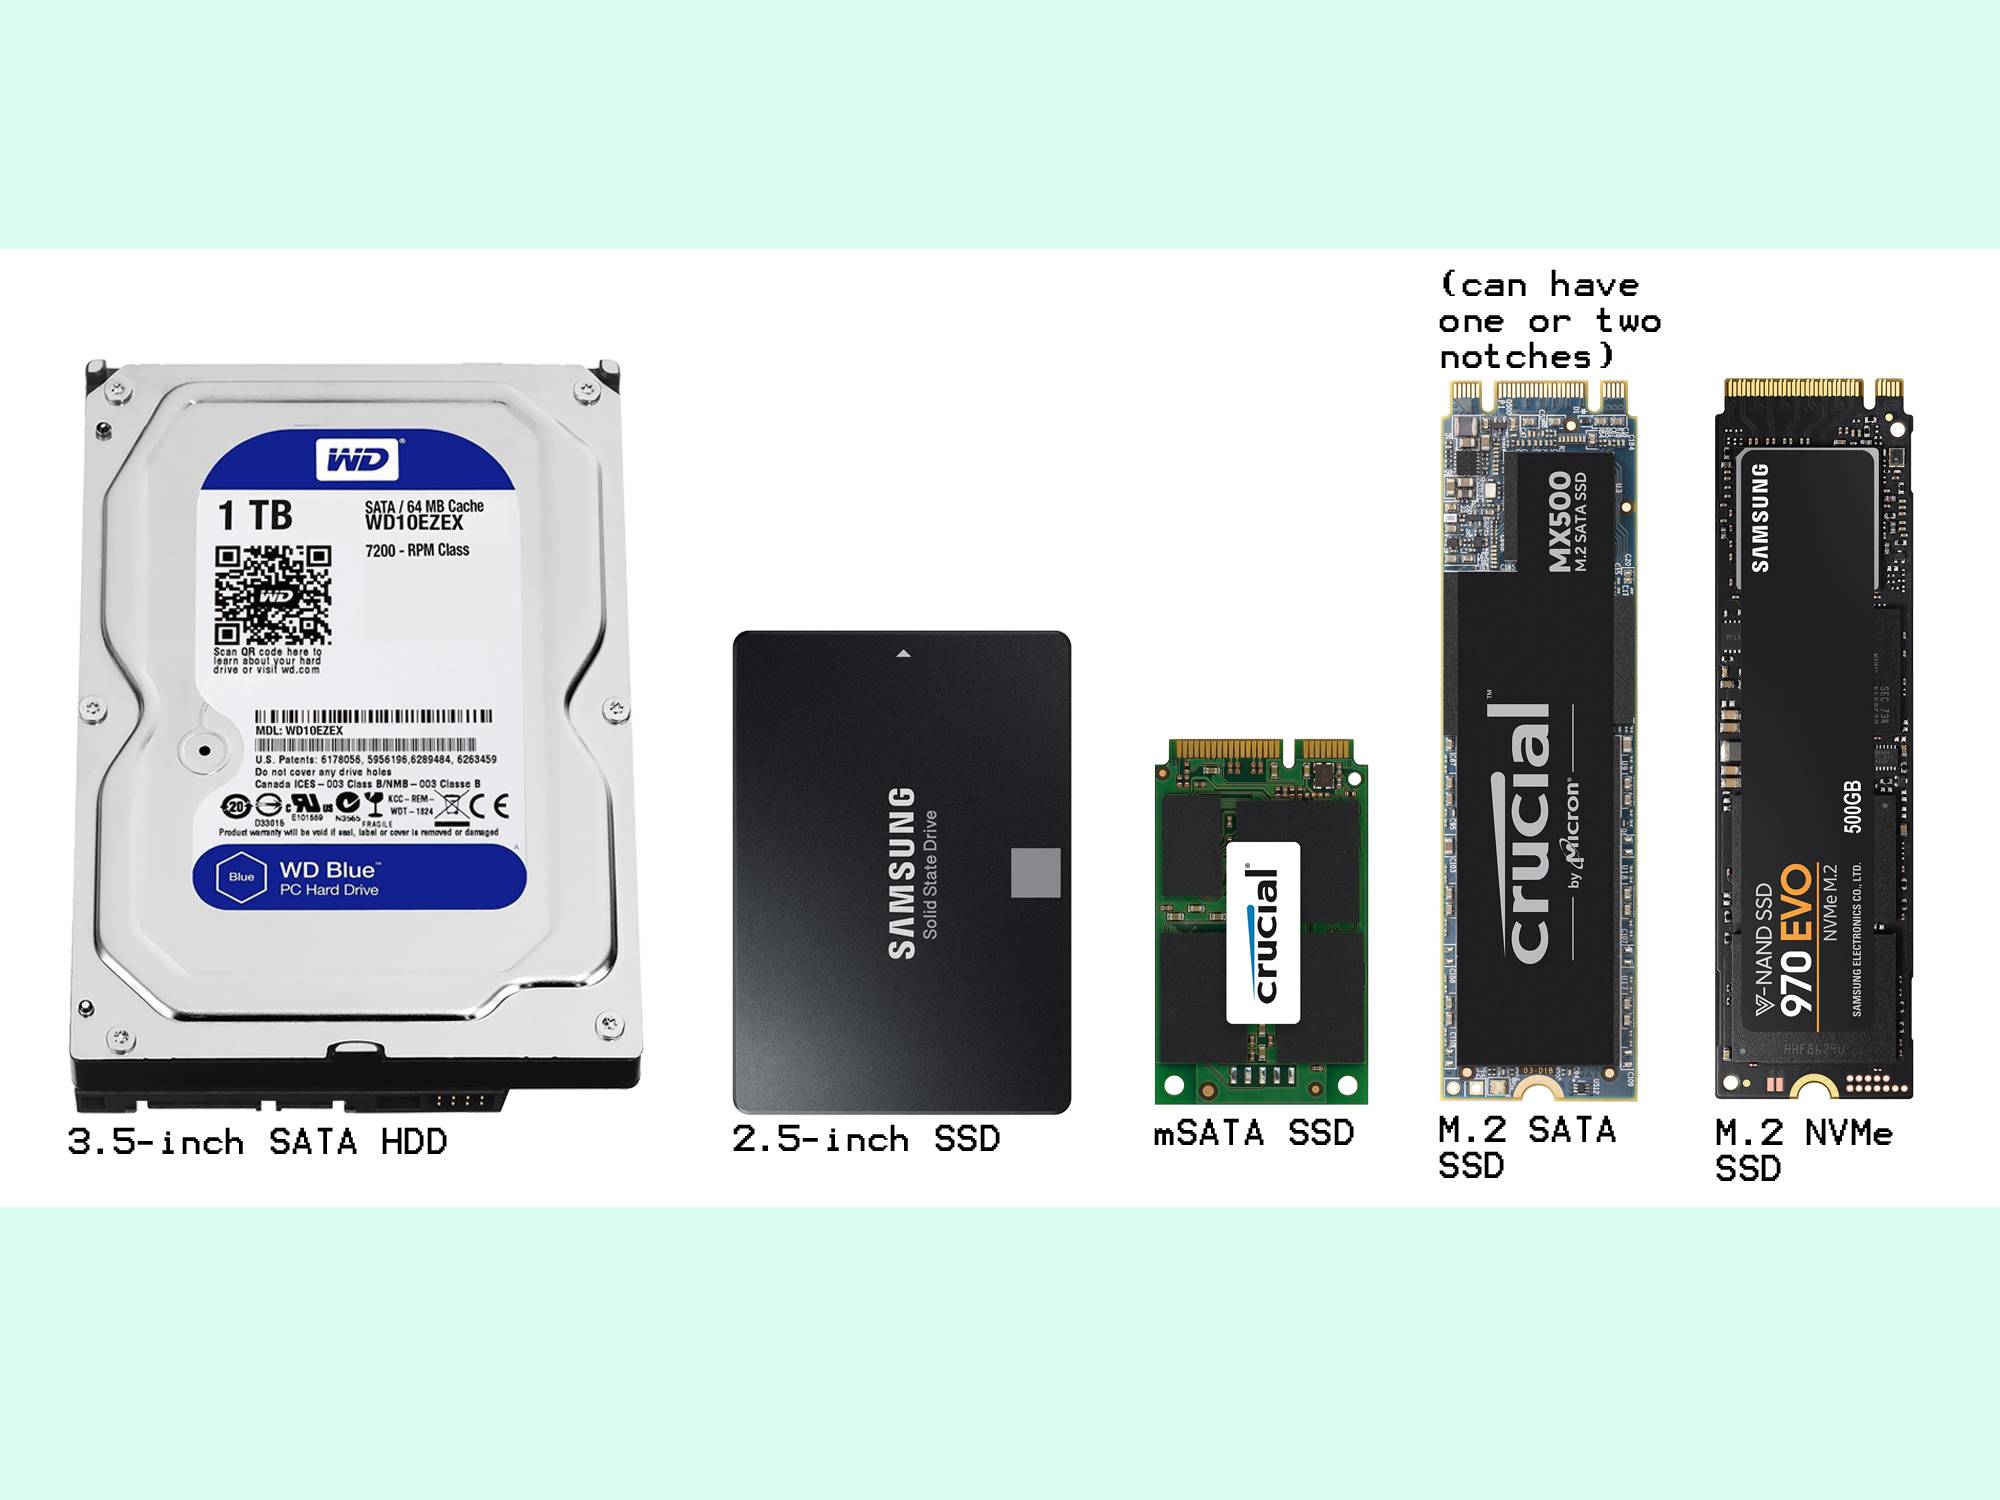
These days, hard drives come in a few forms. On modern PCs, you’re likely to find one of the following:
- 3.5-inch hard drives: Big, slow, and loud, but can hold the most amount of space. You’ll find these in desktop PCs.
- 2.5-inch hard drives: Still slow and loud, but smaller so they can fit inside a laptop.
- 2.5-inch solid-state drives (SSDs): The same size and shape as 2.5-inch hard drives, but with solid-state hardware, which eschews the loud spinning platter for much faster, long-lasting storage with no moving parts.
- mSATA SSDs: Modern laptops—that is, those manufactured in the past 10 years—save even more space by cutting down the 2.5-inch form factor into something much smaller. These mSATA drives are similar in speed to 2.5-inch SSDs, but are more compact.
- M.2 SATA SSDs: M.2 is a new connection standard that looks similar to mSATA. Not all M.2 drives are the same, though—some use the old SATA connection standard (and thus are similar in speed to 2.5-inch and mSATA SSDs), while others use a faster connection called…
- M.2 NVMe SSDs: NVMe storage is super fast, and common in many of the higher-end laptops you’d buy today. M.2 NVMe SSDs often look similar to M.2 SATA SSDs, but may not be compatible with the same enclosures.
That may sound like a lot, but don’t worry—you don’t necessarily need to know everything about each drive type. Just look at your drive (or, if you haven’t opened your computer yet, look at photos or video of your laptop’s repair guides) and compare it to the photo above. The label may also list the drive’s connection type.
For 3.5- and 2.5-inch drives, there are dozens of different enclosures out there. On the affordable end, ORICO enclosures are popular and have worked well for me in the past. This model fits 3.5-inch drives, and you can grab it with old-school USB-A or new-school USB-C, depending on what ports you’ll need to plug it into. For smaller drives, their more compact 2.5-inch model works well for a dirt-cheap price and comes in multiple connection types. That said, you do get what you pay for, to an extent. I’ve used cheap drives at home without problems, but you can invest in more durable materials and more attractive designs if portability or aesthetics are important.
For more compact laptop drives, things are just a tad more confusing, since they look so similar. Thanks to its size, mSATA is a bit easier—if your drive is short and stout, this enclosure should do the trick. For M.2 drives, pay attention to the label and the “keying”—the shape of the connector at the end. Most Amazon listings will have a graphic in the carousel of images that shows you which drives it’s compatible with—this UGREEN model, for example, works with SATA-based drives that either have the “B-Key” (one notch on the end) or “M+B Key” (two notches on the end).
It does not, however, work with NVMe-based M.2 drives, which can look identical to M-Key SATA drives, so check the label to see whether your drive is NVMe- or SATA-based. NVMe drives will work with this UGREEN enclosure instead. Like above, you can feel free to search around for drives with different appearances or durability features—just make sure to read reviews before you buy.
Transfer your drive, plug it in, and reformat

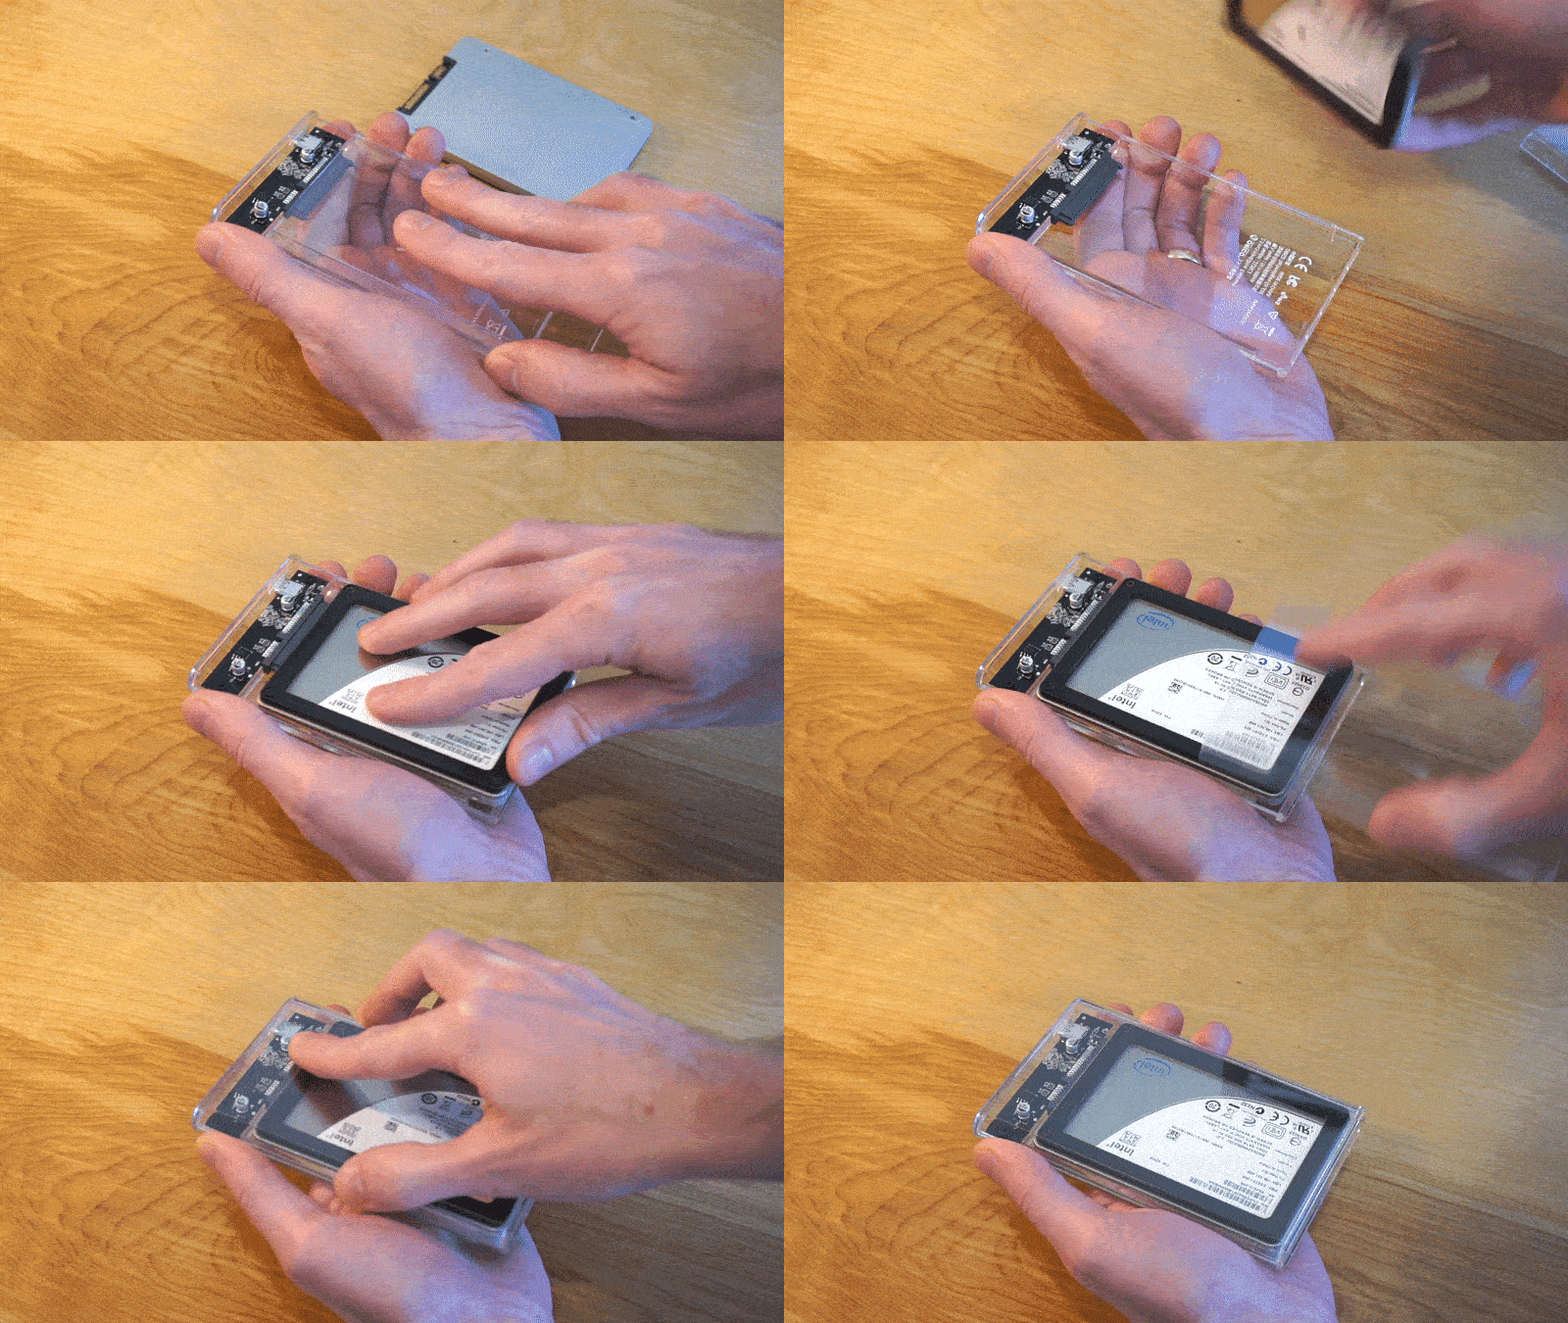
Picking the right enclosure is, weirdly, the hard part. Transferring the actual drive is super easy, and you shouldn’t need much in the way of tools. In fact, the ORICO drive I’m using for the purposes of this guide is completely tool-less—the top just slides right off, revealing the inner chamber where the hard drive lies.
Grab your old drive, face the SATA or M.2 connector toward the dock inside the enclosure, and gently slide the drive into place. Once you’re sure it’s in all the way—it shouldn’t take too much force—just close it back up.
Congratulations, you just made your own external drive.
Plug one end of the USB cable into the enclosure, and the other into your computer. If you’re using a 3.5-inch enclosure, it may also require you to plug it into a wall socket using the included adapter, so it can draw enough power to spin that big drive. Smaller, more portable drives shouldn’t require this, but you can read your enclosure’s instruction manual for more info.
Your computer should recognize the old drive as if it were any other external drive. It will still have all your old data on it, though, so once you have that extracted to the new drive inside your computer, you’ll want to format and erase the old drive. In Windows, open Explorer, right-click on the drive, and choose Format. Select NTFS if you plan on using it on Windows machines, or ExFAT If you plan on moving it between Windows and Mac machines. If you have a Mac, you can format the drive by running Disk Utility (you can find it in Utilities, in the Applications folder), selecting the drive in the left sidebar, and clicking the Erase button. Choose Mac OS Extended (Journaled) as the format and click Erase.
Once your drive is free and clear, you’re ready to fill it up with whatever nonsense you choose—which, coupled with the new drive in your PC, should give you plenty of room for activities.
