You can never have too many tote bags, especially ones with zippers. They’re a great alternative to plastic while shopping, you can bring them to the gym, stuff them full of books, or haul your laptop around. The possibilities are endless.
Most of the tote bags you get for free are made out of cheap, boring fabrics, usually with logos on them that make you look like a walking advertisement.
And to make matters worse, they almost never have a zipper. As a city dweller, a bag without a zipper is just asking for someone to reach in and help themselves. And even if theft isn’t much of a concern for you, a zippered bag lets you revel in the satisfaction of hurling your belongings across the room at the end of a long day without worrying about the contents spilling out all over the place.
Making your own tote bag—zippered, no ads—is easy and doesn’t require a huge amount of material. You can upcycle remnants from other projects—old tapestry, curtains, even a quilt you’re no longer using—and transform them into something useful and entirely customized for you.
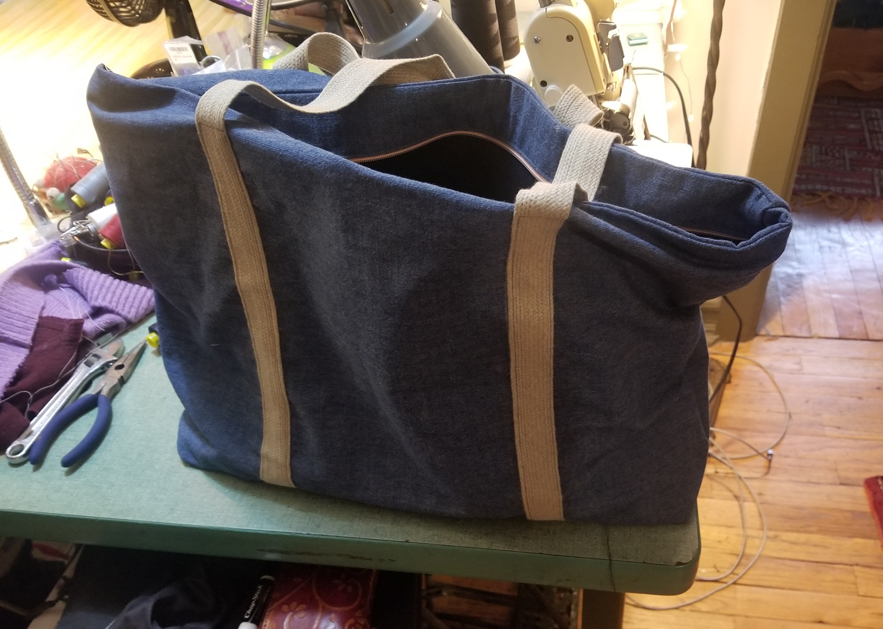
The tote bag I made for this story consists of two shades of leftover cotton denim from a jumpsuit project, cotton muslin for a stiffener, some tan webbing, and an old peach zipper. Don’t be afraid to get creative with your fabric choices—anything can be the outside or lining fabric, so you can play around with colors and patterns.
And that’s not the only way you can get creative. You can use these instructions to make a bag as big or small as you want, so you can truly craft a tote bag that fits your needs.
Stats
- Time: 4 hours
- Material cost: $0-$30
- Difficulty: moderate
Materials
- 3 yards of webbing (or twill) for handles
- 1 yard of outside fabric
- 1 yard of lining fabric
- 1 yard of muslin
- 1 zipper at least 22 inches long
- Thread
Tools
- Scissors
- 18-inch ruler
- Sewing machine
- Tailors wax (or marking pen with disappearing ink)
Cut your pieces
This tote has three layers: an outside fabric, a flat lining fabric, and a lining fabric. These are the pieces you’ll be cutting from each layer:
- Outside fabric: two outside (side) pieces, and two upper lining pieces. The latter pieces can be cut either from the outside fabric or lining fabric. This decision is merely aesthetic.
- Flat lining fabric: two side pieces. This is only necessary if you want to add sturdiness to your outside fabric.
- Lining fabric: two lower lining pieces.
1. Measure and mark two rectangles on the outside tote fabric. These two pieces will give your tote bag its dimensions, so decide what height and width works for you. Then, add 1 inch to the width and 2 ½ inches to the height for seam allowance, which is the margin between the stitching line and the fabric edge. I’m making a tote that is 20 by 14 inches, so I marked two rectangles 21 inches wide by 16 ½ inches high.
- Note: When fabric is manufactured, the weaving process creates parallel selvedges that run the length of the fabric at a consistent distance from one another. In fabric terminology, these are where the weft (width) threads loop back at the end of a row. They’re more tightly woven than the rest of the fabric, so they do not fray. Many cotton fabrics have words printed on the selvedges, usually the name of the fabric designer and/or the company that distributes it. Use these edges as guides to make sure you’re marking a straight line that follows the fabric’s grain (the direction of the thread, like wood grain).
2. (Optional) Add stability to your fabric. If your outside fabric is already sturdy (like a thick denim), you can skip this step. If you chose a light- or medium-weight fabric, cut two rectangles of the same size out of muslin (an off-white cotton fabric) to use as flat lining.
- Note: Flat lining is a standard sewing technique where support fabric is used to add structure and stability to the outside fabric. The two layers of fabric are sewn together around all four edges and then treated as one piece. Flat lining originated in historical dress making and was particularly common in the 19th century, when most dress bodices were constructed in this manner.

3. Add depth. To do this, you’ll need to create gussets. I like a depth of 4 inches because I find it the most useful for carrying a good amount of stuff while, at the same time, not having a bag that is so big that it constantly bangs into things (or people). Cut 2-by-2-inch squares from the bottom corners of the outside fabric and muslin flat lining.
- Tip: If you want to give even more depth to your tote bag, calculate how much that would be, divide it by two, and use that number for your squares. So, if you want your tote to have a depth of 8 inches, you’ll have to cut 4-by-4-inch squares. Keep in mind, though, that this will take away from the height of your bag. The bigger the squares, the shorter your bag will be.
4. Cut your lower lining pieces. Mark and cut two rectangles from your lining fabric that are the same width as the outside fabric and 2 inches shorter in height. No matter what size bag you are making, you must cut these 2 inches shorter because there will also be upper lining pieces. For my bag, the lower lining pieces are 21 inches long, by 14 ½ inches wide. These will be attached below the zipper on the inside of the bag. Cut out the squares from the bottom of these pieces as you did in the previous step, following the measurements you decided on for the depth of your bag.
5. Cut two upper lining pieces from the outside or lining fabric. The choice of which fabric you use is only aesthetic. These pieces will form the top part of the tote, where the zipper goes. They will both be long, rectangular pieces, 2 ½ inches wide and as long as the width of your bag. For the one I’m making, the rectangles are 21 by 2 ½ inches. If you’re using a lighter outside fabric, you should also cut two equally sized pieces from the muslin or flat lining fabric to give it structure.
6. (Optional) Cut a pocket. The beauty of totes is that they are simple bags, but if you’re carrying a lot of stuff, an inside pocket will definitely come in handy for keys and other small items. If you want to add one to your bag, cut a rectangle 8 inches high by 11 inches wide from your lining fabric. This will make a finished 5-by-7-inch pocket. If you want a bigger or smaller pocket, figure out the size and cut a piece that is 1 inch wider and double the height plus 1 inch. Also, cut a piece of muslin in the same size for flat lining.
7. Cut two pieces of webbing for handles. They must both be 50 inches long and will make an 11-inch strap from the top of the bag to the top of the handle. If you don’t have webbing, you can make straps from your fabric: For a finished strap 1 inch wide, cut two pieces 50 inches long by 3 inches wide. If you want them wider, the total width of the unfinished piece should be double the final width, plus 1 inch for seam allowance. You will have some webbing left over.
Flat line your fabric
8. Iron all the pieces to make sure there are no creases.
9. Flat line your fabric. As explained above, this is the act of attaching two layers of fabric together by sewing around all the edges. Place the outside fabric pieces right-side down on a flat surface and put the corresponding muslin pieces on top (also right-side down), matching all the edges. Pin in place to keep the two fabrics from shifting while sewing. If you’re adding a pocket, flat line the pocket as well.
10. Sew along all edges, a quarter of an inch in. Place the side that will be on the inside of the bag (the flat lining side) up.
Attach the webbing handles to the bag fronts.
11. Mark the strap position on the outside pieces of the tote. With a ruler, find the center of each outside piece and measure 3 ½ inches on either side of it. (You can also simply fold your pieces in half to find the center.) Draw a line perpendicular to that mark using a disappearing ink pen or tailor’s wax that will go away when ironed. Pin the two 50-inch long pieces of webbing in place so the inner edges are along the lines you drew. Then, from the top of the outside pieces, draw a mark 1 ½ inches down. This is where the stitching will stop.

12. Sew the webbing straps. When you do so, make sure the needle stays an eighth of an inch from the edges of the webbing.
(Optional) Attach the pocket

13. Fold the pocket in half with the flat lining facing up. Leaving an opening of 2 inches on the bottom edge, sew around the bottom and sides of the pocket, half an inch from the edges. The opening will be where you turn the pocket right-side out.
14. Clip the corners of the pocket at a 45 degree angle. Be careful not to cut through the stitching lines. Then, pull the pocket right-side out through the opening you left in the bottom. Use your fingers, or a point turner if you have one, to push out the corners. Don’t use anything with a sharp point (like a pen or pencil), as it may make a small hole in the fabric.
15. Fold the edges of the opening under toward the inside and press the entire pocket flat.
16. Center the pocket 3 inches from the top edge of the lower lining pieces. These are the pieces you cut out in Step 4. The pocket will be on the inside of the bag and attached to a lower lining piece. Pin it in place and sew, staying an eighth of an inch from the edges. To make a stronger, more secure pocket, sew a second row of stitching a quarter of an inch in from the first row.
Attach the zipper
17. Position the zipper facing up on the top edge of a lower lining piece. This will be one of the two pieces you cut out in Step 4. The top edge of the zipper should be along one side edge of the lining piece. The lower lining piece should be right-side or face-up.

18. Place the upper lining piece on top of the zipper, outside face down. The two fabric edges and the edge of the zipper should all be lined up. Pin it in place. Then, open the zipper so the pull is out of the way while sewing.
19. Using a zipper foot, sew the zipper in place. Here, you are sewing one side of the zipper between the lower lining piece and the upper lining piece—essentially sandwiching the zipper between the two pieces.
20. Topstitch the zipper. Open the lining and fold the upper lining piece back over the zipper so the outside is facing up. Sew along the edge, going through the fabric layer, the seam allowance of the lower lining piece, and the zipper to secure everything.
21. Place the zipper face-up on the other lower lining piece.
22. Lay the second upper lining face-down as before, lining up the two fabric edges and the edge of the zipper. Again, sandwich the zipper between the lower lining piece and the upper lining piece. Repeating Step 19, sew.
23. Open the upper lining piece and fold it over. Do this the same way you did for the other side, pushing both lower lining pieces to one side. You’ll want to sew through the upper lining piece edge, the zipper, and the seam allowance of the lower lining piece. Stitch again.
Put the bag together
24. Sew the upper lining to the outer pieces. On the zipper piece, fold all the layers to one side except for one upper lining piece. Line up the edge of the upper lining piece with the top edge of one of the outside pieces. Make sure the outer sides of both pieces are facing each other. Sew. Repeat for the other upper lining and outside pieces.
25. Sew the bottom seams. Lay the tote bag on a flat surface so the two layers of the outside pieces face each other (right sides together) and the layers of the lining pieces face each other (also right sides together).
- Tip: If you’re unfamiliar with sewing terms, the right sides of the outside pieces will be those that make up the bag’s exterior, while the right sides of the lining pieces will be those that make up the bag’s interior.

26. Pin the bottom edges together. This means lining-to-lining, and outside layer-to-outside layer. Sew with a half-inch of seam allowance.
27. Sew the side seams with the top end of the zipper first. Fold the zipper in half so the edges point toward the upper lining piece. Sew the side together with a half-inch seam allowance. With this one seam, you will be sewing one side of the lower lining pieces together, one side of the upper lining pieces together and one side of the outside (side) pieces together. Trim away any excess zipper.
28. Sew the other side seam the same way. Repeat the previous step, but leave a 4-inch opening in the lining side. This is where you’ll pull the bag right-side out when you’re done.
29. Sew the corners. Open one corner and match the seams to form one of the bottom gussets. Sew with a half-inch seam allowance. Repeat for all four corners.
The final touches
30. Turn your bag right-side out. Pull the whole bag through the 4-inch opening you left in the lining. Fold the open seams inside on the lining and stitch along the edge.
31. Press and stitch the top edge. Push the lining to the inside and press along the top seam edge where the outside fabric and upper lining are sewn together. Sew along this edge, all the way around. Your new tote bag is now complete.
Fill it with whatever you like, zip up, and head out into the world with your new, unique, personalized bag.
