
Disk space is always at a premium, so you should take every opportunity to free up as much of it as you can. One of the best ways to do this is to back up a bunch of files to the cloud, then remove them from your computer entirely.
Stashing your data in the cloud will allow you to access your files while still having hard drive space on your computer. The process is relatively easy, but don’t let this be your only form of backup: keep your files on another cloud service or an external hard drive (or two) in case something catastrophic happens.
How does the cloud work?
Understanding the cloud can be a little confusing at first, but platforms like OneDrive, iCloud, Dropbox, and Google Drive keep two identical folders—one in your computer and one in the cloud. They’re in sync by default, which means that when you change something on your laptop, it changes in the cloud, and vice versa. If you have these apps installed on multiple computers, the changes propagate across all of them allowing you to access latest version of your files from any device.
You can also set certain folders to be online-only, meaning they only live in the cloud and take up no space on your hard drive. When you want to access these files, you’ll need an internet connection, but that’s really the only catch.
[Related: How to move your photos to and from any cloud service]
Cloud storage and syncing apps can help you manually choose which files live locally on your computer, but they can also do the job automatically. In some cases, you can keep a folder online-only, but still have placeholders for its contents on your hard drive. As soon as you try to access them, they’ll download from the cloud and open as normal.
All these services also have web interfaces, which allow you to log in and view your files on any computer with a web browser and an internet connection. In some cases, web access might be all you need.
When deciding what kind of files to store where, think of the cloud as your basement—a place where you store things you don’t want to throw away, but wouldn’t keep in the middle of your living room. As such, it’s best to make older files and folders online-only—those you want to keep backed up but don’t need to access regularly, such as vacation photos and videos. You should locally store any files you constantly need access to, especially if you can’t rely on internet connectivity.
How to save computer space with OneDrive
If you run Windows and use OneDrive, certain folders on your computer and in the cloud will sync by default. You can also designate specific files as online-only to save local storage space. If you need them, you’ll have to download them with a couple of clicks, but this is not something you’ll want to do often with large files—it’s time-consuming.
To make some files online-only, right-click on the OneDrive icon (a cloud) in the Windows taskbar notification area, then choose Help & Settings and open up the Settings tab. Go to Sync and backup, then open the Advanced settings. Finally, locate Files On-Demand and select Download files as you use them.
You’ll find there are three types of files in OneDrive. First, there are online-only documents, which you’ll recognize by the blue cloud badge that sits on top of the file icon in File Explorer. These live in the cloud, but open normally as long as you have an internet connection. The second type are locally available files, which have a green check mark on them and live both on your device and in the cloud. Finally, there are locally stored files. These are marked by a white check mark in a green circle and they stay on your computer no matter what.
The last two types are practically the same, and you’ll be able to open and edit them normally, even if you’re offline. The only difference is that locally available files will automatically become online-only after a set period of time if you enable a Windows 10 and 11 feature called Storage sense, which uploads files to the cloud when you’re running out of space on your computer.
OneDrive will handle some of this automatically (by downloading files when you open them, for example), but you can also manually set up what the platform does with specific files and folders by right-clicking on them in File Explorer.
How to save space with iCloud
Apple has two different storage systems: iCloud and iCloud Drive. The first one syncs information on your Mac devices, including music and videos purchased through the iTunes Store, plus contacts, calendars, and pictures. The second, iCloud Drive, is Apple’s version of OneDrive or Dropbox. You can install it on Apple and non-Apple tech, use it to store any file or folder, sync that data across devices, and share your files with anyone.
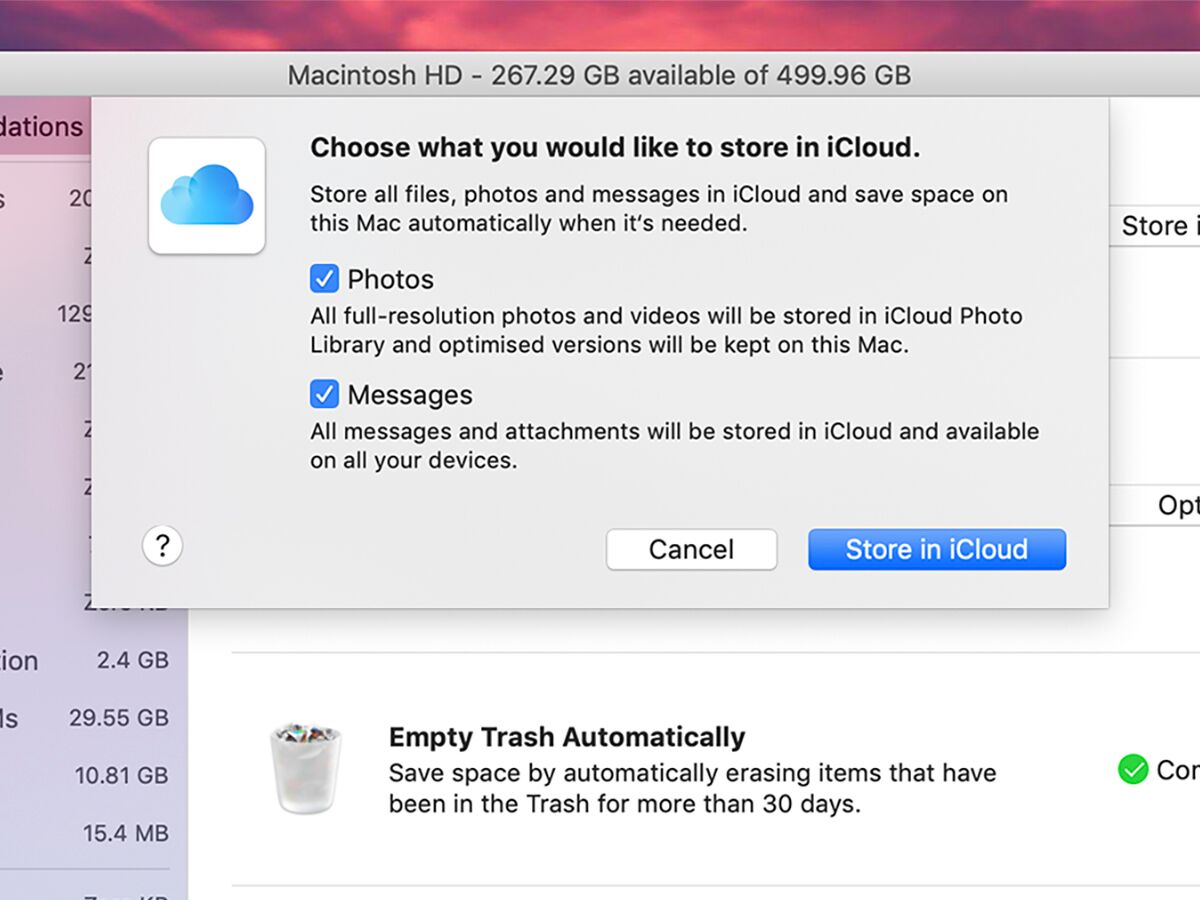
To see how much of your iCloud storage you’re using on your Mac, open the Apple menu, choose About This Mac, click More info, and scroll down to click Storage Settings. Under Recommendations, you’ll see a Store in iCloud button. Click it, and you’ll have the option to save all the files and documents from your Desktop and Documents folders in the cloud so you can access them from any Apple device where you’re signed in with your Apple ID. You can also move all your messages to the cloud rather than storing them locally.
Under Optimize Storage, click Optimize to remove any local iTunes movies and TV shows you’ve got on your Mac that are marked as watched—you can always download them again if you need to.
Finally, open System Settings, go to the Apple ID tab, and choose iCloud. If you toggle the switch next to Optimize Mac Storage, macOS will start to clear your hard drive of older files you haven’t opened in a while, whenever you start to run out of space. These files won’t disappear from iCloud and you can always redownload them.
How to free up space on your computer with Dropbox
Dropbox offers two ways to keep files in the cloud and off your hard drive until you need them. The first is Selective Sync, and it’s available to users of both the free and paid tiers. Simply open the Dropbox Preferences panel on your computer, and under Selective Sync (if you’re a Windows user), or Select folders to sync to this Mac (for Mac users), click Select folders.
This feature will let you uncheck some or all of the folders in your Dropbox to prevent the platform from downloading and syncing them to your computer. If you uncheck a folder, it will disappear from that device, but will remain in the cloud and on any other computers you’re using Dropbox with. You can follow the same path and undo this preference if you want to restore access and syncing capabilities to certain folders.
Then there’s the feature formerly known as Smart Sync, which is only available to paying Dropbox customers. It works like Selective Sync but it’s more automatic: it lets you move files to the cloud, making them online-only, but the platform will put placeholders for them in the Dropbox folder on your computer. You can easily view online-only documents when you’re offline, but if you need to edit them, you’ll need an internet connection to download them. Changes will sync to the cloud, but if you want to keep the file online-only after that, you’ll need to manually enable the feature again.
[Related: 6 essential Dropbox tools you might be missing]
To make a file or folder online-only, go to your Dropbox folder, right-click on the file or folder you want to only store in the cloud and choose Make online-only. You can also make all new files online-only by default: go to Dropbox Preferences, click Sync, open the dropdown menu next to New files default, and select Online-only.
How to save space on your device with Google Drive
On Google Drive, you pick which folders live both on your computer and in the cloud, and which you just want in the cloud. If you use Google Drive on more than one computer, you can keep different folders on different devices. All users, whether they pay for the service or not, have access to the Google Drive for Desktop app, which is the easiest way to manage your files if you’re using this service.
With the app installed on your computer, click the Drive icon in the menu bar, then the gear icon, followed by Preferences. On the sidebar, choose Google Drive and check the bubbles next to Stream files (so they’ll only exist in the cloud) or Mirror files, meaning they’ll live in both locations at the same time. To sync folders from your local drive, select the option for your computer and hit Add folder to start syncing.
This story has been updated. It was originally published on July 10, 2019.
