
I’m a mechanical engineer who loves bicycling. When gas prices soared through the roof in 2009, I rode my bike to save money. I wanted to charge USB devices, such as my phone, during commutes but didn’t want to spend $150 (or more) on a commercial wheel-hub generator. In the end, I was able to build a cheaper system.
Electrical work wasn’t my expertise, so I had to teach myself how to build circuits from the ground up. I’m now on version three of my two-port USB generator, which is about 70 percent efficient above 12 mph and creates less drag on bike wheels than other designs. With the right equipment, you can build one yourself.

STEPPER MOTOR
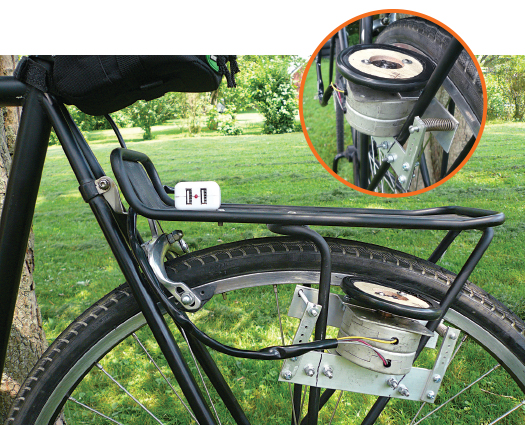
A stepper motor converts the rear wheel’s spinning motion into electricity. To keep the flow consistent enough to charge devices, get a five-volt, 3.3-amp model (about $10 at electronics surplus stores). Attach a small wheel—I cut one from plywood—to the stepper motor. Line the small wheel’s rim with foam padding and electrical tape to give it grip. When mounted against the bike’s rear rim, the small wheel will turn the motor.
RECTIFIER
USB devices use direct current, but stepping motors provide alternating current. Convert the flow by building a rectifier out of eight 1N4001 diodes ($1 a pair at hobby stores). Link the diodes in anode-to-cathode pairs, and solder them together to make four pairs. Solder two pairs side by side into a bridge, and repeat with the other pairs for a total of two bridges. Connect each bridge’s midpoints with four-conductor wire to the stepper motor’s positive and negative wires [see wiring diagram above].
USB CAR CHARGER
Open a two-port USB car charger. Remove the spring on the cylindrical end (positive lead) and the two clips (negative lead) that normally secure the charger in a power port. Solder the rectifier’s positive and negative leads to corresponding terminals on the charger. Connect the other ends of the wires to the matching terminals on the stepper motor.
GENERATOR FRAME
Build a frame to keep the generator’s small wheel in contact with a bike rim. My bike has a rear rack, so I cut a six-inch-long slab of aluminum to span two bars of the rack [see above photo]. I secured the slab under the generator with U-bolts. Next, I cut two 90-degree aluminum angles for the other side of the generator and bolted them to the slab to clamp everything in place. Attach the USB charging port wherever you’d like (I put mine below the seat), and start pedaling for portable power.
Time: 1 day
Cost: $25
Difficulty: 3/5
For Costlow’s complete build instructions, [download this PDF](https://www.popsci.com/files/USB/ Bike Generator by Doug Costlow.pdf).
This article originally appeared in the May 2013 issue of Popular Science. See the rest of the magazine here.
