We may earn revenue from the products available on this page and participate in affiliate programs. Learn more ›
If you need a file on macOS, you find it in, well, Finder. This built-in program is a window to your system, a launcher for your applications, a record of your recent activity, and much more—it’s perhaps the most important utility on your Mac.
That importance means you shouldn’t take it for granted. Take a few minutes to learn all the cool features and hidden tricks Finder is capable of.
1. Tidy up the Finder sidebar
Finder is the easiest way to jump to key parts of your system, whether that’s your iCloud Drive folder or a list of the external hard drives currently hooked up to your Mac. These locations are all accessible via the Finder Sidebar (View and Show Sidebar if you can’t see it).
You get to pick which shortcuts appear in the Sidebar and which don’t. While it’s convenient to have these quick links, you won’t want to add too many of them—that will make it hard to find the ones you need. Instead, stick to the entries that are most useful to you.
To configure the Finder Sidebar, choose Finder, Preferences, and Sidebar. It’s a simple checkbox list, and you might be surprised at just how many locations it covers. Your computer will apply changes as soon as you make them, and you can change the order of the Sidebar list by clicking and dragging individual items around.
2. Build an impressive system of tags
Finder lets you tag files and organize them into folders, which gives you a useful (but often neglected) way of keeping them in order. For example, you could tag files that are important for one particular project, and bring them all up on screen with a couple of clicks, even if they’re spread across multiple disk drives and folders.
There are various ways to tag files, including with Ctrl+Click: from the pop-up menu that appears, choose one of the colored tags macOS provides, or select Tags to set up your own. Your custom tags can be labeled whatever you like—it’s truly up to you how you want to use them.
[Related: Ditch your built-in file explorer for one of these 6 apps]
You can also find tags on the Sidebar, and you can use Finder > Preferences > Tags to select which ones appear in the bar and the Finder menus. It’s also possible to search for specific tags: click the magnifying glass icon in the top right corner of the Finder interface and type out the tag’s name.
3. Rename files in batches
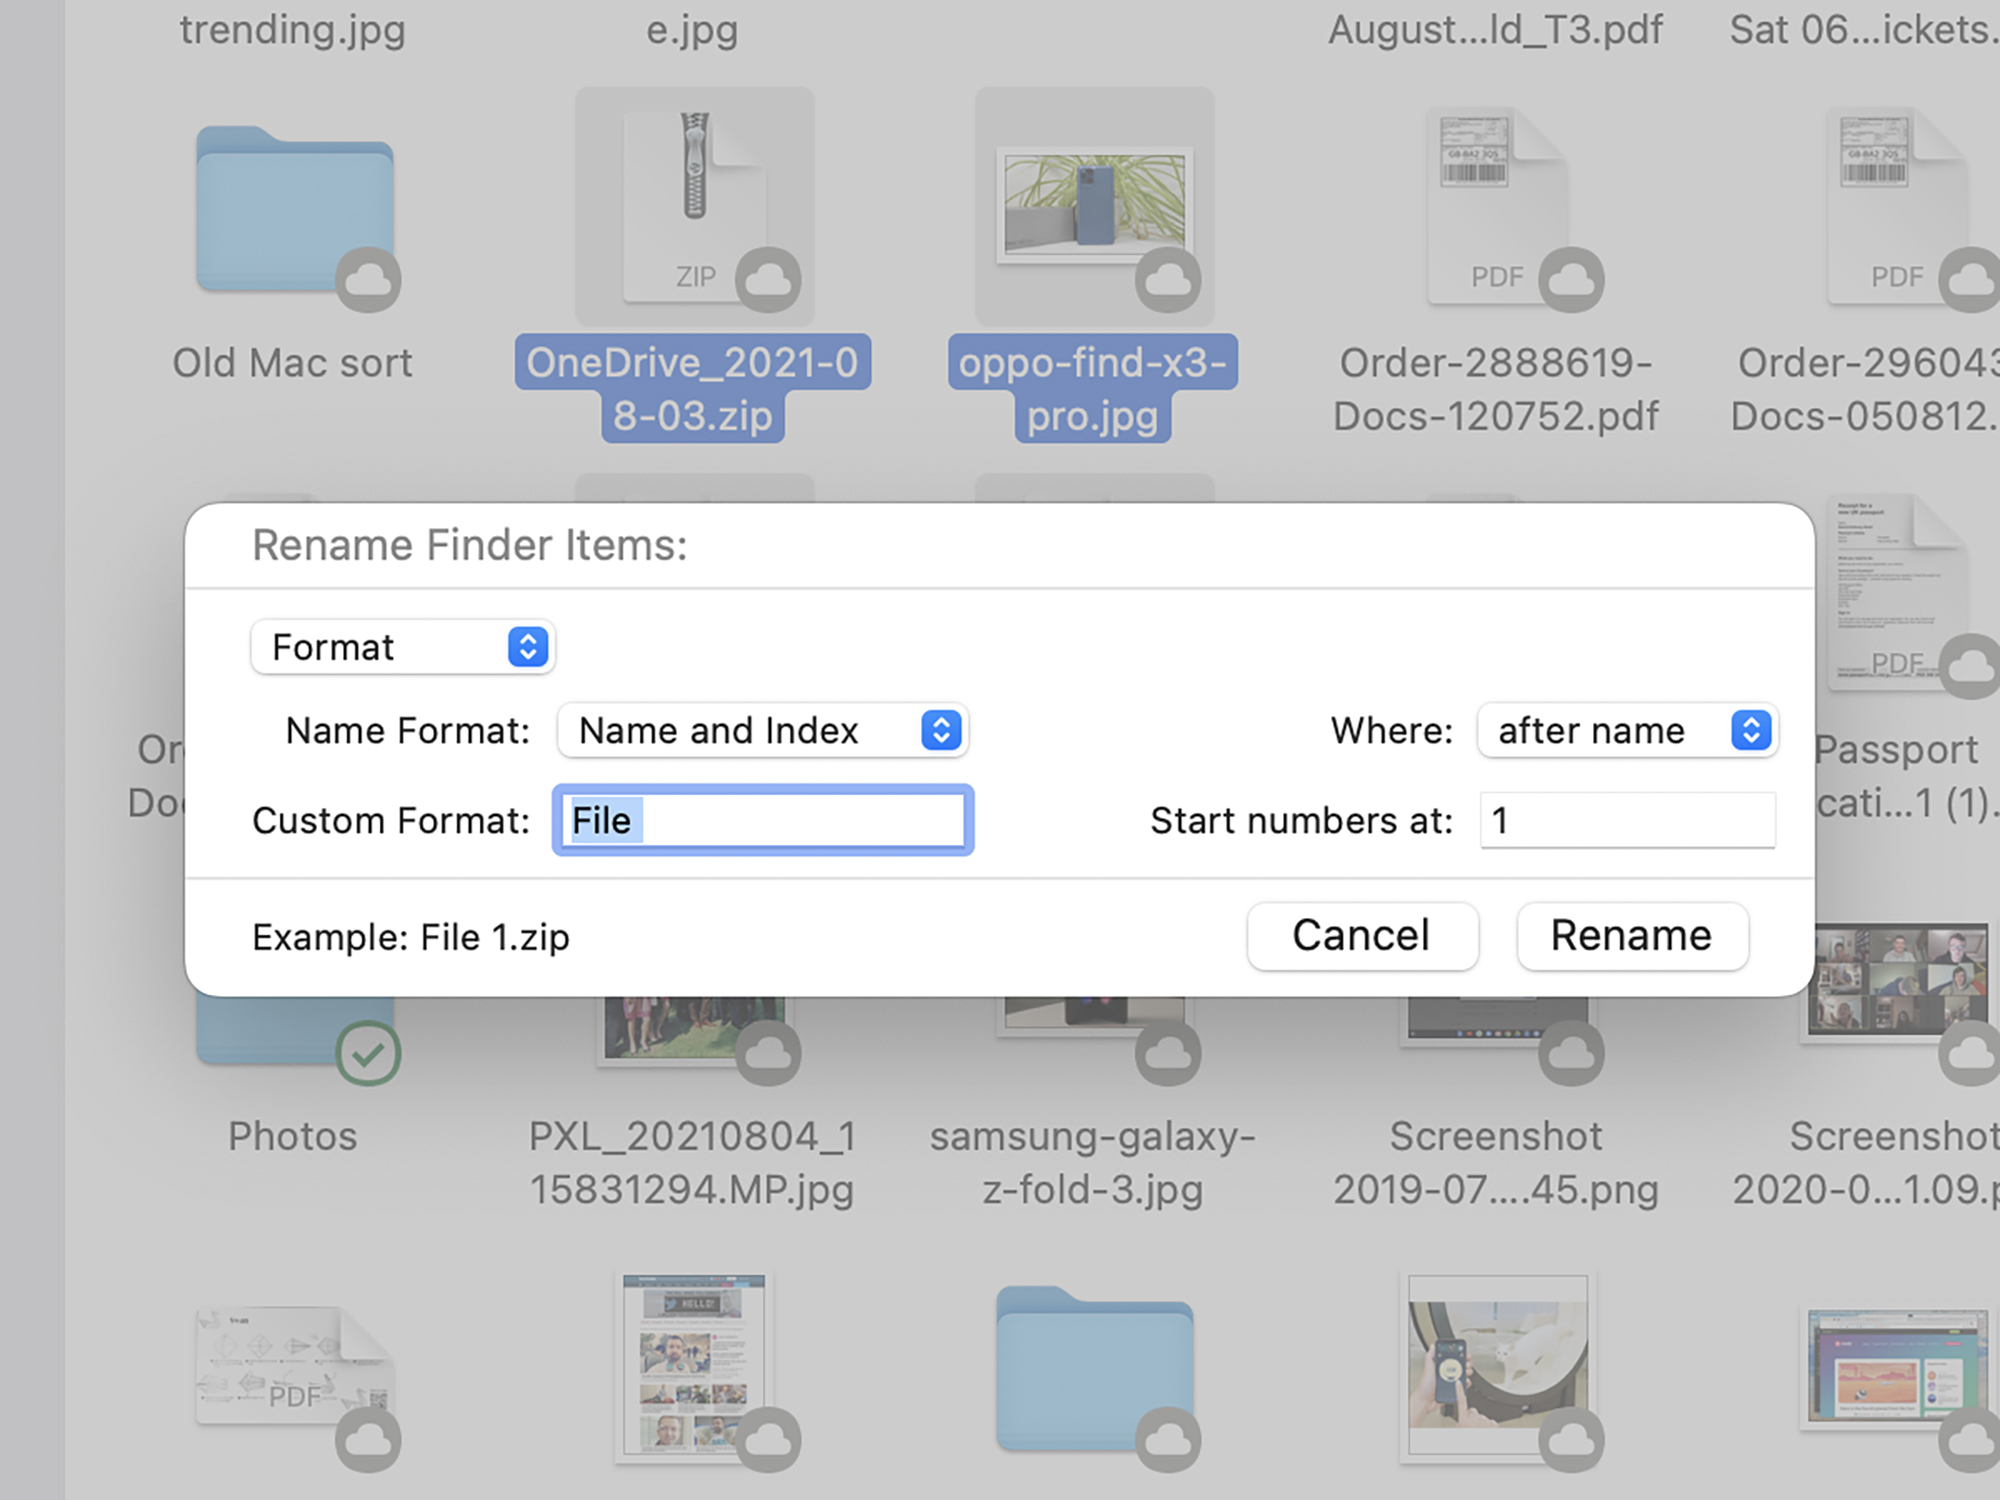
Finder is rather smart when it comes to renaming groups of files, though the way to go about it isn’t immediately obvious. We have a more detailed macOS file renaming guide if you’re interested, but we can cover the basics right here.
First, select the files that need renaming, Ctrl+Click on one of them, and choose Rename. The dialog that appears will give you three options for file renaming, which you can select using the top drop-down menu. Choose Replace Text (the same text gets replaced in each filename), Add Text (custom text gets added to each filename), or Format (every filename gets formatted in a standard way), depending on your preference.
As you make your choice, you’ll see the other options in the dialog box change accordingly (so you can set the text to be added and where to insert it, for example). When you’re happy with the changes, click Rename.
4. Use tabs instead of windows
Just like your web browser, Finder can use tabs inside the same window if you’re browsing multiple parts of your system at once. This keeps your workspace a little less cluttered, and you might find it easier to switch between tabs than between windows.
To create a new Finder tab, choose File and New Tab, or hit Command+T on the keyboard. You can also open a folder as a new tab with Ctrl+Click—choose Open in New Tab from the menu that appears. Use Ctrl+Tab to cycle forward through the tabs in the current window, and Shift+Ctrl+Tab to go back the other way.
There are a couple of extra tab-related tricks as well. First, to get an overview of all the tabs you have open, choose View, followed by Show All Tabs (or press Shift+Command+). Second, combine several Finder windows into one with multiple tabs by picking Window and Merge All Windows.
5. Change the default Finder view
You may have noticed that macOS gives you a lot of control over how files look in Finder. To set the view options for the current Finder window, choose View, then Show View Options. From there, you’ll be able to set a variety of options that depend on the type of view you’re currently using (Icons, List, Columns, or Gallery).
Using the Always open… checkbox at the top of the dialog, you can tell Finder to always open this particular folder using the options you’ve configured. If you want to apply the same settings to every folder opened with this type of view, click on the Use as Defaults button at the bottom.
[Related: 23 useful Mac settings hiding in plain sight]
If you open the view options for a folder using the Icons view, for example, the settings include icon size and spacing. In the List view, they include the data shown on screen, like the date the files were last modified. You can change the view of a particular folder via the View menu or the view icon on the Finder toolbar (which changes to indicate the type of view you’re currently in).
6. Choose where Finder starts
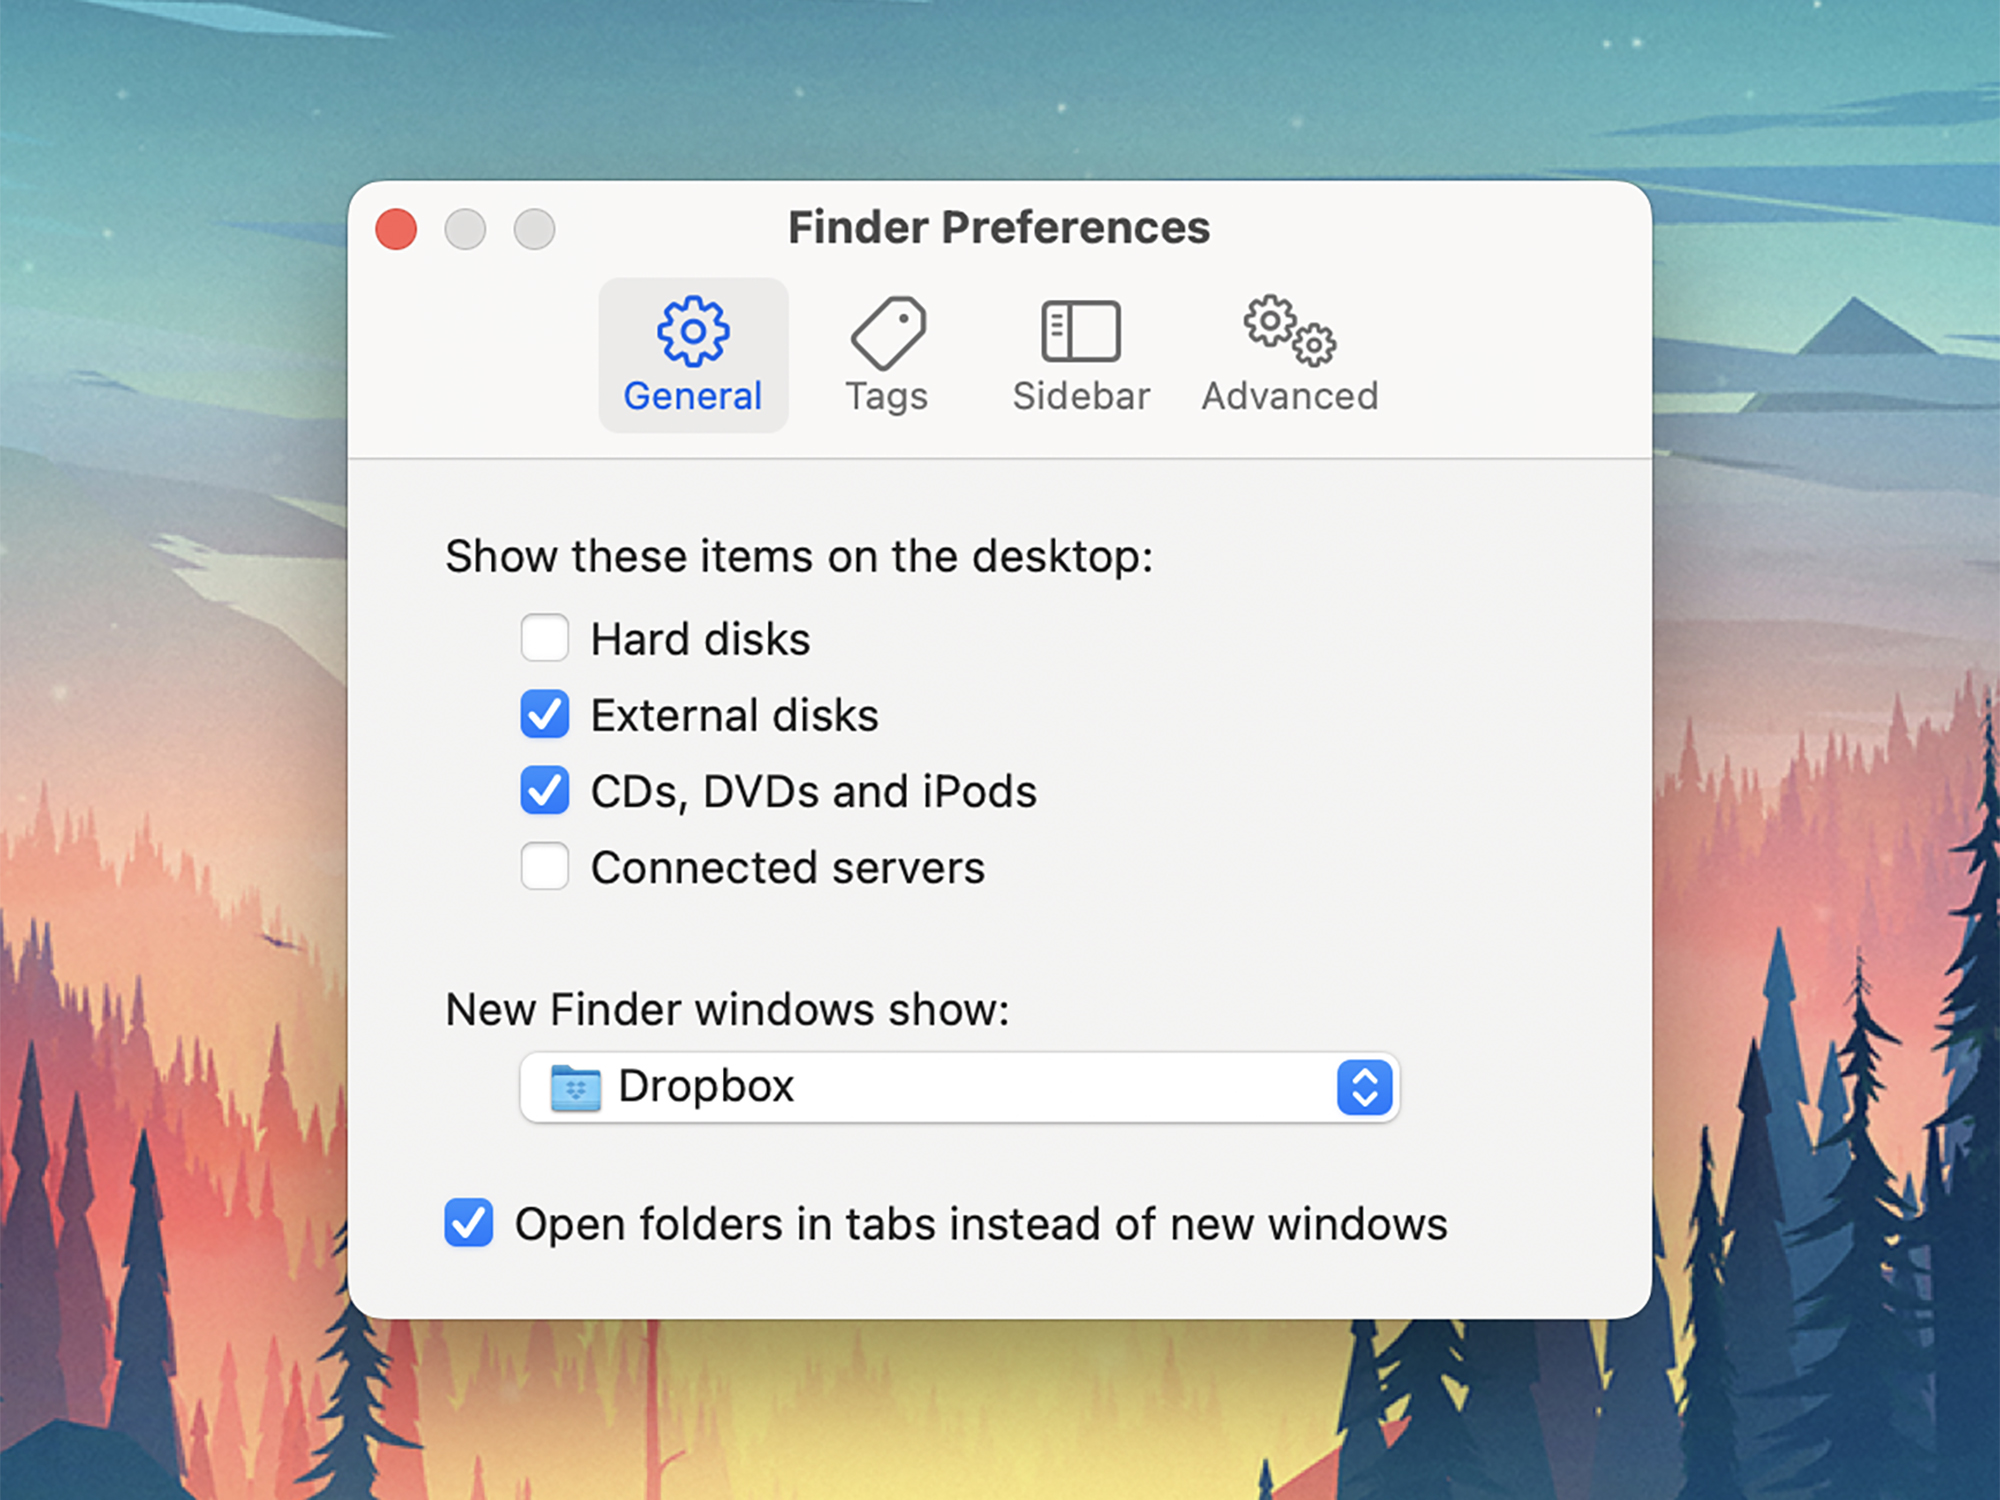
When there are no Finder windows open and you launch the utility, you’ll automatically end up in the Recents view. It’s a handy overview of the files and folders you’ve recently worked on, and a lot of users won’t need or want to change this.
However, you can get Finder to start up showing a different part of the system instead. Open the Finder menu and pick Preferences, then General to make your choice in the New Finder windows show drop-down menu.
Common locations like the desktop and the documents folder are clearly visible, but you can also click Other to pick any folder or location on your Mac. You can choose, say, a particular hard drive or the Applications folder.
7. Know your keyboard shortcuts
Keyboard shortcuts can be hugely useful everywhere on your Mac, and that includes inside Finder. For example, you don’t have to drag a file to the Trash to delete it—you can highlight it and press Command+Delete instead. To delete the file permanently right away, without a stop in the Trash folder, use Option+Command+Delete.
With Command+Shift followed by the right letter, you can jump to different parts of the system. Add a D to go to the desktop, an F to go to the Recents folder, an R to go to the AirDrop folder, and an I to go straight to the iCloud Drive folder. Another handy one to know is Command+F, which will open up the Finder search interface for you.
Cutting and pasting is pretty well hidden in Finder—copy and paste is the default action—but a keyboard shortcut will unlock the mechanism. You can still use Command+C as normal to copy, but instead of using Command+V to paste, hit Option+Command+V instead. That will switch to the cut and paste process. There are plenty more to get familiar with, and Apple has a full list here.
