Ever feel like you have plenty of charging cables, but not enough adapters to plug them into the wall? It would be so much easier if your regular outlets just included USB ports. Luckily, you don’t need an electrician to make this change. Here are two easy ways to add USB ports to your walls.
The easy, no-hassle way: Plug-in adapters
Let’s start with the simplest option: Buy a multi-outlet adapter with USB ports and leave it plugged in.

The typical charging block is easy to lose because it’s so darn small, but if you get something like the APC Wall Mount Surge Protector, you can just leave it in the wall without sacrificing outlets—in fact, you’ll gain a few. You’ll find plenty of models like this on Amazon, albeit with different designs, but APC is a highly trusted name in surge protection, so we’re confident recommending it.
There are a few downsides to this option. First, you’ll obviously have to deal with some extra bulk in the wall—that’s unavoidable. Second, it provides 2.4 amps of power across both USB ports—which means it’ll charge two phones at once, or one larger tablet, but it won’t be able to charge a phone and a tablet at the same time.
Finally, the APC unit provides a screw that allows you to secure it to the wall using the screw hole in traditional outlets—but not all outlets will have that threaded hole in the middle. In those cases, you can still use the APC unit, but it won’t connect to the wall as securely, which means it may fall out easily when you unplug your charged device. You’ll experience this issue with just about any wall-mounted surge protector, so it’s up to you whether that’s worth the hassle-free installation.
The DIY way: Replace your outlet
If you’re willing to do a bit of electrical work, you can install an actual receptacle with built-in USB outlets. It’s remarkably easy to do, as long as you take the necessary precautions.
One quick caveat before you start: If you’re at all uncomfortable working with electricity, hire an electrician. Or at the very least, get a DIY-savvy friend to help you your first time. This is particularly important if you’re thinking about replacing GFCI (ground fault circuit interrupter) outlets, which protect you from electrical shocks in rooms with water sources—like the kitchen or bathroom. In this case, you may want to consult a professional first, especially if you aren’t sure how that room’s circuit is laid out.
For this guide, I’ll be installing this receptacle from TOPGREENER, which provides up to 2.4A of current for each USB port. It’s perfect for charging all your devices, including tablets. If you have a number of USB-C devices (or want to be prepared for the inevitable USB-C future), you can use this model instead, which outputs 5.8A for quicker USB-C charging on phones that support it. Whatever you get, make sure it’s UL-listed, which ensures it adheres to certain safety standards. You’ll also need a voltage tester like this one.

Klein Tools NCVT-1 Non Contact Voltage Tester
This video demonstrates how a non-contact voltage tester works.
To start, use your voltage tester on your outlet to ensure the tool works properly. If the outlet is hot, the device will turn red and beep repeatedly—that’s what you want to see. Check out the video above for more information on how to use your voltage tester properly. Do not skip this step or get lazy—it’s one of the most important things you can do to protect yourself from electric shock.

Next, head to your home’s circuit breaker box and switch off the power to the receptacle you’re replacing. Test the outlet again with your voltage tester to ensure it’s turned off (again, do not skip this step.) If your breakers aren’t labeled well, this step may take a little trial and error, so before you start flipping switches, first shut down any computers or other important devices.
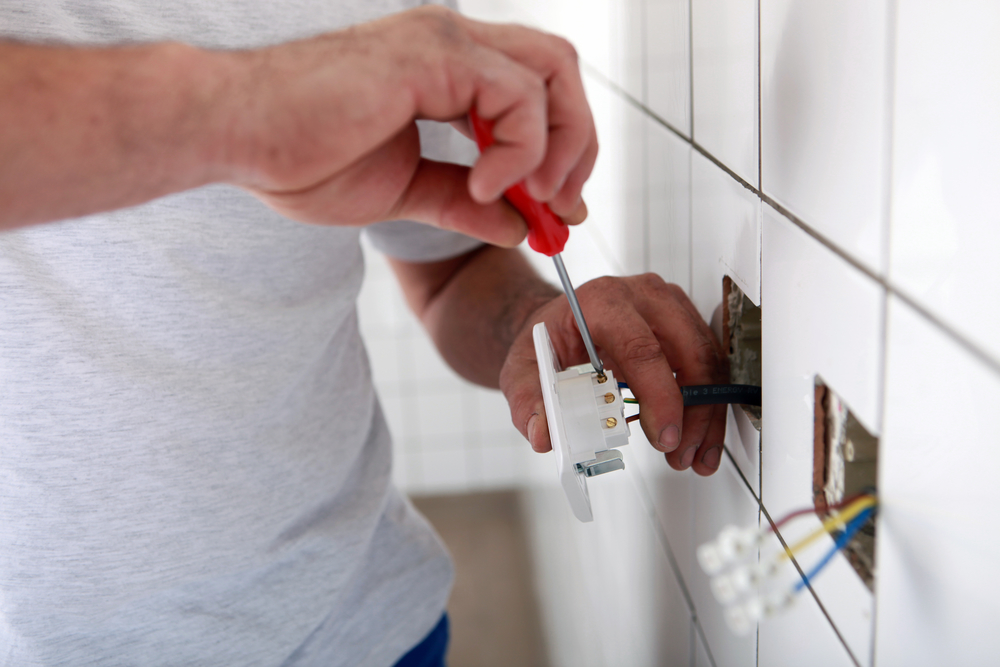
Once you’re confident you’ve shut off the electricity to that outlet, you can unscrew the faceplate and remove it. You’ll then find two more screws under that, holding the outlet in place. Remove those and pull the outlet out of the wall.
Next, make note of which wires are connected to which terminals on the outlet. If your wires are properly colored, like mine were, you should have one or two hot wires (black) connected to one side with a gold screw, and one or two neutral wires (white) connected to the other side with a silver screw, along with a bare copper ground wire connected elsewhere on the outlet with a green screw. The wires may be be wrapped around screws, under clamping plates, or pushed through holes in the back of the outlet, depending on its design.
If these colors are reversed, all wires are black, or you see some other inconsistency, it’s a good idea to have an electrician come take a look. It’s always possible that the previous owner wired something improperly—and you don’t want to repeat their mistake.

Take a photo, so you can refer to how the original outlet was wired. Then unscrew the wires from their terminals and remove the outlet from the wall.

Now, install the new outlet with exactly the same connections as the old one. Connect the black wires to the hot terminals and the white wires to the neutral ones, just as they were before. Finally, connect the ground wire to the green screw, and then push the whole outlet back into the wall. This may take some strength, since those wires are thick. When you’re done, screw everything back in.

When everything is in place, flip the power back on and test the outlet. If it works, congratulations—you’ve successfully brought your home into the 21st century.
