The iconic American cowboy’s style invokes a feeling of ruggedness and free spirit, so it’s no surprise the functional fashion of the wild, wild West is once again trendy in mainstream fashion. Distressed boot-cut jeans, a cowboy hat, and a pair high-end boots make wearers feel like they’re ready to saddle up and work on a ranch—even if they’ve never ridden a horse or touched a cow. Hand-carved handbags and custom-tooled belts are popular accessories for those who long for a day in the saddle, but they’re also part of the everyday attire for working cowboys and competitive riders like myself who like to bring a bit of the frontier into the corporate office space.
But mass-produced leather products aren’t the same as those handcrafted by an artisan. They’ve got a similar look and feel, but often aren’t made with the same high-quality leather and don’t offer the personalization that defines artisan work. So, when it’s time for me to order a new belt or gear for my horse, I go to a skilled leatherworker.
Aprille Tomlinson is exactly that. And as a trained artist who taught herself the craft after buying a horse, she knows the appeal of teaching oneself a new trade. For anyone considering a foray into leatherworking, she has some wisdom to offer.
Home on the range
Tall and thin with a neat blonde braid that hangs down to her waist, Tomlinson looks like she belongs on a ranch out west—especially when she’s riding her golden palomino. Her favorite outfit is a chocolate-colored felt cowboy hat, a long-sleeved purple button-down shirt with pearl snaps and a western yoke adorning her shoulders. Chocolate-colored leg coverings with ivory accents are her favorite piece of cowgirl gear.
Known as chinks, these protect a rider’s legs from brush and bramble, the weather, and a cow’s pointy horns. They’re a shorter variation of chaps that end mid-calf on most riders and are believed to have evolved from the Spanish vaquero leg covering called armitas. These are her favorite because she made them herself.
Tomlinson fits the part of a working cowgirl, but she wasn’t raised on the open prairie; she was born in West Sand Lake, New York—a town with fewer than 3,000 residents that’s about 40 minutes north of Albany, the state capital. She lives in nearby East Nassau on a 12-acre farm, large enough for a few horses.
An elementary school art teacher by day, Tomlinson earned a bachelor’s degree in art education and a master’s in painting and drawing. About five years ago, she was shopping for new horse gear, called tack, and found herself admiring the decorative carvings on the leather.
“I remember thinking: ‘Why can’t I make this myself?’” she says. “My parents are creative and always building things just by looking at a finished piece. It was just a way of life for me and with my art background, I thought, ‘Why not?’”
Leatherworking: the basics
Her workshop is in a spare bedroom at the back of her 1879 farm house, with various work stations set up around the perimeter of the room. There’s one table for dye work and painting, and one oversized wooden desk topped with a granite slab for drawing, carving, and stamping. A long table covered by a rubber mat fills one wall and serves as the cutting and assembly area. An industrial sewing machine sits in one corner and a large rack that nearly fills one wall of the room stores rolls of leather. She’s also created a staging area near her worktable for photographing her work.
But before you go on a shopping spree to fill a room with tools and materials for leatherworking, Tomlinson says it’s important to understand a few basics of the trade:
- Make sure your work area is well-lit. The detail and crispness of the carving is what makes a difference in the final quality and working in a dim area makes it hard to make fine cuts.
- Start with an inexpensive kit. Well-made tools are expensive. They are worth the investment as you become more skilled, but starting with a cheap kit will give you a chance to learn how to use the tools.
- Set up a workspace with a surface that won’t damage your tools when you cut through the leather. Tomlinson uses a self-healing cutting mat to protect her blades when cutting leather to size. When tooling, she sets a granite slab on top of the work bench for a solid surface to pound against. A plastic kitchen-style cutting board is best for punching holes.
- Don’t get discouraged if you don’t have experience with drawing or painting—you can buy ready-made patterns online.
- Take your time. Mistakes happen when you rush, and there’s no eraser or undo option.
Leatherworking supplies
Tomlinson says there are eight tools every aspiring leatherworker needs to start:
Utility knife with an interchangeable blade
You’ll use one of these to cut smaller pieces of leather off a hide or to round corners. They’re ideal for leather about 1/16th of an inch thick—5 ounces in leatherworking terms—or less. Leather measurements describe the material’s thickness, and Tomlinson says 1 ounce is equal to about 1/64th of an inch. Other countries measure in millimeters instead of ounces.
Round knife
Also called a head knife, these are used to cut out shapes or trim off pieces of leather.
Swivel knife
Leatherworkers use these to carve designs into leather. Tomilinson says this type of knife tends to feel quite awkward until you get the hang of it. Using one a skill that relies on muscle memory, so you’ll have to train your hand through repetitive work. “Start just using leather scraps and practice creating curved cuts and following lines until you’re comfortable using it,” she says.
Beveler
Simply put, these are used to enhance the edges of a design.

Maul
Use this tool to tap the top of a beveler or a stamping tool to make impressions in the leather. Mauls come in different weights, ranging from 6 ounces up to 5 pounds, so it’s important to find one you like. Tomlinson prefers a 16-ounce maul and says anything heavier quickly tires her arm. Some people use mallets, but she feels she has more control with a maul.
Mallet
These are made out of rawhide or plastic, and Tomlinson uses one to punch holes and set rivets.
A set of stamps
When hammered into wet leather, these three-dimensional metal blocks leave an impression in the form of either a letter or a geometric design.
An awl and thread
Together, you’ll use these to stitch two pieces of leather together or to add decorative details.
Material selection
Cow hides are a leatherworker’s canvas. Learning the difference between leather types takes a lot of research, and Tomlinson says the project she’s working on dictates which leather she uses. For beginners, she recommends imported leathers, as they’re inexpensive and good to practice on.
Tomlinson mostly uses American vegetable tan leathers for her custom orders, especially when making horse gear, because it needs to be durable. This type of leather is heavy, stiff, and comes in a natural tan color that leatherworkers can dye to their desired hue. She doesn’t have a tannery nearby so she buys it online by the square foot.
Regardless of the brand, leathers are of varying quality, Tomlinson says. All hides are ranked Grade A, B or C, depending on how damaged they are and how many defects are in the most usable (prime) areas or sections most likely to be trimmed off (non-prime). “I’ve found that I’m able to use Grade B for most of my projects and they are a bit more reasonably priced. You can definitely feel the difference in quality when you get to C leather,” she says.
If you’re looking for softer, more flexible leathers that come pre-dyed in a range of colors, you may want to check out the oil tan and glove tan varieties.
Getting to work
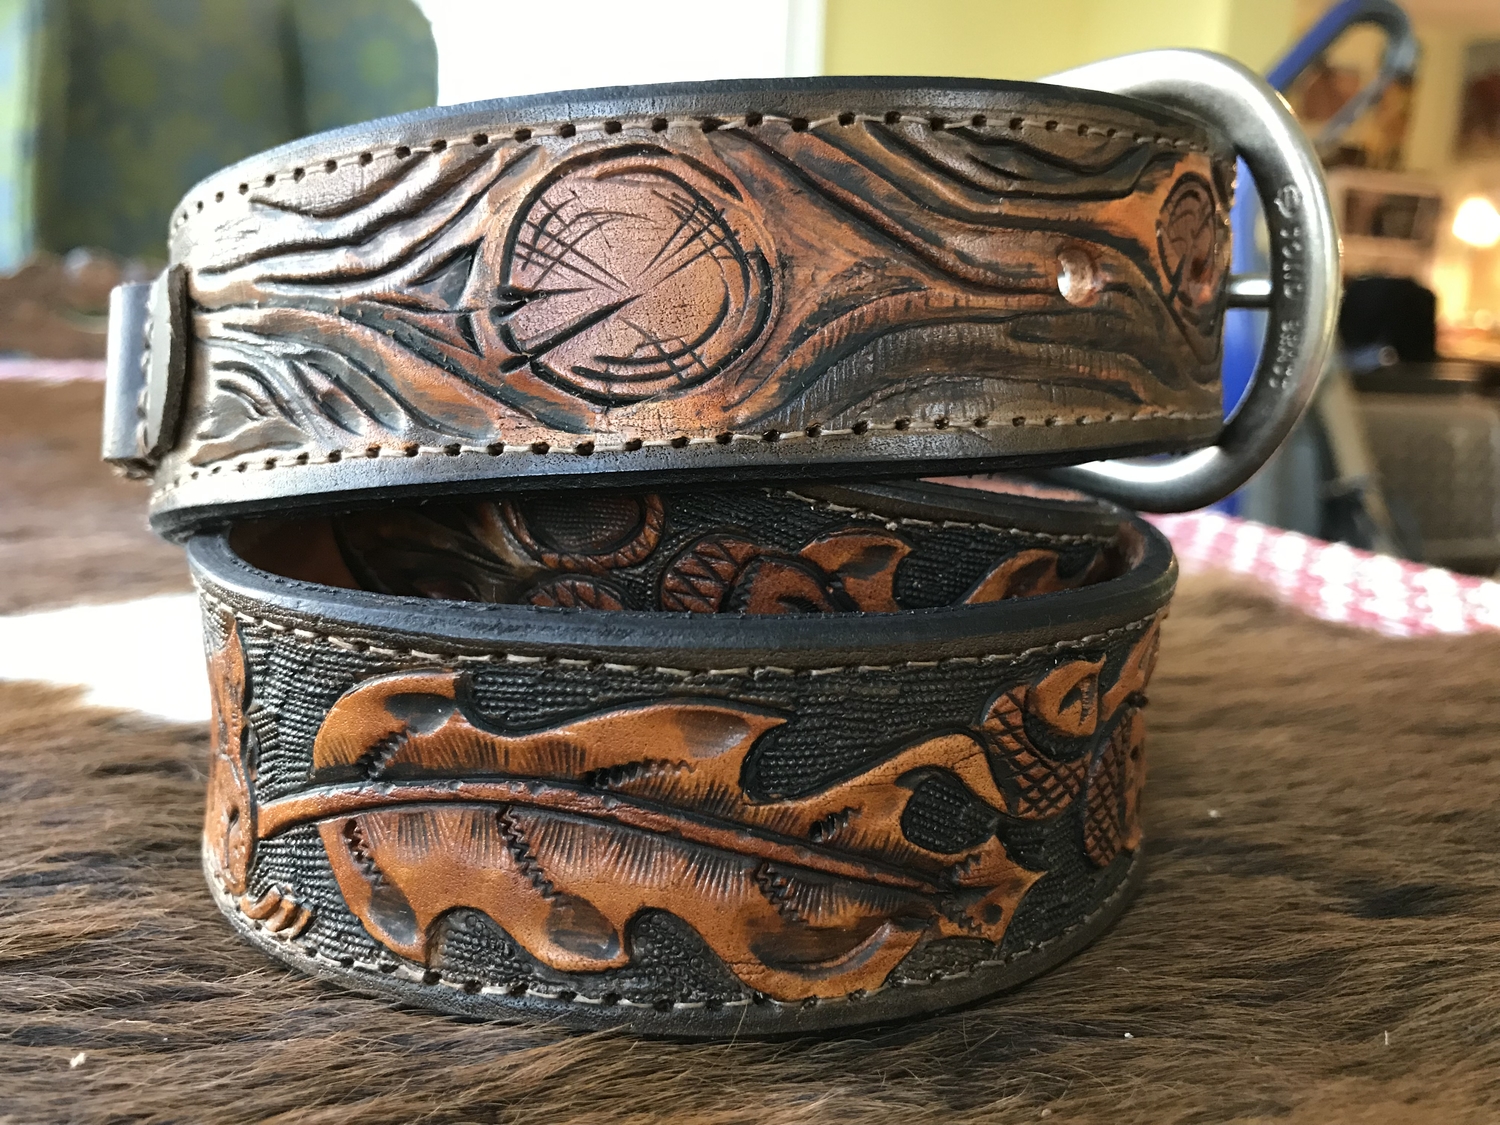
Deciding on a design is the first step to any leatherworking project. When Tomlinson makes an item for a client, she first asks if they have a design in mind. Some prefer a traditional leather pattern such as an oak leaf, acorn, or flowers. Others choose something more personal. Once she has a direction, she draws the design on tracing paper. Wax paper works, too.
“When I first start to draw a design, I always start with the flower and build my vine-type lines off that,” she says. “There is a certain flow that needs to be achieved when designing a pattern and that flow needs to be established ahead of time so you know which way each petal should bend, and which direction each vine should travel.”

Next, she wets both sides of the leather—a process called casing. If the hide is too wet or too dry, it is difficult to get a good, clean, deep cut. To get the perfect moisture content, Tomlinson uses a spray bottle. You could also use a sponge or dip the hide in water and then let it sit.
“When the natural color starts to come back into the leather, that’s usually about the ideal moisture level you are looking for,” she says.
Once the leather is wet, she transfers the design to it by laying transfer paper with the pattern over the wet leather and tracing the lines with a stylus-type tool. The stylus imprints the design into the wet leather, giving her an outline to carve.
“A drawing can be transferred to leather in a number of different ways,” she says. “If you feel comfortable enough, you can just draw directly on the leather with pencil because it erases quite easily.”
The carving process begins with the swivel knife. Tomlinson tries to go about half the thickness of the leather. The deeper you cut, the more dimension you’ll get in your carving, but you obviously don’t want to cut all the way through the hide.
After she’s finished with the main design, she uses the beveler to add depth and dimension. Holding the beveler in her off-hand, she angles the widest part of the edge where she wants to add shading and taps the tool with a maul. Depending on the project, she might also use a stamping tool to add texture.
“Decorative cuts are like the artist’s signature. Every leatherworker develops their own set and style of decorative cuts, and they are added after all the other carving and is done,” she says. “In general, these marks are shallower than the cuts that are being beveled.”
The finishing touches
For Tomlinson, leathermaking is functional art. Each completed piece is worn—either by horse, human, or dog—rather than hung on a wall for display. Beyond the carving and the stamping, she adds her own flair by using an antique gel or acrylic paints to create accents.
“I like to experiment,” she says. “I once carved a mermaid and watered down some acrylic paint to color her hair and tail.”
Antique gel is a popular finish among leatherworkers. It’s a dark brown goo that gets wiped over a carved design, filling in crevices, creating contrast, and giving the carving a 3D look.
“There are so many items that we use on a daily basis that either already are or could be made from leather,” she says. “I have made sandals, rifle scabbards, belts, chaps, and hand bags. My favorite is when I see my work in action… especially when I am at a horse show and see someone ride by in a pair of chaps I made — it’s exciting.”
