
You might be careful about what you say on social media now, but we were all dumb teenagers once—and you never know what someone might dig up in an attempt to get you fired. Here’s how to delete all of your old, embarrassing Facebook and Twitter posts.
Of course, you could always go whole hog and delete your social media accounts entirely, but most people don’t want to take such drastic measures. The instructions in this guide will help you delete posts older than a certain age, which can partially cover up your younger, stupider past.
However, this won’t necessarily erase those posts from history. People may still remember, or keep screenshots of, your bygone ideas, but these steps will at least prevent someone from looking for them in the future. And if you want to keep those old posts for personal viewing, you can download your Facebook and Twitter archives to your hard drive before deleting them.
Facebook: Hide or delete old posts

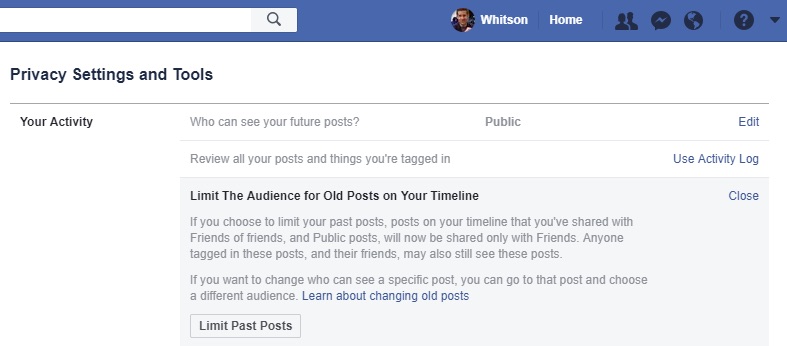
On Facebook, you don’t necessarily have to wipe your old history in order to hide it. The social network has a built-in feature that allows you to limit all your past posts to “Friends Only,” preventing outsiders from seeing them.
Head on over to Facebook, click the arrow in the upper-right corner of the page, and go to Settings and then Privacy. There, on Your activity, choose Limit Past Posts. Finally, click the Limit Past Posts button that appears on the dialog box, and all your past posts that are currently visible to “Public” or “Friends of Friends” will be reset to “Friends Only.”
If you’re satisfied with that, then you’re good to go. But if you have a lot of Facebook friends, especially those you aren’t particularly close with, I wouldn’t stop there. You never know who might have it out for you one day.
Unfortunately, Facebook makes it hard to delete lots of old posts at once—you can only erase them one by one. Thankfully, a Chrome extension called Social Book Post Manager will automate the process for you.

You just need to install this add-on: Launch the Google Chrome web browser, head to the extension’s page, and click Add to Chrome.
Once you’ve secured your add-on, head back to Facebook, click the arrow in the upper-right corner, and select Activity Log. Click the extension’s button in the upper right-corner of Chrome, and you’ll see some options for pruning your past. Choose a month and year, enter a search term if you so desire, and click Delete.
Social Book Post Manager will scroll through the page, highlighting in yellow the posts that match your parameters. This may take a few hours, since the software is actually imitating a human, scrolling gradually through the entire page. Once it has highlighted everything that you might want to delete, it will ask you to confirm. This gives you a chance to alter your parameters and re-run the search if there are any highlighted items you’re not ready to erase. Finally, the add-on will delete your posts (which, again, will take a long time).
This process isn’t perfect, so you may have to repeat your purge a few times to get all stray posts. But at the moment, it’s the best option we have.
Twitter: Delete old tweets with web apps
Twitter, like Facebook, doesn’t give you an option to delete old posts in big batches. So again, you’ll have to turn to a third-party service. Yes, you’re trusting your data to yet another stranger, but if you’re dead set on removing those old tweets, the ends justify the means. And for this social media housecleaning, you have a couple different options.

TweetDelete is a free history-scouring service with a very clear privacy policy. But it only lets you delete items that fall within the range of your previous 3,200 tweets. You could run it multiple times to erase your entire history, but this isn’t ideal if you want to keep the past couple years and delete everything before that.
To use TweetDelete, head to their home page, sign in with your Twitter account, and authorize the app to access your account. (You aren’t giving it your password or direct messages, just access to certain Twitter functions like that ever-important Delete button.)
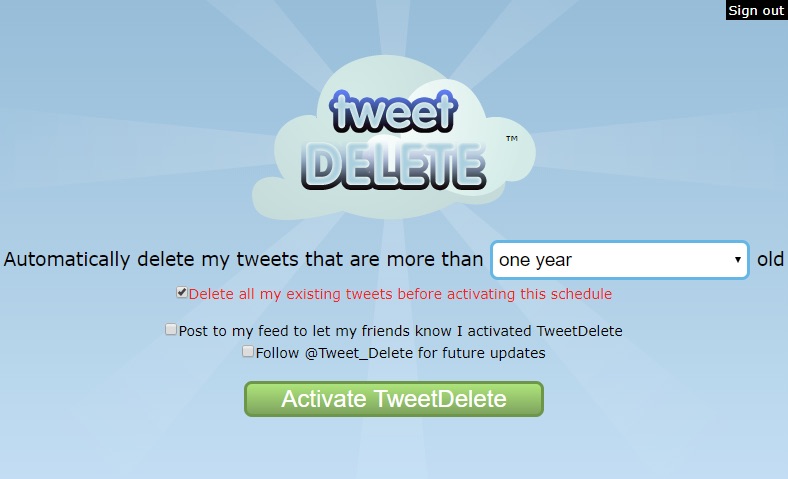
Once authorized, slash-and-burning all past tweets is incredibly simple: Tell TweetDelete to delete your posts older than a certain age (one week to one year), check the box that says “Delete all my existing tweets before activating this schedule,” and uncheck the boxes that allow TweetDelete to post to your account. Click Activate when you’re ready. Again, if you have a long history, you may need to go through this process multiple times.
After that, TweetDelete will continue to run in the background, automatically deleting tweets once they reach your specified age. If you don’t want TweetDelete to keep working on a schedule, then sign out, head to Twitter’s Application Settings, and revoke access for tweetdelete.net. Your old tweets will still be gone, but your newer ones won’t continue to disappear on a schedule.
If you want a more powerful deletion tool, you’ll likely need to pony up some cash. Of the fee-based options, we like TweetEraser, which costs $6.99, and also has a decent privacy policy. In order to delete more than your past 3,200 tweets, this web app will require a copy of your Twitter archive.

Visit your Twitter Account settings, scroll down to the bottom of the page, and click the Request Your Archive button. Twitter may take a while to retrieve your data—mine took about 20 minutes—and then you’ll receive an email containing a link to download the archive.
Next, head to TweetEraser and choose the Standard or Premium tier. You’ll see a prompt to authorize access to your account (this won’t let them see your password, but it will give them full access to all posts, messages, and functions like Delete). Once logged in, click the PayPal button below the Standard or Premium tier to pay for your upgrade, which will allow you to delete more than the standard 3,200 tweets.

After paying, the screen will return to TweetEraser. On the left-hand side of the page, head to Your Twitter > Tweets. Then choose Upload Archive and select the ZIP file you downloaded earlier. This will give TweetEraser access to your entire Twitter history, rather than the 3,200 tweets available on the Twitter website.
Once that’s done, you should see your orange Tweet count on the right. This was originally limited to 3,200 posts, but should now display the total number of tweets you’ve ever shared. If it does, then you’re ready to delete.
Click Advanced Search on the right-hand side of the page and set the date range for the tweets you want to eliminate. (You can also search for tweets with certain words, if you’d prefer to prune specific topics.) Once you’ve done so, click Search, and TweetEraser will load that batch of tweets in the middle of the page. Check them to make sure you’re deleting the correct updates.
When you’re ready to delete those tweets forever, click the select all checkbox in the list’s top-left corner and then press the big red Delete Tweets button. This process may take some time, but once it’s finished, you’ll have a squeaky clean timeline.
When you’re done, don’t forget to downgrade your subscription to make sure you don’t receive extra charges. Finally, head to Twitter’s Application Settings to revoke TweetEraser’s access to your account. If you want to keep regularly deleting your old tweets after they reach a certain age, then you can use the free TweetDelete option instead of continuing to pay for the premium version of TweetEraser.
