This article was originally featured on Popular Photography.
What could be more fundamental to photography today than our smartphone cameras? They’re ever-present, ready in moments, and the technology behind them makes it easy to capture great photos in most situations. And yet, I regularly encounter people who are unaware of many of the core functions of the built-in camera app.
Smartphone camera fundamentals extend beyond just “push the big button.” Some tools help you set up the shot, and some give you more control over the exposure. A few are just plain convenient or cool. However, these features aren’t always easy to find. That’s where we come in.
[ Related: “Make the most out of your iPhone’s back tap feature” ]
iOS 16 vs. Android 13
But first, for these examples, I’m using the two phones I have at hand: an iPhone 13 Pro running iOS 16 and a Google Pixel 6 Pro running Android 13. I’m also focusing just on the built-in camera apps; for even more manual control, you can find third-party apps in the app stores. Many of the camera features overlap between iOS and Android operating systems, and it’s possible that some may not be available on older models, or are accessible in a different way. If you see something here that doesn’t match with what you see, break out the manual—I mean, search Google—and see if it’s available for yours.
How to quick-launch the camera
Most people perform the usual dance of unlocking the phone, finding the camera app, and tapping to launch it. By that time, the moment you were trying to capture might be gone. There are faster ways.
On the iPhone’s lock screen, swipe right-to-left to jump straight to the camera app without unlocking the phone at all. You can also press the camera icon on the lock screen. On the Pixel, double-press the power button from any screen.
When the phone is unlocked, a few more options are available. On both phones, press and hold the camera app icon to bring up a menu of shooting modes, such as opening the app with the front-facing selfie camera active.

I also like the ability to double-tap the back of the phone to launch the camera. On the iPhone, go to Settings > Accessibility > Touch > Back Tap and choose Camera for the Double Tap (or Triple Tap) option. In Android, go to Settings > System > Gestures > Quick Tap > Open app and choose Camera.
How to use the volume buttons to trigger the shutter
If you miss the tactile feedback of pressing a physical shutter button, or if hitting the software button introduces too much shake, press a volume button instead.
On both phones, pressing either volume button triggers the shutter. Holding a button starts recording video, just as if you hold your finger on the virtual shutter button.

On the iPhone, you can also set the volume up button to fire off multiple shots in burst mode: go to Settings > Camera > Use Volume Up for Burst.
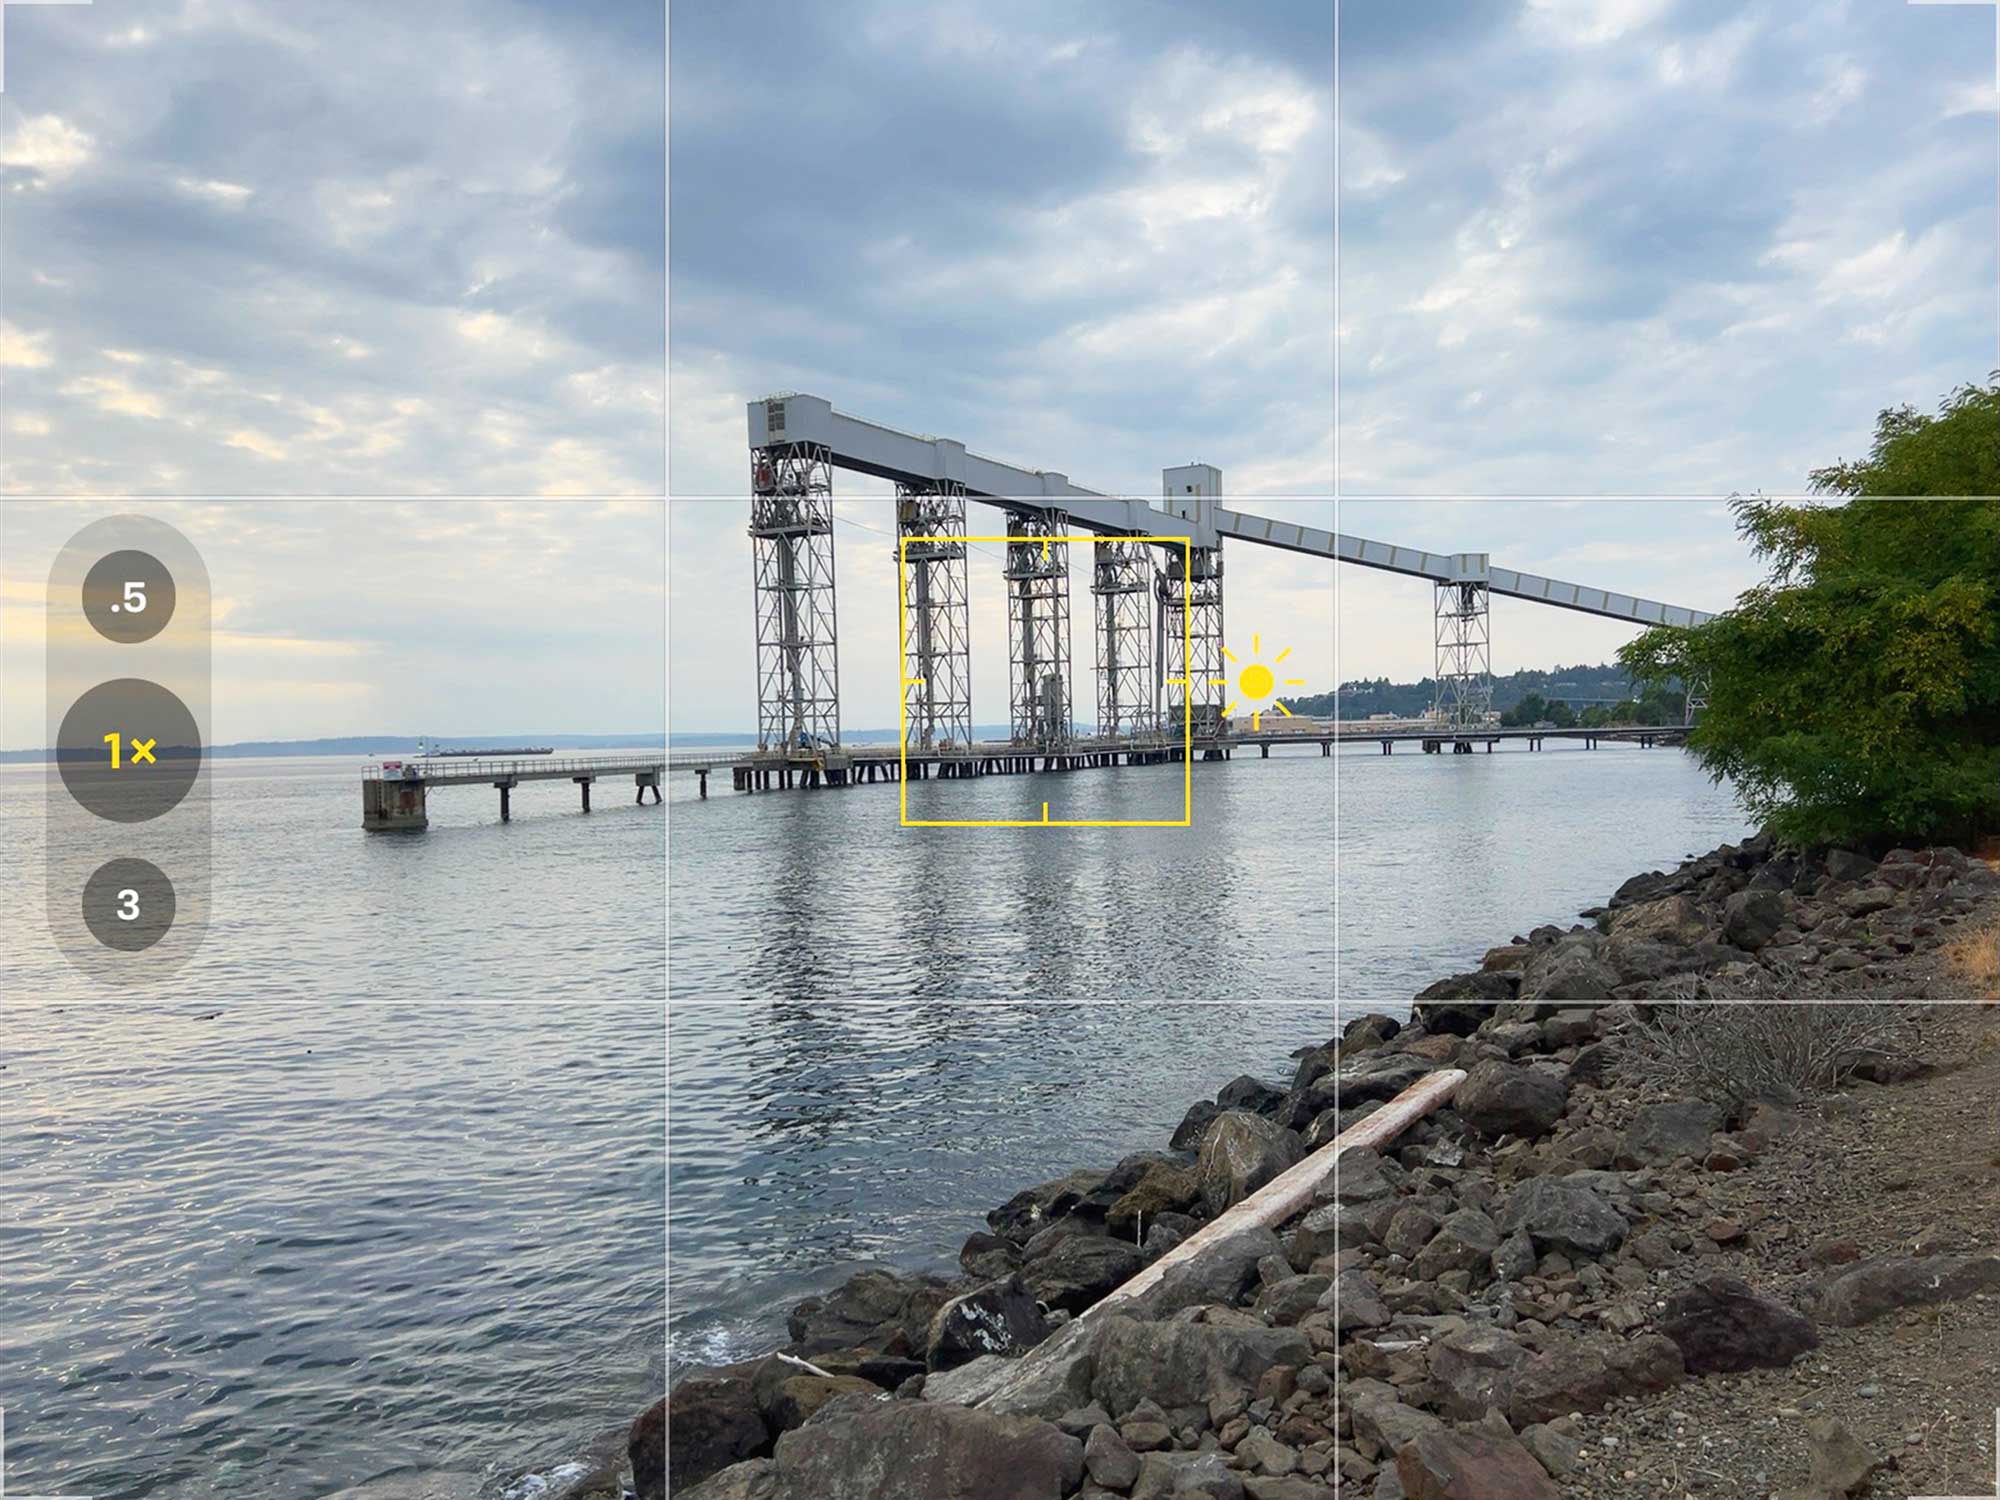
How to adjust the exposure & focus quickly
The camera apps do a good job of determining the proper exposure for any given scene—if you forget that “proper” is a loaded term. You do have more control, though, even if the interfaces don’t make it obvious.
On the iPhone

On the iPhone, tap anywhere in the preview to set the focus and meter the exposure level based on that point. Even better (and this is a feature I find that many people don’t know about), touch and hold a spot to lock the focus and exposure (an “AE/AF LOCK” badge appears). You can then move the phone to adjust the composition and not risk the app automatically resetting them.

Once the focus and exposure are set or locked, lift your finger from the screen and then drag the sun icon that appears to the right of the target box to manually increase or decrease the exposure. A single tap anywhere else resets the focus and exposure back to automatic.
On the Pixel
On the Pixel, tap a point to set the focus and exposure. That spot becomes a target, which stays locked even as you move the phone to recompose the scene. Tapping also displays sliders you can use to adjust white balance, exposure, and contrast. Tap the point again to remove the lock, or tap elsewhere to focus on another area.
How to zoom with confidence
We think of “the camera” on our phones, but really, on most modern phones, there are multiple cameras, each with its own image sensor behind the array of lenses. So when you’re tapping the “1x” or “3x” button to zoom in or out, you’re switching between cameras.
Whenever possible, stick to those preset zoom levels. The 1x level uses the main camera (what Apple calls the “wide” camera), the 3x level uses the telephoto camera, and so on. Those are optical values, which means you’ll get a cleaner image as the sensor records the light directly.

But wait, what about using the two-finger pinch gesture to zoom in or out? Or, you can drag left or right on the zoom selection buttons to reveal a circular control (iPhone) or slider (Android) to let you compose your scene without needing to move, or even zoom way into 15x or 20x.
It’s so convenient, but try to avoid it if possible. All those in-between values are calculated digitally: the software is interpolating what the scene would look like at that zoom level by artificially enlarging pixels. Digital zoom technology has improved dramatically over the years, but optical zoom is still the best option.
How to switch camera modes quickly
Speaking of switching, the camera apps feature many different shooting modes, such as Photo, Video, and Portrait. Instead of tapping or trying to drag the row of mode names, on both iOS and Android, simply swipe left or right in the middle of the screen to switch modes.

How to use the grid & level for stronger compositions
Whether you subscribe to the “rule of thirds” or just want some help keeping your horizons level, the built-in grid features are handy.
In iOS, go to Settings > Camera > Grid and turn the option on. In Android, you can choose from three types of grids by going to the settings in the camera app, tapping More Settings, and choosing a Grid Type (such as 3 x 3).
The grid on the iPhone, and a related setting called Framing Hints on the Pixel, also enable a horizontal level. When you’re holding the phone parallel to the ground or a table, a + icon appears in the middle of the screen on both models. As you move, the phone’s accelerometer indicates when you’re not evenly horizontal by displaying a second + icon. Maneuver the phone so that both icons line up to ensure the camera is horizontally level.

How to control the flash & ‘Night’ modes
Both camera systems are great about providing more light in dark situations, whether that’s turning on the built-in flash or activating Night mode (iOS) or Night Sight (Android). The interfaces for controlling those are pretty minimal, though.
On the iPhone, tap the flash icon (the lightning bolt) to toggle between Off and Auto. For more options tap the carat (^) icon, which replaces the camera modes beneath the preview with buttons for more features. Tap the Flash button to choose between Auto, On, and Off.
On the Pixel, tap the Settings button in the camera app and, under More Light, tap the Flash icon (another lightning bolt).
The Pixel includes its Night Sight mode in the More Light category. When it’s enabled, Night Sight automatically activates in dark situations—you’ll see a crescent moon icon on the shutter button. You can temporarily deactivate this by tapping the Night Sight Auto button that appears to the right of the camera modes.
The iPhone’s Night mode is controlled by a separate button, which looks like a crescent moon with vertical stripes indicating a dark side of the moon. Tap it to turn Night mode on or off. Or, tap the carat (^) icon and then tap the Night mode button to reveal a sliding control that lets you choose an exposure time beyond just Auto (up to 30 seconds in a dark environment when the phone is stabilized, such as on a tripod).

Put the fun in smartphone fundamentals
As with every camera—smartphone or traditional—there are plenty of features to help you get the best shot. Be sure to explore the app settings and the other buttons (such as setting self-timers or changing the default aspect ratio) so that when the time comes, you know exactly which smartphone camera feature to turn to.
