
We may earn revenue from the products available on this page and participate in affiliate programs. Learn more ›
My welding hobby started shortly after I got a bid for a steel staircase. As with everything, the money always causes me to do the Carnett calculation:
- How much is the equipment?
- How much is the material?
- How much did that guy say he wanted?
- How much can I save?
Then I run off to buy the gear.
This of course leaves out the skill to do any of these things—but the Carnett calculation includes the discovery phase, where I make all my mistakes, ask just about anyone for help, and somehow come out on the other side a more skilled operator. And 50 percent of the time, I really do save money.
My father-in-law purchased a 140-amp 110-volt Hobart MIG welder for me as a birthday gift. I had no mentor, no skills, just an urge to weld something. I started welding and never looked back. I now own my original Hobart MIG, a Miller 252a/220v that lets me weld half-inch steel, and a Miller Dynasty that is a combo stick and TIG unit.
Here’s a look at your basic types of welding. I’m going to keep this very simple, because you just want to get your feet wet and start playing.
Stick welding
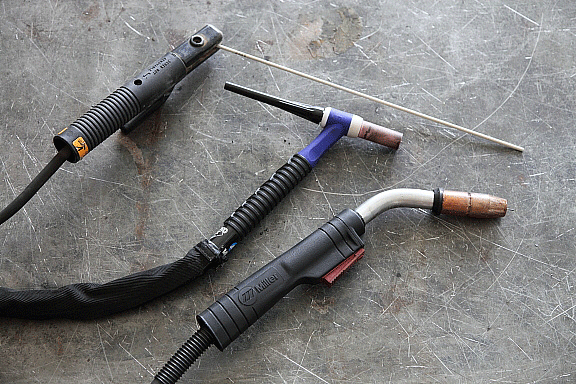
This is the old-school technique. It allows for deep penetration using fairly cheap equipment. The guys that do it all day are true artists. You see this used a ton in the field of oil rigs, bridge building, boat building, and the like, but the smaller units can easily be used in your garage. Electric current arcs between the material that you want to join and the consumable electrode rod. The rod is coated with a flux that protects the weld area and eliminates the need for a cover gas. The thickness of material that you can weld is related to the power output of the machine and the thickness of the welding rod. Stick welding gear is available at the consumer big-box stores and is a very cheap way to get started in welding. The problem is that it takes more skill to get a good weld with stick than with MIG, so I can only imagine the number of units sold every year that get only 20 minutes’ use. If you have a friend who is good at stick welding, it’s a great place to start, but otherwise I’d recommend you begin with a MIG unit.
MIG welding
This is the welding process that looks like a gun that shoots metal. MIG is like stick, but instead of having to stop to change the used-up welding rods, the machine has a spool of wire that is auto-fed with the simple pull of a trigger. You can use wire coated with flux, or regular steel wire and a cover gas. The output power of the welder, the thickness of the wire on the spool, and the rate it’s fed all contribute to how thick a metal you can weld with a MIG unit. The gear is more complex, so it costs more than stick to weld the same thickness of metals.
With practice and some care you can be making decent MIG welds inside an hour. Most consumer stores only sell MIG gear up to 140 amps / 110 volts, but this will allow the weekend welder to manage most projects. Over time your needs will expand, and you will want to weld thicker metals, or weld longer without stopping: that’s when you will move onto the 220-volt higher-end units that are sold at the welding shops.
TIG welding

This is the most complex form of welding, and one that can consume you when you graduate to it. It is very quiet because the electrode is not being consumed. You manually hold the tungsten electrode over the weld area, which is shielded by an inert or semi-inert gas mixture to protect the area. As you heat the area up, you manually fill the joint with a hand-fed wire. You need to melt the material just enough, so that you can fill it just enough. Think of it as a micro-super-hot heat source that is melting the metal. This allows for welding very thin or thick material, great control, and an incredible looking weld, but it is very slow, and if you suck it looks horrible. The thickness of what you can weld is based on the output of the machine and the thickness of the filler metal. TIG units are not available at your big-box stores.
John B. Carnett, PopSci‘s staff photographer, is using the latest green technology to build his dream home. Follow along as the project progresses on his Green Dream blog: popsci.com/green-dream.
