Astrophotography is hard. Astronomically hard. Everything has to be perfect. Your telescope, with camera attached, must track your target in precise synchronization with the rotation of the Earth. It can’t shake. It can’t even vibrate. You have to nail your camera’s exposure settings or you’ll be rewarded with an incoherent mess. Your targets are often so dim you can’t even see them until after the image has been made, so focusing is a nightmare.
So why try? Because it makes the entities floating in the vastness of the universe much more real than any Hubble wallpaper on your computer desktop can.
Those images, as spectacular as they are, don’t capture personal experience. Marvelous photos have been made of Yosemite, Monument Valley, and the Grand Canyon, but people still trek to see them in person. Similarly, astronomy—for me—is best experienced first-hand. No shot of Saturn, Jupiter, the Orion Nebula, or the Whirlpool Galaxy from the Hubble can equal–intellectually or emotionally–my own experiences at the eyepiece. The scenes, when delivered by nothing more than a few layers of precision-ground glass, are reality. Saturn is an actual object, floating in the blackness of space. Star clusters sparkle like diamonds on black velvet. Everything has scale, depth, and context. They’re actual things, not abstractions. And far from making me feel like I’m an insignificant little nothing–unlike, say, watching an episode of Entourage–I actually feel like I’m part of something spectacular. Capturing images myself would be an extension of that first-person experience. I want to record these things, and share them, as I see them.
Astrophotography is a black art of the first order, and, frankly, I suck at it. Every one of my previous efforts over the last 10 or so years has ended in frustration, usually after sitting stock-still next to my scope for hours, shivering to death on fantastically cold nights. Fortunately, though, technology may finally be catching up with my own incompetence. The digital revolution swept amateur astrophotography a decade ago, and new cameras are more powerful and much easier to use than they were when CCD’s first crashed in from outer space back then. You can now shoot the universe with everything from consumer DSLR’s to $100 “planet cams” to ultra-sensitive, ultra-expensive CCD cameras that come with cooling fans, cryogenics, and finely tuned sensors. You also have exceptionally capable image-capturing and processing software that allows you to better control the camera and pull out the hidden details in these usually very dark shots. So with this in mind, I decided to finally commit myself to conquering my demon, to making an astro-image truly worth showing off.

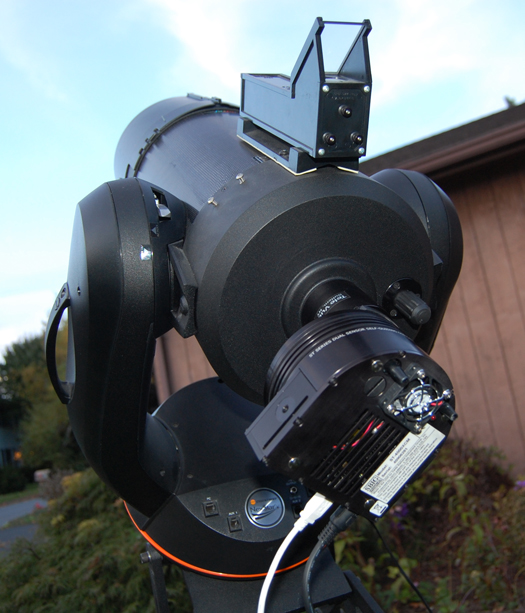
I turned to one of the leaders in the astro-photo biz, the Santa Barbara Instrument Group, or SBIG. They sent over an ST-4000XCM, a 4.2 megapixel color camera with an integrated cooling fan–this minimizes visual “noise” in your images that an overheated sensor can cause–and a built-in autoguider. This technology helps compensate for minor errors in your telescope’s alignment, which is critical when you start taking exposures longer than a minute or so. Essentially, the autoguider analyzes the view, locks on to specific stars, and makes constant adjustments to the telescope to keep everything in alignment. You won’t have images with stars burning streaks across the frame–they’ll remain fine points.

Having been an avid telescope consumer my entire adult life–I have, like, nine–I had a good head start in terms of the rest of the basic equipment. One of my scopes happens to be great for astrophotography. It’s a computerized, 8-inch aperture Schmidt-Cassegrain from Celestron. (Schmidt-Cassegrains use a combination of mirrors and lenses to cram a lot of focal length and aperture into a compact tube. And the more aperture you have, the more light, and detail, you can bring in.) I’m able to align the motorized mount so that it can track smoothly, and I’ve got the super-sturdy mount option to minimize the shakes.
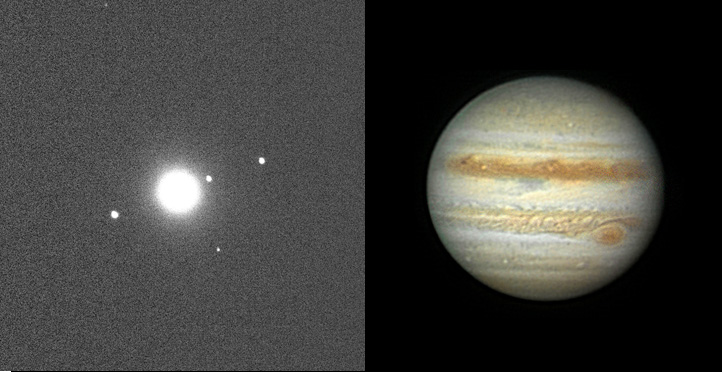
One my first night, my target was Jupiter, which is positioned nicely in the sky right now–fairly low on the horizon and centered along the ecliptic in the early evening. After spending about an hour installing and experimenting with SBIG’s CCDOPS software, I wired everything up to the scope. The computer recognized the camera and began pulling in data about its temperature and various other parameters that I’ve yet to fully comprehend. Before I attached the camera, I’d centered the scope on the planet, and she looked beautiful through the eyepiece–three moons visible, nice detail in the cloud bands. When I took the eyepiece out and put the camera back in, the image on my laptop showed barely a hint of yellow blob. Since the eyepiece and camera focus at different points, the crisp view was long gone. The CCDOPS software solves this with a Focus function–it takes a steady stream of quick images so you can make adjustments between each shot. Within a few minutes, I was pleased to see a much more defined yellow blob. It was obviously overexposed, but I figured the camera would help me tame the shot in good time.
Finally, I started grabbing images. I tried exposures from 1/30th of a second down to 1/60th and up through a full second. Each time the image came back looking roughly the same. I also tried the software’s Planet Master function, in which the computer takes over and tries to grab the best shots in a rapid sequence. I had no better luck. This, however, I’d anticipated. It was my first night with an extremely sophisticated and complicated camera. I was just going to learn its rough functionality and then dive in with the manual once I’d had some degree of familiarity with it. So I packed it in, sent my shot to Michael Barber, an engineer at SBIG, and cracked open the book. Within a few minutes, Michael got back to me. I’d assumed that my shot was badly out of focus, but I was actually just being too ambitious. “That shot’s actually pretty well focused,” Barber told me. “The problem with planets is the great dynamic range and the brightness. The exposure is too long and the planet is saturated and burned out. You need to shorten the exposure time for Jupiter.”
So even at less than 1/60th of a second, I was shooting too long. Barber followed up with some more advice. “The temptation for beginners is always to try the moon and Jupiter first because they are so easy to find and so bright,” he said. “But this also makes them very difficult to image [see the image at the top of the article]. Try a globular cluster or other dense star field to get the feel of the camera and to see how much guiding plays a part in taking a good image. Very short exposures of less than a minute will appear grainy, and this will be worse in light-polluted skies. Longer exposures will be far less grainy.”
A glob? No problem–globular clusters are among my favorite sights. These clusters of tens of thousands of stars are fascinating targets. You can stare at M13 in Hercules for hours and watch it unpack more and more individual stars as your eyes adapt to the sight. The next night, I went straight for Hercules.
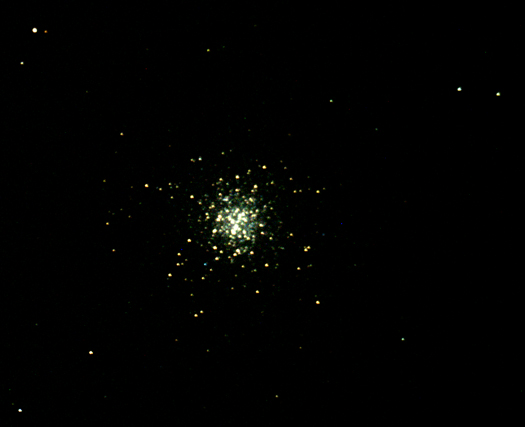
My luck improved. I focused the camera and started experimenting with exposures. I tried three minutes, two minutes, 60 seconds, and 45 seconds. Each time, I got something that actually looked something like my view at the eyepiece. There are clearly still problems with my technique–the image still needs a few focus tweaks, and I suspect that there are settings I’m not familiar with that will help refine my shooting. But it’s my first successful, coherent astrophotograph. It’s a fine image, if I do say so myself–thanks to some contrast adjustments to darken the background–but it’s still a first try from a CCD novice, and it doesn’t quite capture the experience the way I want it to. Plus, I haven’t even scratched the surface of this camera’s capability–there are plenty of other features that can enhance my imaging, and plenty of ways I can tweak the image on the computer to get the best possible results.
Next, after some further schooling, I’ll go back to Jupiter, try M13 again, and then, hopefully, go intergalactic.
