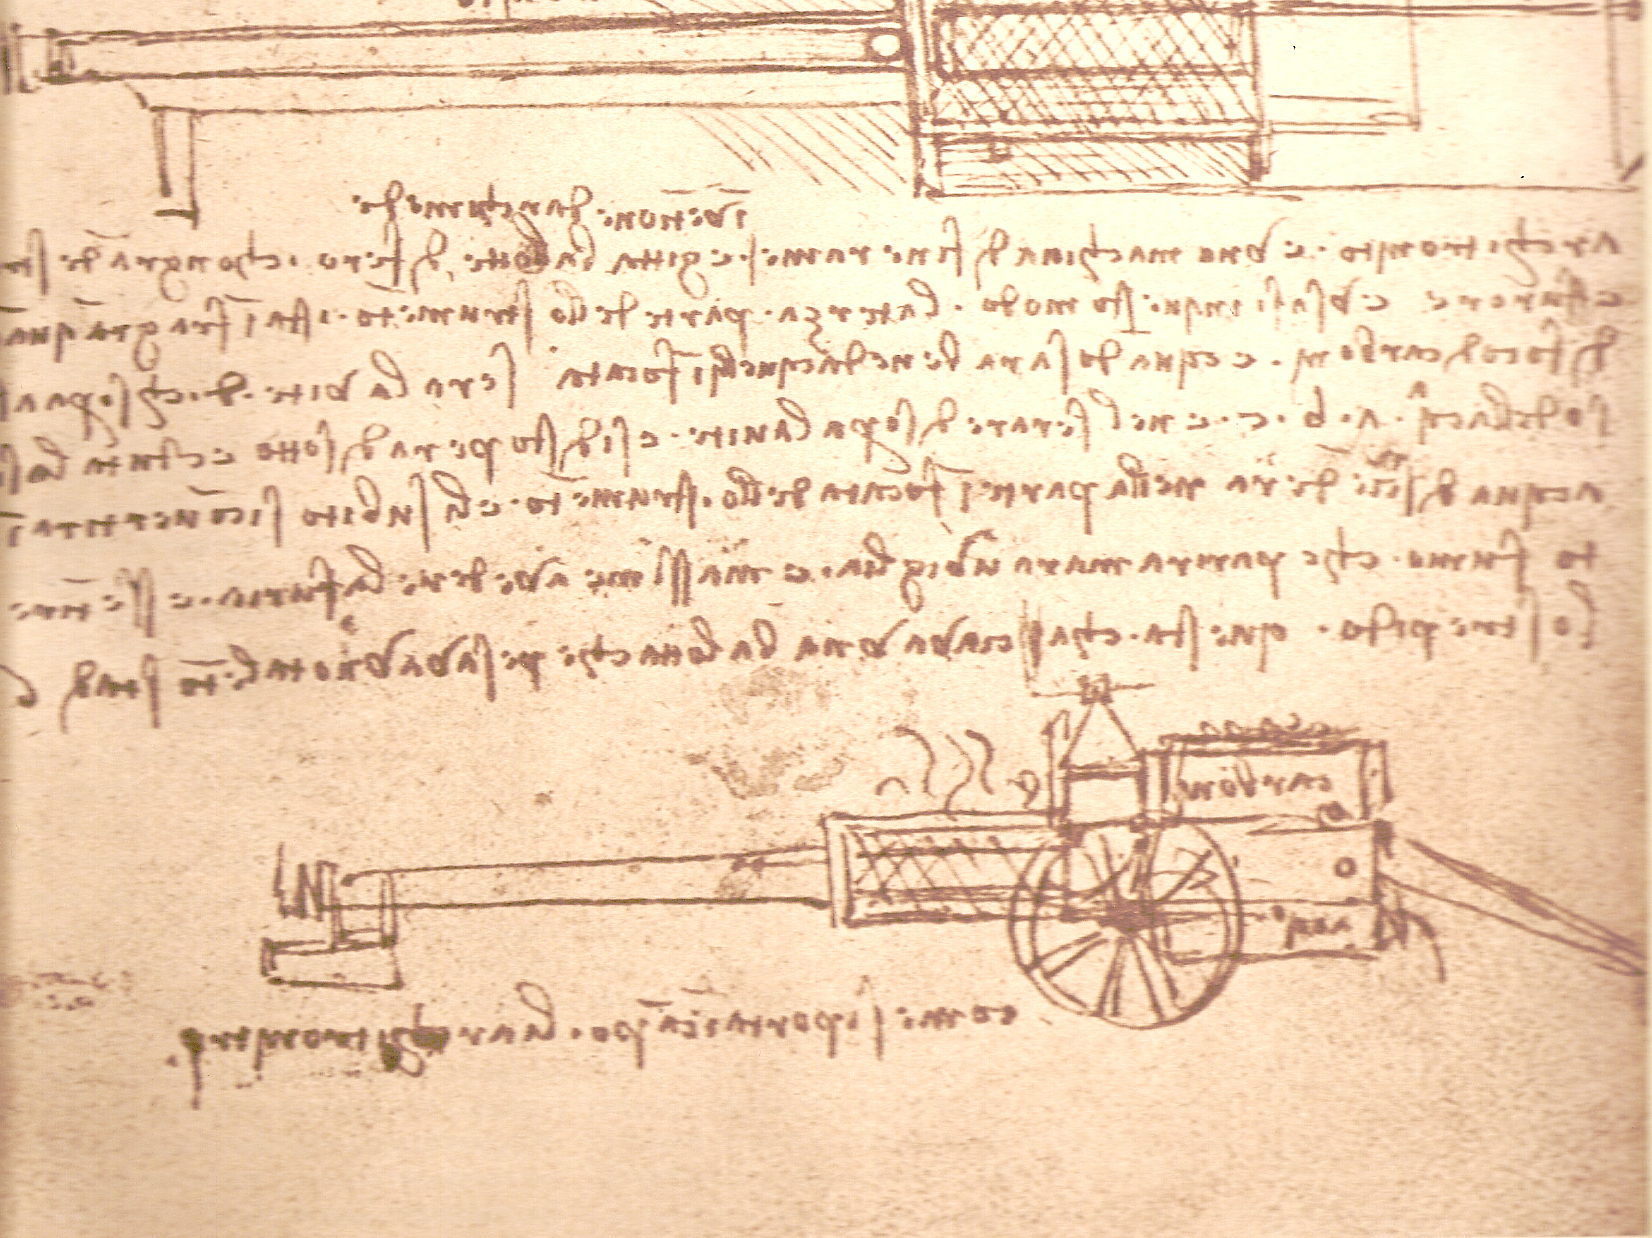
Leonardo da Vinci, best known to modern audiences as an artist and Renaissance man, actually made his living as a military engineer. Da Vinci designed a number of highly original weapons, filling his notebooks with drawings and sketches for devices such as the first flintlock rifle, a 135-foot-wide rock-throwing catapult, and a rapid-firing repeater crossbow. One of his most interesting concepts was a steam-powered cannon.
Da Vinci called this invention the Architronito (which translates to “the thunder of Archimedes) after his inspiration, the Greek scientist Archimedes, who devised a steam-powered weapon to protect his home city of Syracuse from invaders. According to Da Vinci, Archimedes’ weapon used steam power to hurl a large projectile weighing one talent (around 50 pounds or so) with nearly as much velocity and momentum as a modern gunpowder-propelled cannon.
Although Da Vinci’s idea, like many of the novel weapons he designed, was never used in actual combat, steam did find its way into modern warfare.
Full steam ahead
While there are a few examples of more modern steam cannons, the concept never met with much success. One of the best-known was the Winans Steam Gun, deployed during the American Civil War in the 19th century. The Winans used steam power to spin a rapidly revolving drum, which shot out projectiles at nearly 250 rounds per minute.
A hundred years later, the British Royal Navy tried out a steam-powered grenade hurler on board some of its ships during World War II. This weapon, called the Holman Projector, consisted of a 4.5-foot-long pipe on a swivel mount, connected to the ship’s steam boiler through a pedal-operated valve. Once low-flying enemy aircraft began an attack, sailors would drop a live hand grenade down the pipe. They’d tug and manipulate two large iron handles to aim the swiveling pipe at the attacking fighter planes. Then, at the instant the enemy swooped in, they’d stomp on the pedal. A tremendous blast of high pressure steam would gush through the valve body, propelling the grenade toward the enemy aircraft and, they hoped, knocking it out of the sky.
It was a clever, simple, and cheap idea. But most sailors who had occasion to fire the Holman Projector held a poor opinion of it. The device was cumbersome to use and hard to aim. Many sailors thought the Holman was more dangerous to themselves than to the enemy. But there are reports of sailors shooting potatoes at other British ships as a form of recreation—possibly making the Holman the earliest-known embodiment of potato cannon technology.
DIY Architronito

Encouraged by historical examples, I decided to create my own steam cannon—one that would be more fun than deadly. I tried various designs before deciding on a straightforward, simple build that I could throw together with 3/8-inch iron pipe fittings, a ball valve, and a vise.
To my surprise, a very small quantity of water, converted to steam, could produce an incredible amount of energy. When I boiled just a tablespoon or two of water inside the reservoir of the steam cannon, it produced enough energy to shoot a .38-caliber steel ball across the backyard. One can only imagine the power available from a full-sized steam cannon!
This Architronito miniature steam cannon operates on the same principles as the inventions of Archimedes, Da Vinci, and Holman. Basically, when water heats up in a closed reservoir, it changes to steam and exerts pressure on the container walls. When the valve to this reservoir opens, the steam pushes on whatever object is in the barrel, sending it flying.
And fly they do. I used a ballistic chronograph to measure the speed of the projectile. Using 5 milliliters of water and about 30 seconds of heating time, I averaged a muzzle velocity of about 65 feet per second.

Make your own miniature Architronito
Safety
Although my DIY Architronito design is not as deadly as a historical weapon, you should still take safety precautions when building and using it. Follow these rules, and use your common sense.
- You will need a propane torch to apply heat to the pipe. This makes the pipe extremely hot. Do not touch it until it cools. Cooling can take several minutes.
- Use no more than 5 to 10 milliliters of water.
- The metal ball, along with the steam jet pushing on it, exits the barrel with substantial velocity. Clear the area in front of the cannon of people, animals, and breakable objects for 100 yards, or use an acceptable shooting backdrop.
- Never, ever look down the barrel of the cannon.
- Wear safety glasses and heat-resistant gloves.
- Handle the propane torch safely. Read and follow the propane torch manufacturer’s instructions.
- This project is not intended for children. For use by adults or under close adult supervision.
- Your experience may differ from ours. Accidents happen, and things can and do go wrong. Therefore, tackle this project at your own risk.
Tools and materials

All pipe and pipe fittings are standard-wall iron with NPT (national pipe thread) threads. The pipe fittings available at most hardware stores should be suitable.
- 10-inch-long 3/8-inch diameter pipe nipple
- 4-inch-long 3/8-inch diameter pipe nipple
- 3/8-inch diameter pipe elbow
- Ball valve with 3/8-inch NPT openings
- Pipe reducer, 3/8-Inch Male NPT to 1/4-Inch female NPT
- 2-inch-long 1/4-inch diameter pipe nipple
- ¼-inch pipe tee
- Pressure gauge, ¼ inch NPT connection
- Pressure relief valve, 1/4-inch NPT connection
- Pipe sealing compound
- Metal-jawed vise
- Safety glasses
- Heat-resistant gloves
- Propane Torch
- A quantity of 7/16-inch steel balls. Steel balls can be ordered online from places such as McMaster-Carr or Amazon.
- Pipe wrenches
Instructions

Connect the pipe fittings and valve together as shown in the assembly drawing. It is very important that all fittings are screwed together tightly with no leaks. Poorly connected joints will leak hot steam and cause poor performance.
Find a safe, suitable area for testing your steam cannon.
Securely clamp the cannon in a vise. Angle the barrel at least 15 degrees from the horizontal, but not more than 45 degrees.
Open the ball valve. Pour in 5 to 10 milliliters of water, making sure it reaches the reservoir section behind the valve.
Don safety glasses and heat-resistant gloves.
Close the ball valve. Use the propane torch to apply heat to the reservoir portion of the cannon. As you heat, watch the pressure gauge while looking carefully for leaks around the joints. If leaks are present, wait for the device to cool before fixing the joint. Stop heating when the pressure gauge reads 20 PSI. Do not exceed 20 PSI.
If no leaks are present, test-fire the cannon by quickly opening the ball valve. Then load it up with steel balls and follow steps 4 through 6 to fire at a target. WARNING: Follow the safety instructions, and fire the cannon at your own risk!
Here it is in action:
