
We may earn revenue from the products available on this page and participate in affiliate programs. Learn more ›
Dept.: DIY
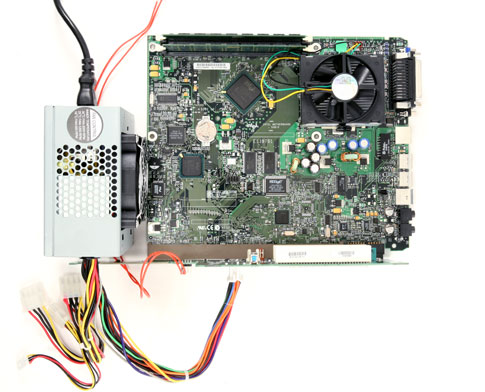
Tech: LCD photo frame
Off-the-shelf cost: $100?$3,000
DIY Project cost: $751
Why DIY? Bigger screen, more options
I shoot about 1,500 digital photos a year. To display them all — or even a judicious array of masterworks — would cost me a fortune in paper and ink and take every inch of wall space I have. So instead I cannibalized a 15-inch LCD monitor and built a digital-photo frame. Yes, I could have just bought one, but for several hundred bucks I would have gotten a snapshot-size screen and few expansion options. Mine has a custom-built frame, space for 25,000 pictures, and a full PC motherboard. With a wireless network card, I could feed it new photos over the Web. Or I could add an infrared module so it lights up only when somebody walks by. Heck, with its Linux OS, this thing could filter my e-mail and control my appliances. Here’s how to start your own digital exhibition.
CONNECT IT (see illustration, left)
1. Plug ATX power supply (C) into socket on motherboard (B).
2. Run extra ATX plug to hard drive (D).
3. Solder power cord from LCD (E) to cord from power supply; wrap in electrical tape.
4. Solder power switch (A) to wire; attach to power-on wires on motherboard.
5. Attach IDE connector from hard drive to motherboard.
6. Use second IDE plug to connect external CD drive for OS and software install (see “The Brains Inside,” below).
7. Plug LCD into motherboard.
8. Attach to network via Ethernet to add images and download final OS components.
ASSEMBLE IT
9. Velcro motherboard to LCD. Use chair-bottom protectors on LCD to mate to Velcro (F) and add clearance for power supply.
10. Velcro hard drive to LCD in position to clear motherboard while still within reach of power and data cables.
11. Have frame (H) built to fit LCD; add 2.5 inches of depth to house components.
12. Have mat cut to match LCD display area.
13. Use wood blocks (G) to wedge LCD in frame.
PARTS LIST
1. Power switch and wire, $1; Radio Shack
2. VIA EPIA-ME 6000 motherboard with 633MHz CPU, $126; essencompu.com
3. PW-70A miniature ATX power supply and 12-volt brick, $55; mini-box.com
4. 20GB notebook hard drive, $90; newegg.com
5. 15″ LCD monitor, $300; local electronics store
6. Velcro and chair-bottom protectors, $5; hardware store
7. Wood blocks, free; my garage
8. Custom frame and mat, $120; local frame store
9. Notebook-to-IDE adaptor, $10; dirtcheapdrives.com
10. 256MB DRAM, $44; newegg.com
11. Debian GNU/Linux OS, X-Windows emulator and feh slideshow software, free; debian.org
12. CD drive to transfer Linux to hard disk, free; junker PC
Total cost: $751
The Brains Inside
To get the Linux OS on the picture frame, I attached an old CD-ROM drive to the hard drive’s spare IDE cable and used a basic install CD burned from files downloaded at debian.org. Once the frame was running, I connected it to the network via the built-in Ethernet port and downloaded the X-Windows system (which handles mice and graphics on Linux), KDE window manager for automatically logging in and launching selected programs at start-up, and a simple but effective image viewer called feh. I can plug in a mouse to control the slideshow options, or change them remotely from any computer in the house. More software options and details on the install here.


