We may earn revenue from the products available on this page and participate in affiliate programs. Learn more ›
This story has been updated. It was originally featured in the July 2007 issue of Popular Science magazine and involves outdated technologies and services. For current advice, check our regularly updated article about how to build a good gaming PC for less than $100.
With antiquated components flooding the surplus-parts market and free operating systems only a click away, building a fully functional computer has never been such a bargain. No, the $72 PC won’t replace your new dual-core, Vista-shredding laptop. But with its compact size and solid-state components (no hard drive or CD drive), it’s perfect for building into custom enclosures and for specific tasks like web surfing or playing games. The computer boots from a USB flash drive running an operating system called Damn Small Linux that can handle just about any job. Got any grand ideas for a sub-C-note PC? Send them to us at h20@time4.com.
- Project: build a $72 computer
- Cost: $71.79
- Time: 4 hours
- Difficulty: easy | | | | | hard (Editor’s note: 3/5)
Parts
- Intel SU810 motherboard ($5; centrix-intl.com)
- Two 64MB PC100 SDRAM modules ($4 each; pcprogress.com)
- Intel Celeron 500MHz processor socket 370 ($11; pcprogress.com)
- Intel Socket 370-compatible heatsink and fan (~$5; newegg.com)
- Gateway 4000437 NLX riser card ($25; alancomputech.com)
- 512MB USB flash drive (free; salvaged)
- Momentary, normally open SPST switch ($3.29; radioshack.com)
- Insulated wire for switch (free; salvaged)
- ATX power supply ($14.50; amazon.com)
- (Optional) Lilliput LCD VGA Touchscreen 619GL-70NP/C/T ($229; CarLCD.net #619GL-70NP)
- (Optional) Syba SD-CF-IDE Compact Flash to IDE Adapter ($10.99; newegg.com #N82E16822998002)
- (Optional) A-Data 1Gb Compact Flash ($13.75; newegg.com #N82E16820211045)
- (Optional) Vantec IDE Cable ($3.79; newegg.com #N82E16812104210)
Instructions
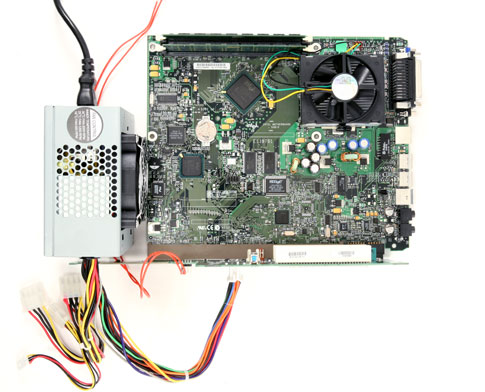
1. Plug and pray. Carefully insert the Intel Celeron processor into the PPGA Socket 370 on the Intel SU-810 motherboard and seat the heatsink on the top of the processor. Insert the two PC100 SDRAM modules into the two DIMM sockets. Slide the motherboard into the riser card’s system board connector. Plug the power supply’s ATX connector into the power supply receptacle on the riser card. Wire the SPST switch to pins 6 and 8 of the front panel header on the front of the NLX riser card. Attach the keyboard, mouse, and VGA monitor.
2. Boot it in the USB. Now fire her up (press the SPST power switch) and press the F2 key. Inside the BIOS setup, select USB drive as the startup disk. See the optional note for updating your BIOS.
- Note: If your BIOS is too old for permitting USB booting, you might need an IDE drive (floppy, CD-R, or fixed disk) for flashing a more modern BIOS release into your system memory.
3. It really IS damn small. Insert a formatted USB drive containing the complete embedded installation of Damn Small Linux (see damnsmalllinux.org for instructions and files for installing the OS on your USB drive). Restart the Linux Lunchbox. After several minutes, you should be staring at a Linux command line prompt. Type “qemu” and press enter. You now have a powerful open-source GUI that’s both free and damn small.
4. Snip and tuck. Measure the dimensions of the assembled Linux Lunchbox components and cut the metal joist duct to fit. Leave the top and bottom panels open for ventilation. If you’re using the optional Lilliput LCD VGA touchscreen monitor, cut an opening in the back for holding the screen and bezel. Fasten the duct work together and glue your salvaged cereal box panels to the four sides of the Linux Lunchbox.
5. A touch of Linux for breakfast. Configure the Linux driver for the Lilliput LCD VGA touchscreen monitor. Reboot the system and remove the keyboard and mouse. Just slap the Linux Lunchbox down on the breakfast table, plug ‘er in, and experience the pleasure of reading and interacting with the back of a cereal box, again and again.
4 things you can do with your Linux Lunchbox
After you’ve poured your bowl full of cereal, it’s time to read the back of the cereal box. Here are four things you can do with your new breakfast of champions companion:
1. Check the weather and read your email. Use one of the internal PCI slots for adding a Linux-friendly WiFi card. Try the Netgear WG311T PCI Adapter sporting the Atheros chipset.
2. Overclock. Give your aging Intel Celeron processor a much needed speed bump. Increase the front side bus (FSB) speed setting inside the BIOS from 66 MHz to 100Mhz. Beware; this overclocking will increase heat production and your processor will need additional cooling.
3. Add a touchscreen. Take that keyboard and mouse and replace them with a LCD VGA touchscreen monitor. You will need a special Linux driver for this capability, but the popular Lilliput Electronics VGA touchscreen monitors can be adapted to this task with Linux drivers from eGalax-EETI.
4. Play games. Many flavors of Linux (including Mac OS X) still harbor this UNIX holdout treasure trove of games. Just type this command into the terminal: “emacs”.
Now press both esc and X simultaneously to obtain the emacs prompt.
At the emacs prompt, enter the name of a game to play. You can obtain a listing of valid games by typing on the terminal (not inside emacs): /usr/share/emacs/21.2/lisp/play or /usr/share/emacs/21.1/lisp/play.