The DIY solar charger
Keep your gadgets powered even when the grid fails you.
This story has been updated. It was originally featured in the August 2007 issue of Popular Science magazine and involves outdated technologies and services. For current advice, check our story about what to know before buying a portable solar panel, as well as our product review team’s picks for the best solar panels and best solar generators.
It’s a dark and stormy night—too dark. Your home has lost power. Fortunately, you’ve got a fully charged power plant, built from an inexpensive solar panel and a rechargeable battery. Eight hours of sun will produce enough juice to watch An Inconvenient Truth twice—on a portable DVD player. You can even find inverters that will turn the station into an AC outlet. Add additional panels and batteries, and you could power the margarita machine and the flat-panel too.
- Project: build a solar power station
- Cost: $150
- Time: 3 hours
- Difficulty: easy | | | | | hard (Editor’s note: 3/5)
Parts
- Bamboo scraps ($7; local flooring store)
- Sunforce 5-watt, 12-volt solar panel ($48; amazon.com)
- Quarter-inch plastic mono plug (50; allelectronics.com; #SPH)
- Solar DC charger controller for solar panel ($28; allelectronics.com; #SCN-2)
- 12-volt 12AH rechargeable battery ($36; allelectronics.com; #GC-1214)
- 4 feet of 18-gauge wire ($5.65; allelectronics.com; #WRB-18)
- 2 female terminal disconnects (23; jameco.com; #109112)
- 15-amp DC panel meter ($12; allelectronics.com; #PMD-15A)
- Reese “Towpower” connector ($9; local auto-parts shop)
- Cigarette-lighter “Y” adapter ($3.65; allelectronics.com; #CLP-Y)
Instructions
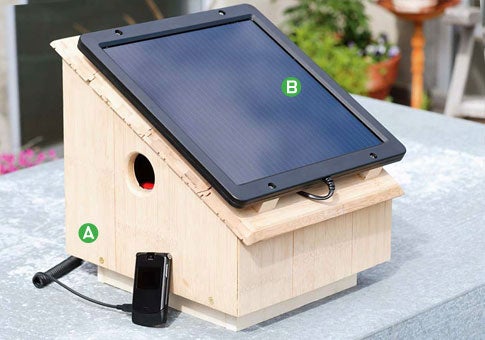
1. Build the case. To make a cheap, eco-friendly case, we glued up bamboo flooring scraps (bamboo is fast-growing and renewable). Cut holes in the box for airflow and easy carrying, and build frames to hold the DC charger controller and the battery.
2. Add the panel. Attach the solar panel at an angle roughly equal to your latitude for optimum charging (browse the US Census Bureau’s Gazetteer files to find yours). Add a tilt bracket for additional adjustability. Leave space underneath both the panel and the controller for airflow.
3. Wire it up. Snip off the cigarette-lighter plug and solder the quarter-inch mono plug onto the “Y” adapter. Insert the mono plug into the 12-volt output outlet on the controller. Connect all four power leads from the battery and the solar panel to the controller’s input terminals. Hook up the meter to the controller’s input terminal for the solar panel.
- Pro tip: For more power, attach additional solar panels, and add extra batteries—but don’t exceed the 12-volt rating of the controller.
4. Connect the battery. Test all connections with a volt-meter before attaching the battery. Connect the red wire with a female-terminal disconnect to the battery’s positive (+) terminal, and connect the black wire to the negative (-) terminal. Place the station in the sun, and plug something in.