It’s official: Santa showed up a little early this year. The unveiling of the Popular Science archives on Google was, last week, a very big deal. Our readers and fans can now search and browse over 136 years’ worth of the future then and now whenever they damn well please.
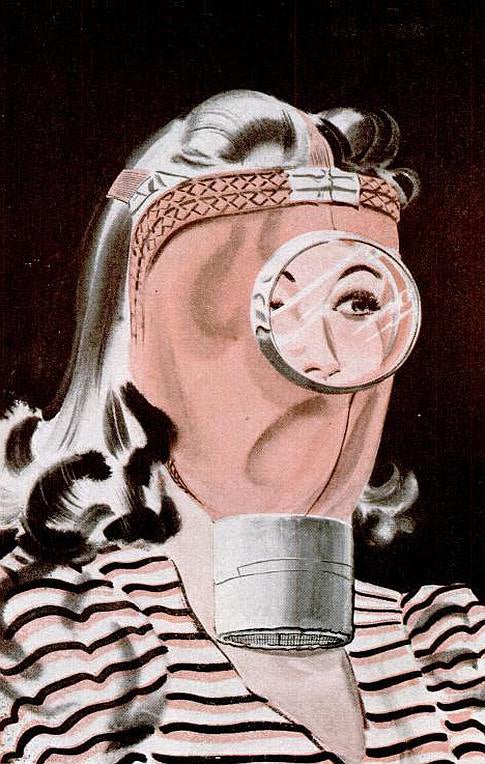
Ever resourceful, PopSci DIY-ers are already doing what they do best. Instructables.com member TimAnderson created a gas mask using instructions in a December 1942 Popular Science Article. How awesome is that?
Click through the gallery to see how he did it. We encourage you (though-we-take-no-responsibility-for-injuries-etc.) all to try this at home.
Anderson and his 1940s-era PopSci DIY gas mask.
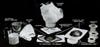
Step 2: “Common Materials” back in 1942
In case you can’t read the little labels, they read: From left to right: Canisters (they appear to be ordinary tin cans) Bathing cap Elastic Handkerchiefs Fly Swatters Charcoal and Soda Lime Powder-Puff Box Adhesive Tape They sure had some odd stuff laying around back then. Dirt roads and horses caused a lot of fly swatting and nose blowing.
Step 3: 1942 Mask step-by-step
The powder-puff box has a clear lid, this is the window the user looks through. The bathing cap is the mask that fits about the face. There is no valve. The breath goes in and out through the filter. The charcoal/soda-lime mixture is wrapped in two layers of hanky and packed into the can. The pieces of screen are taped over the ends of the can and any excess cloth cut off. Then the can shoved into a hole in the mask and sealed on with tape.
Step 4: Start a Fire
I need to filter paint fumes and sanding dust, not phosgene, so I didn’t bother adding soda lime to my filter. Start a fire. That’s the first step in making charcoal. Coconut shell charcoal is standard for gas masks. I wanted to try coconut husk charcoal. So I husked some of the driest, lightest coconuts I could find. Three of them were starting to sprout. Yay! I ate one of the sprouted coconuts. I started a fire. It was horrible. I couldn’t get the coconut husks to burn properly. It smoked a lot and wanted to smolder. In Mexico the husks had flamed out and burned down to a nice bed of coals in minutes. I guess they were a lot drier than the husks here in Maui. I tried all my fire making tricks. I ripped the husks into strips and stacked them like a log cabin. I added tinder of various kinds. I finally dumped paint thinner on the burning pile. That flamed for a while but then it went back to smoldering. I finally gave up and decided to let it smoke. Eventually the heat would make some of the stuff in the middle into charcoal. I piled a whole lot more husks on and after an hour or so it looked like the final picture, ready for my coal mining operation. It’s a calm day and the smoke followed me around everywhere. I needed a gas mask.
Step 5: Eat Canned Pears
I needed a can. So I had to eat some canned pears. Life is hard. Then I cut an ‘X’ in the remaining end of the can to make a hole for the snorkel
Step 6: Fit Snorkel to Can
While that nasty fire smokes up the neighborhood, get back to tinsmithing. Bend up the flaps of the ‘X’ and fit the can to the end of the snorkel.
Step 7: Affix the Can to the Snorkel
Make sure the tube doesn’t protrude all the way into the can. Drill a hole through the can flaps and the end of the snorkel tube. Insert a wire through the holes. Bend the ends of the wire over. The assembly will feel pretty secure.
Step 8: Seal the Joint Between Can and Tube
Wrap the end of the can and the joint with the tube with plastic cling-wrap and tape. Try sucking air through the tube while the open end of the can is blocked. It shouldn’t be possible. It’s very much easier to seal vacuum leaks than pressure leaks. Vacuum leaks tend to suck things into them and seal themselves.
Step 9: Quench Some Coals
I looked into my fire and saw some good coals glowing inside. So I knocked it apart, grabbed some good coals with tongs made from two sticks, and quenched them in water. I was wondering whether my charcoal would be “activated” or not. After some reading I decided my wasteful way of making it pretty much guaranteed it would be “activated”. That means no hydrocarbons left in the pores and all the carbon being short chains with their little arms out ready to grab molecules.
Step 10: Crush Some Charcoal
After quenching the coals I set them on some cardboard to drain and dry out a little. Then I dumped the water out of the pot and used it for a mortar to crush the charcoal in. I used a section of bamboo as a pestle. Quenching had drawn a lot of water into the charcoal. It turned to wet paste as I crushed it. I mashed it til the largest grains were well under .25″ in diameter. The volume decreased a lot as I crushed it. This husk charcoal wasn’t very dense. I needed to grind a few batches to get enough to fill my canister.
Step 11: Dry the Crushed Charcoal
I spread the crushed charcoal paste on some newspaper and put it in the sun. It was still wet after a day in the sun so I dumped it onto tinfoil on a pan and put it in the oven. I tasted a mouthful of charcoal to see if it was any good. It didn’t taste like a smoldering fire, which is what I was afraid of. I couldn’t figure out what the taste was. Then I realized the taste was the taste of no taste at all. It was absorbing all the stuff from my mouth that could activate a taste bud. This was a non-taste I’ve probably never experienced before. I remembered how the old nuns in the old-folks convent at home used to eat burned toast for the charcoal. Those nuns were the best educated people in the area for a hundred years or more, so I figured they knew a thing or two. I chewed it up and swallowed that mouthful of tasteless carbon with gusto. I smiled with clean black teeth.
Step 12: Base Manifold Wad
I put a loose wad of paper towel in the base of the can. I wanted the airflow to spread out from the tube into the can without restrictions. I put a disk of folded paper towel on top of that to keep charcoal dust from going into the tube and my lungs.
Step 13: Pack the Can with Charcoal
I packed the can with charcoal til it was about as high as the longest gas mask cartridge I’ve seen. The can was taller than that, so I added some wadding on top of that. to hold it in place.
Step 14: End Cap
I taped a folded paper towel over the end of the can, cut off the excess, and taped it some more, just like the 1942 version. I don’t know what the function of the screen was in that model. Probably it was for durability. They probably intended people to actually fight and dig through rubble while wearing those swimcap and baby pants gasmasks on their faces. Since I’m just going to do some light varnishing, I’ll stick to mere paper towels.
Step 15: Exhale Valve
This snorkel has an exhale valve so air doesn’t have to get forced back out the filter. The air flow is one direction, which means there’s no dead air going back and forth in the tube for CO2 to build up in. Because of this exhale valve, I could use a longer more flexible tube. That would probably make it more comfortable to wear.
Step 16: Varnishing!
I considered trying the “clothespin on the nose” to keep me from inhaling through my nose, but it turns out to not be a problem. Something about a snorkel makes a person not want to inhale through their nose. Not to mention there’s a bad varnish smell to remind me if I forget. The whole thing works great! I didn’t get a headache and get all stupid from fumes. I tried shoving the tube up against a nostril and inhaling through it that way, and couldn’t smell anything through it. If I start smelling anything through it, I’ll repack it with new charcoal. The only problem was condensation dripping out of the exhale valve onto the varnish. I tied a rag over it to catch that. When I wore it as seen in the opening photo, no drips came out. This respirator works so well I’m thrilled. I’ll look for a flexible hose so I can hang the canister on my belt. It will be perfect for welding, since a welding hood won’t hit the mouthpiece. Can any chemists or welders in the audience tell me if I need to add the soda lime to filter welding fumes? Apparently manganese, manganese dioxide are in the fumes and cause harm.