Turn a boring box into a sweet working robotic hand
Fingers, joints, tendons, and the whole shebang.
Excerpted from Cardboard Box Engineering © 2020 by Jonathan Adolph. Used with permission from Storey Publishing.
Of all the creatures that have ever lived on this planet, we modern humans are the champions of making stuff. I know, I know: beavers build dams, honeybees create honeycombs, birds make nests, and spiders spin webs. Those are all very impressive, especially when you don’t have thumbs! But none of that really compares to what people produce today, and if you doubt me, just ask your mobile phone as you are flying in a jet over a skyscraper. We’ve invented a few things that have caused us problems (I’m looking at you, atomic bomb!), but far more often, we come up with marvels of engineering that change our lives for the better.
Why is that? What allows people to be so good at building things?
In a word: science. We humans have science, the greatest tool ever invented for figuring out how things work, and how they could be made to work better. Thanks to the scientific method—the process of making predictions and then testing them—we can try out our ideas and separate the good from the bad. Science is what gives engineers and designers the knowledge to produce all the amazing devices that surround us—including every toy, game, and electronic gizmo you own.
And here’s the best part: You can be one of those people. You can be a designer and an engineer. With the help of this book, you’ll learn how to turn old boxes, cartons, tubes, and other cardboard into games, airplanes, robots, roller coasters, and more. And, in the process, you’ll see what engineering and design are all about.
Why cardboard?
To learn how to do anything right, you need to practice. And to practice engineering, you need stuff that can be engineered. That’s where cardboard comes in.
Cardboard is an amazing invention in its own right. It’s easy to cut and assemble, but it’s also sturdy and durable. Even better, it’s free. You probably have a pile of it lying around your house right now: mailing boxes stacked in the basement, cereal boxes and cardboard tubes filling the recycling bin. That means you may already have what you need to start making stuff, and maybe even enough to make a project several times.
And that’s important, because engineers know that projects rarely work perfectly the first time. In fact, the best engineers love to make things over and over because each time they do, they get a chance to improve the design. They start by building an experimental model, called a prototype, and then improve it using the scientific method—they test the model, see if it works as expected, tinker with it if it doesn’t, and then test it again. Whenever something doesn’t work out, they’ve learned something new.
As the great engineer and inventor Thomas Edison said, “When I have eliminated the ways that will not work, I will find the way that will work.”
The cardboard projects in this book let you do just this kind of tinkering. They’re engineered in a particular way, but other options might be just as interesting. For each project, think about what you are trying to build, how it is supposed to work, and how you might be able to make it work even better. If you hit a snag, be like Thomas Edison and try something else. You might need to substitute a new material for one you don’t have or come up with another way to attach two parts. Make adjustments, change the design, test out new ideas, be creative.
Do that, and you’ll be learning more than how to build with cardboard. You’ll be learning how to build with any material. Because the process of engineering is the same no matter what you are tinkering with, and all engineering is based on the same laws: the laws of science.
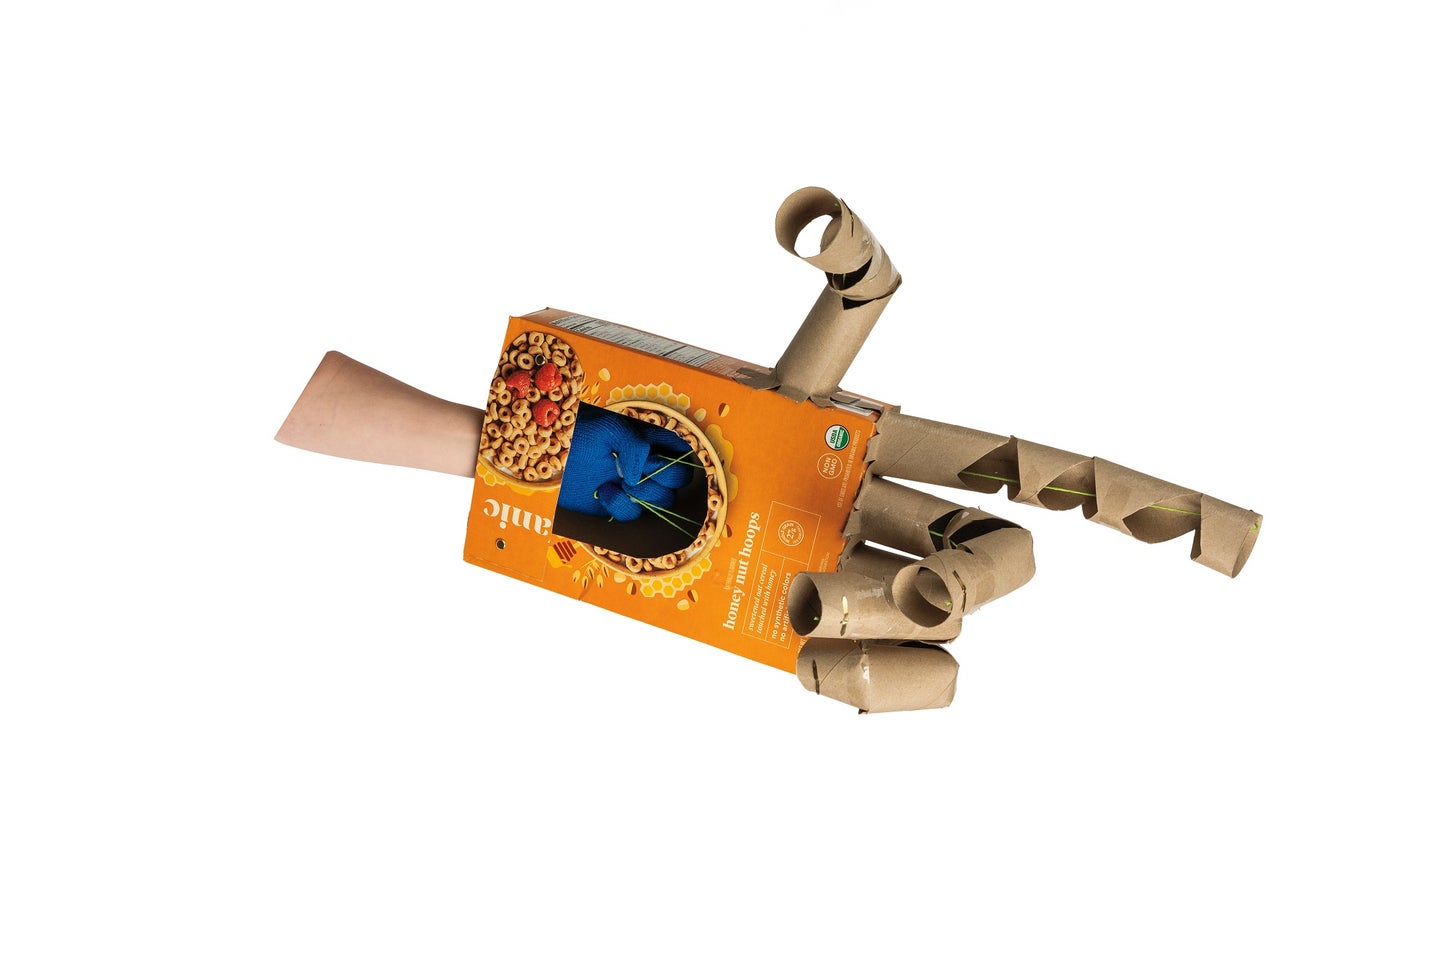
How to make your robotic hand
The human hand is marvel of engineering, capable of powerfully lifting a climber up a mountain face, precisely threading a needle, or gracefully playing the violin. Engineers have long sought to create robotic hands with similar dexterity, and many of their designs are truly remarkable. This one—controlled by your hand in a glove—won’t let you perform surgery or assemble a computer, but it will let you wiggle your new giant fingers, make the peace sign, and give a big robotic thumbs-up.
Speak like an engineer
Biomimetics or biomimicry is the process of basing a design on something found in nature. The strings in this robotic hand, for example, mimic the tendons found in our actual hands. If a design involves more technology, engineers might call it bionic, a term made popular by the 1970s television show The Six Million Dollar Man, about the world’s first bionic human. (These days, of course, six million dollars might get you only a bionic hand!)
Tools
- Pencil
- Scissors
- Hot glue gun
Materials
- 5 paper towel rolls
- Empty cereal box
- 2-foot-long piece of string cut into 5 pieces
- Paper fasteners
- Glove
- Packing tape
Instructions
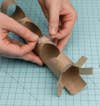
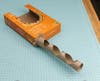
1. Use a pencil to mark the diamond-shaped “joints” evenly down the tubes, leaving a little extra space at the bottom. Then cut out those diamond shapes, gently squeezing the tubes and snipping across the fold.
- Note: The finger joints are diamond-shaped holes cut into the cardboard tubes. The four fingers each have three holes, while the thumb has two holes.
2. Hold the thumb tube against the side of the cereal box at an angle, as shown—just like your thumb is set at an angle on your hand. Use a pencil to mark the angle where the tube meets the box. Trim the bottom of the tube along that angled line.
3. Snip the bottoms of the tubes to make small tabs. Fold the tabs upward.
4. Apply packing tape to the fronts and backs of the tubes, working around the diamond-shaped holes, to reinforce them.
5. Use a pushpin to poke a hole through the top of each tube, on the back side. Wiggle it around to make the hole big enough for a paper fastener.
6. Remove the flaps from the opened end of the cereal box. Cut a large opening in the front panel, as shown. (Save the piece you cut out for the strap you’ll make later.)
7. Using a pushpin and one of the cardboard finger tubes as a guide, make four evenly spaced holes across the unopened end of the box. Make another hole on the side for the thumb. Make sure the holes are big enough for your string.
8. Tie a 2-foot length of string to a paper fastener. Insert the paper fastener, with the string attached, through the hole in the top of one of the finger tubes from the inside. Push the string down through the tube so it comes out at the tabbed bottom end. Do the same with the other four tubes.
9. Use a pencil (or a skewer, knitting needle, or similar tool) to push the end of one of the strings through one of the holes in the cereal box. (Make the hole bigger if you need to.)
10. Hot-glue the tube in place over the hole. Repeat Steps 9 and 10 for the rest of the fingers.
- Note: If for some reason the glove you are using cannot be hot-glued, you can attach the strings in other ways. Try poking holes through the fingers and tying on the strings, or simply tape the strings in place.
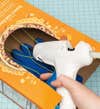
11. Place the glove inside the box (you can tape it down, if necessary). One by one, pull each string tight and hot-glue it to the appropriate fingertip of the glove.
12. Adjust the glove so that the strings have good tension, and then hot-glue the glove in place inside the box.
13. Cut a strap from the piece you cut out of the cereal box. Poke holes and secure the strap across the front of the box with paper fasteners. If you can (some gloves will be too thin), hot-glue the front of the glove to the back of the strap.
Now put your hand in the glove and test the action. You can tinker with the string tension by adjusting the strings on the paper fasteners. The fingers may be a little stiff at first, but as you use them, the joints will crease and bend more easily. If the fingers still don’t bend easily at the joints, try making the diamond-shaped cuts deeper.