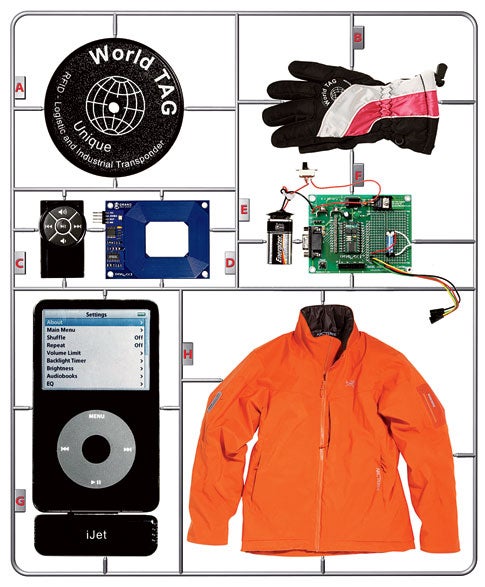
The touchless iPod remote
With a small radio tag in your glove, you can control your music on the slopes with a simple swipe of your hand.

When you’re tearing downhill on your snowboard, it’s a little distracting to take off your glove and dig out your iPod just to, say, hit pause. Instead, build this simple radio-frequency ID system and control your iPod by waving your hand in front of your coat. A tag sewn into your glove sends instructions to a reader stashed in your pocket.
- Project: unwire your iPod
- Cost: $161
- Time: 6 hours
- Difficulty: easy | | | | | hard (Editor’s note: 3/5)
Parts
- [A] RFID tag (Parallax 28142): $2.75
- [B] A glove to hold the tag
- [C] iJet remote control (B&H Photo Video): $29.95
- [D] RFID reader (Parallax 28140): $39.95
- [E] 9-volt battery
- [F] Controller carrier board (Parallax 27130): $19.95
- [F] Microcontroller (Parallax BS2): $49
- [F] SPST 5-volt reed relay (RadioShack 275-0232): $2.99
- [G] iJet receiver
- [H] A jacket to contain the rest of the components (and keep you warm)
Instructions
1. Assemble the electronics. This step requires some soldering. Connect:
- The remote control to the reed relay.
- The RFID reader to the carrier board.
- The reed relay to the microcontroller.
- The switch to the 9-volt battery harness and to the carrier board.
2. Program the board. Tell the microcontroller to read and process a signal from the RFID tag by plugging the microcontroller into your computer with a serial cable. Download the code from Parallax and copy it from your PC to the microcontroller.
3. Stash and use. Slip an RFID tag into your glove, and plug the iJet remote receiver into the iPod. Stuff the electronic parts into a chest or sleeve pocket. Wave your glove within 4 inches of that pocket, and the music will pause, just in time for you to hear your friend shout “Avalanche!”
Additional customization
Once you’ve mastered the pause function with your “touchless switch,” how about adding fast forward or reverse functions? As you’ve probably guessed, adding more functionality, increases this project’s complexity. Luckily, it’s just a wee bit tougher.
The construction steps are fairly straightforward:
1. Each additional control option will require a new Reed Relay. You will also need a new RFID tag for each additional control option.
2. Solder one electromagnet pin of the relay to ground (i.e., Vss -). Connect the other electromagnet pin to another free port on the Parallax Super Carrier Board (e.g., P4).
3. Wire the two remaining relay poles to switch pads for your chosen remote control option (e.g., skip to next track; fast forward). Use the same technique that you used for the pause/play button.
That’s it; well almost. The more complex part of this “advanced” project involves the programming of the microcontroller. Unlike our pause-only “touchless switch,” this added functionality project requires the reading and interpreting of specific RFID tag IDs.
A specific tag ID is assigned to each of these additional functions. When that tag ID is read, the code will send a trigger signal to the appropriate microcontroller port and toggle the selected relay. Therefore, you will need to assign a specific tag ID to a specific function. Don’t lose that tag, however. Only that tag can enable and play its assigned function.
1. You have now physically wired a new iPod remote control function to a specific port on the BASIC Stamp microcontroller. In order to control this new iPod function, you must modify your original pause/play program.
2. Program the microcontroller for enabling specific BASIC Stamp ports based on reading different RFID tags. First you will need to read the unique ID number that is registered for each tag. You can download some sample code from the Parallax website that will allow you to read a tag’s ID. Now that you have correlated a tag ID and Super Carrier Board port number with an iPod remote control function, you can modify the free Parallax code for activating a specific port based on the “reading” of a specific tag.
3. Stitch each RFID tag into a different location (e.g., left ski glove for pause/play and right ski glove for fast forward).
4. Plug the iPod remote control receive into the iPod’s docking port and the advanced, multifunctional touchless switch is ready for use.
Now hit the slopes and keep on track—your iPod’s track, that is.
This story has been updated. It was originally featured in the January 2007 issue of Popular Science magazine.