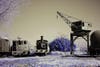
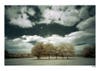
Infrared photography, which blocks visible light and captures only the IR spectrum to produce strange, beautiful images like the one above, has been around for more than a century. But it’s become more popular recently, since now anyone with a point-and-shoot camera can easily take these unusual shots. Not all subjects are suitable—some objects reflect part of the infrared spectrum, making them appear white and almost ghostly, so you won’t want to shoot, say, candid family shots. When done right, however, IR can work wonders. Formal portraits, for example, gain a delicate touch. Because IR softens the image, your subject’s skin will be imbued with a smooth glow that effectively hides blemishes and wrinkles. Landscapes, too, take on an ethereal look.
Infrared light can cause color shifts and soft focus, so manufacturers today make digicams less IR-sensitive by installing an IR-blocking filter in front of the sensor. That need not stop you, though. There are a number of methods you can use to make infrared photos launch them here. No matter which one you choose, before long you’ll have a whole portfolio of haunting artistic shots.
Click here for a gallery of tips to get IR pics.
Filter It
The standard method of creating infrared images is with special red filters that block the visible light but allow the infrared rays through. Film photographers have used this method for years and a number of companies, such as B&W;, Cokin and Hoya, offer IR filters in a variety of strengths and sizes. Technically there are a few challenges such as especially long exposures and potential focusing issues. But with some practice and experimentation, these can usually be overcome. If you have a digital SLR, all you have to do is thread an IR filter to the lens. Some point-and-shoot models also have threaded lenses or accept a lens adapter so you can attach an IR filter. That’s the easy way. Don’t fret if your point-and-shoot digital camera doesn’t have a threaded lens. There are a couple of different ways to attach an IR filter that are fairly simple for DIYers (and if all else fails, you can always just hold the filter in front of the lens). 1. Measure the length of the lens from camera body to the top of the lens when it is extended to its fullest. Press the shutter button half way to see if the lens extends farther when it is focusing. 2. Purchase a lens adapter that is slightly longer than the longest extension of the lens and attach an IR filter to the top of the adapter. Once you’re sure the lens won’t touch the filter, run glue along the bottom edge of the adapter and attach it to the camera. Alternatively, and following the same measurement suggestions above, you can cut a piece of PVC pipe (or similar tubing), glue in a step-up ring (a threaded ring for attaching filters) to one end so you can attach an IR filter and glue the other end to the camera.
Faux Infrared
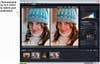
Converting a color image to infrared using image-editing software is a snap. The results are so similar to those created using an IR filter that you may want to forego the hardware and use software instead. We used Adobe Photoshop CS3 but you can also convert images in other programs as well. 1. Open your image and save a copy as a TIFF or PSD. 2. Go to Layer>New Adjustment Layer>Black and White. Name the layer and click OK. 3. In the Black and White dialogue box, click the Preset arrow and choose Infrared. Adjust the slider bars until you get the look you like. 4. When you’re happy with your image, click OK then Layer>Flatten Image and save it. For earlier versions of Adobe Photoshop, follow the steps above but choose a Channel Mixer adjustment layer instead of Black and White; click the Monochrome box in the lower left corner of the dialogue box to convert the image to black and white and adjust the sliders to tweak the image to your aesthetics.
Plug It In
Special plug-ins are available for Photoshop, Elements and other compatible programs that offer quick, easy but adjustable infrared effects: With Alien Skin Exposure 2, choose the Black and White option and use the drop down Infrared menu to reveal a long list of IR looks. Play around with some of the adjustments to fine-tune the image before you click OK and save it. Nik Color Efex Pro 3.0 offers four infrared black and white presets and a number of adjustments. First choose Glamour Glow from the plug-in menu for a more ethereal look. Then convert the image to black and white infrared. This works especially well for portraits—the Glamour Glow does more for a person’s skin than an expensive facial.
Replace the IR-Blocking Filter
You can do this yourself, but opening a camera can be dangerous. To be safe, hire a service like Life Pixel ( lifepixel.com), which does conversions for $400 to $600.
Keep In Mind
IR filters cut down the amount of light that gets through to the camera, so be prepared for long exposures. Pump up the ISO (the level of light sensitivity) to get a faster shutter speed, and use a tripod.
Keep In Mind
Getting the right exposure in IR is tricky, especially when using filters. Try shooting some over- and underexposed images.
Keep In Mind
Since focusing can be difficult in IR, when possible, use a high-number f/stop to get the best possible depth of field. Read the entire article here.