What camera mode to use and when
Get by with a little help from your friend Auto Mode.
Cameras are complicated machines designed to harness the laws of physics to create a permanent visual record of the wonders that surround us. And take selfies. To make things easier, these gadgets—whether digital or analog—have various modes that give you different degrees of control over exposure settings, and tell your camera what you’re trying to do.
If you just want to take a quick picture, use automatic mode—push the shutter and you’re done. On the other hand, if you want a great shot of the blood moon, you’ll need all the control manual mode offers so you can dial in every setting.
But there are other modes too, and taking great photos means knowing what they do and when to use them.
What matters most
Shutter speed (measured in seconds or fractions of a second) and aperture (measured in f-stops) are your camera’s two most important settings. How they interact determines much of how an image looks.
A faster shutter speed freezes quick-moving objects, while a slower one lets your camera capture more light when it’s dark out. A wider aperture also lets in more light, but makes your background blurry, while a narrower one keeps everything in the frame in focus.
The problem is that for a well-exposed photo, your camera has to let in the correct amount of light. Too much and the photo will be pure white; too little and you won’t see anything amidst the dark shadows. This means shutter speed and aperture need to be in balance—the wider the aperture you use, the faster the shutter speed needs to be. If you want to use a really wide aperture like f/1.8, you’ll have to use a faster shutter speed than you would with a narrow aperture like f/22. Similarly, if you want to use a slow shutter speed, you can’t use a wide aperture unless it’s really dark out.
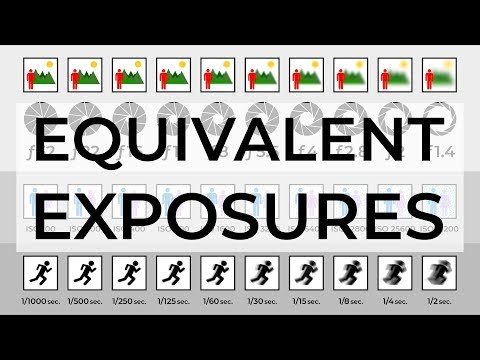
Because of the math involved with all photography, there are multiple pairs of shutter speeds and apertures that will produce the same exposure—in other words, the photos will be equally bright. For example, shooting at f/1.8 for 1/125th of a second is equivalent to shooting at f/11 for 1/8th of a second.
Beyond shutter speed and aperture, there’s another important exposure setting: ISO. In film stocks, this number indicates sensitivity and tells the photographer (and the camera) how much light it needs to be exposed to for good photos. The higher the ISO number, the more sensitive the film. This means that films with lower ISOs (also known as slow films) need more light and require wider apertures and slower shutter speeds than faster films. Digital cameras don’t have the same limitation, but you can control the sensitivity of the sensor in a way that, in practice, is similar.
If this sounds hard, don’t worry—your camera’s automatic modes handle all these choices seamlessly. And if you want to control your camera manually and dive deeper, check out a good photography book for beginners, such as Understanding Exposure by Bryan Peterson.
Know what kind of control you want
Every DSLR and mirrorless camera has an automatic mode and a manual mode. You should be able to find the former under a big “A,” but it might have a different name, depending on your camera’s manufacturer. For example, Sony calls it “superior auto,” and Canon named it “scene intelligent auto.” This mode controls absolutely everything—you just have to aim and shoot.
Manual mode, on the other hand, lets the photographer select every setting. You’ll almost always get something usable in automatic mode, because the camera sorts out the details for you, but that’s not the case with manual. Instead, the camera will shoot what you instruct it to shoot—even if the settings are totally wrong for the photo you’re trying to take.
But there’s some middle ground between these two extremes. Some modes let you tell the camera what kind of photo you’re trying to take so it can pick appropriate settings (like portrait and sport modes). These are variations of automatic. Others lean closer to manual and give you control over individual settings (such as aperture priority mode) without you having to select absolutely everything. Right in the middle, there’s program mode, which allows you to choose among a range of options provided by the camera, but also lets you tweak how much you stick to those settings.
As you might have imagined, automatic mode and its variations are much easier to use, since you don’t really need to understand what’s going on to take photos that are properly exposed and technically decent. There’s nothing wrong with using your camera like this, but it does limit how much you can express yourself creatively.
Manual mode, and the two modes closest to it—aperture priority mode and shutter speed priority mode—give you direct control over your camera. They require more hands-on work to get correctly exposed photos, but give you the opportunity to express yourself creatively through the choices you make. This is why the vast majority of professionals and advanced hobbyists shoot almost exclusively with either manual or aperture priority modes.
Now that you know your options, you should decide what level of control you want to have over your camera. If you want to take slightly better portraits, understanding the difference between automatic and portrait mode will be helpful. But if you want to be able to take total control of your camera to get awesome, creative shots, you’ll need to know when to use manual and aperture priority mode.
The big three

To make the most of your camera, you’ll need to be able to control the exact aperture and shutter speed you use when you take a picture. To do that, you’ll need to use manual, aperture priority, or shutter speed priority mode.
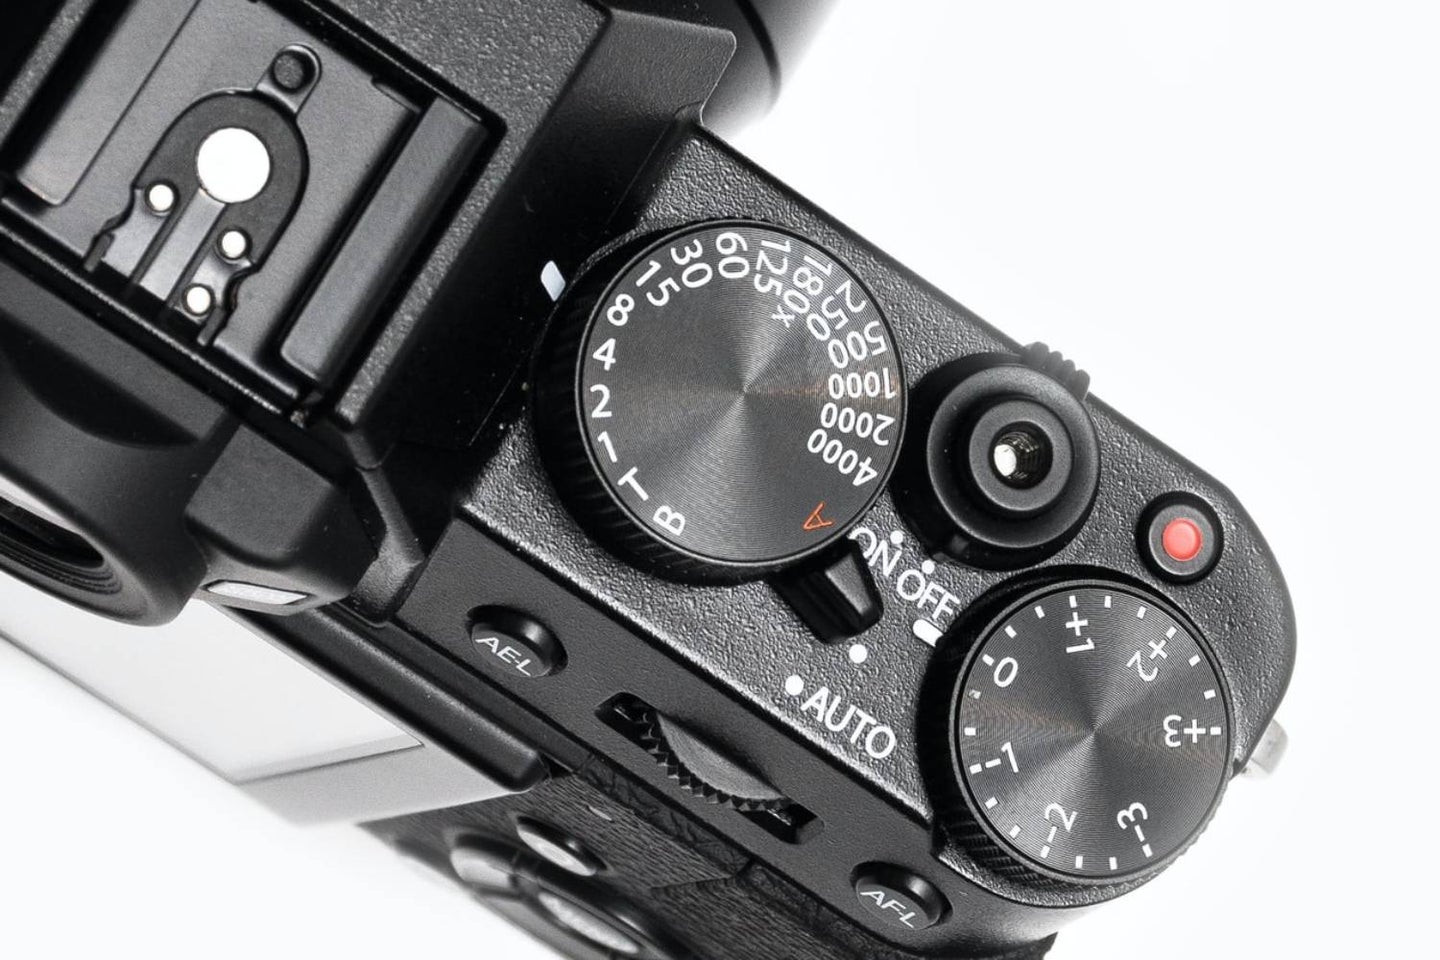
Manual mode (M on your camera’s mode dial)
Manual mode gives you the most control. You have to select the aperture, shutter speed, and ISO. Whatever options you select are what your camera will use, regardless of the resulting exposure. Want to use a 30-second shutter speed on a bright sunny day? Sure, go ahead. Just know you’ll end up with a bright white rectangle of a photo, though.
Manual is the mode to use when you absolutely want to be in control of everything. This happens less than you think, but it’s important for shooting at night, doing long exposure photography, and in any situation where you want to lock your camera to specific settings, like in a studio.
Aperture priority (A or Av on your camera’s mode dial)
Aperture priority mode is the most important mode on your camera if you want to take control of things while avoiding going mad tweaking the settings for each shot. With this option, your camera chooses the shutter speed and you select the aperture and exposure compensation. The latter is what makes this mode so useful, and it refers to how much faster or slower you want the shutter speed to be compared to what your camera thinks it should be. This means you can dial in the aperture, take a test photo, and then quickly correct if things are off.
In most situations, aperture affects the look of an image much more than shutter speed. Often, photographers use one in a small range of apertures but are happy with any shutter speed that works. The difference between 1/50th of a second and 1/5,000th of a second is huge, but the effect it’ll have on most images is minimal.
I shoot in aperture priority mode about 95 percent of the time and most professional photographers I know do too. It’s the best balance between total control and ease of use, so the question isn’t really when you should use aperture priority—it’s when you shouldn’t. Unless you have a compelling reason to use another mode, aperture priority should be your default for everything.
Shutter speed priority (S or Tv on your camera’s mode dial)
Shutter speed priority is similar to aperture priority, but you choose the shutter speed and the camera chooses the aperture. It’s a holdover from film cameras, where you were more likely to want a specific shutter speed because you couldn’t change your ISO without changing film. It’s rarely useful with digital cameras.
You might have noticed there’s no ISO priority. In manual, aperture priority, and shutter speed priority modes, you have the option to select your own ISO or let the camera do it for you.
The case for program mode
You don’t need to know a lot about optics to take good photos, but you need to understand that there are multiple combinations of aperture and shutter speed that result in equivalent exposure, while still changing how your photo looks.
In program mode, the camera chooses a shutter speed and an aperture that will give a correct exposure, but you can choose from one of the other pairs of values that will give the same exposure. Your choice will depend on several factors, like whether you want all the elements in your frame to stay in focus (for a landscape shot, for example), or if you want to create more depth with a blurry background (for a portrait). The camera does most of the work, but you still influence what it does. You can also dial in exposure compensation so you can correct the choices your camera makes, like with aperture priority and shutter speed priority modes.
Program mode is pretty useful and a great way to get started with more creative shots. Also, because you know the shutter speed and aperture before you shoot, it teaches you how they work together and makes it easy to progress to the more advanced, more manual modes.
Fifty shades of automatic

There are many versions of automatic mode, but they all do the same thing—they leave everything up to your camera.
In this past, this meant cameras played it safe and took generic, well-exposed photos that wouldn’t be too far wrong in most situations, but also wouldn’t be particularly creative or give you any specific effects. But things have changed for the better.
Most cameras manufactured in the last 10 years have a version of automatic mode that uses machine learning to try to detect what kind of photo you’re taking and use slightly more appropriate settings. For example, it will use a wider aperture if it thinks you’re taking a portrait rather than shooting a landscape.
While this mode is good, most entry-level models also have other specific automatic modes. You’re likely to find some combination of them in your own camera:
- Auto flash off (which is like automatic, but will never use the camera’s built-in flash)
- Portrait
- Landscape
- Close-up
- Night portrait
- Sports
- Children
There might be others, too, but the logic is the same—they all let your camera know what you’re trying to do so it can choose the appropriate settings. If there’s an auto mode that matches what you’re shooting, use it.
All the rest
In addition to the modes above—which appear in some form on most DSLRs and mirrorless cameras—manufacturers often have their own specific modes. For example, Nikon has a “guide mode” on its entry-level cameras that walks you through the process of taking a photo. Canon has one called “creative auto,” which lets you dial in background blur without having to work with exposure settings. They all work and can even be the best tool for the job, but sometimes they’re just there to make it easier to sell cameras.
The bottom line: If you want total control of your camera, use aperture priority or manual mode; if you want the simplest settings, go with the most appropriate automatic mode; and if you’re somewhere in the middle, go with program mode.
