Restore old print photos with free software
Get your pictures perfect.
When you want to revisit an old digital photo, you can simply scroll through your past social media posts or open your favorite storage app. But what about those physical prints from your film camera days—are they still filling up old albums and boxes in the basement? If so, they’re probably looking a little worse for wear. Once you digitize these pictures, you can harness modern-day software to restore them to their former glory.
This guide will offer some free techniques for bringing your print pics to digital life, but we won’t cover every photo problem. That said, you should be able to adapt these methods to tackle your specific situation, or apply the tools we recommend to experiment with your own fixes.
First of all, you’ll need to create digital versions of your physical photos and put them on your computer. Either upload them with a scanner, or in a pinch, set up some good lighting and snap them with a high-quality smartphone camera. Once you have the scanned files, duplicate them and keep the originals separate while you tweak the copies. That way, if you make an editing error, you can always start over from scratch.
Tweak colors and brightness in Pixlr

Need to color-correct a scanned image? You don’t have to shell out for a monthly subscription for Adobe Photoshop. Free web app Pixlr offers a lot of the same tools, and you can use it right inside your browser. That means it works across Windows and macOS too.
Once you load up the web interface and open an image, Pixlr offers various tricks to bring back faded or discolored photos. Start with the Auto levels option on the Adjustment menu. On the same menu, you’ll see Brightness & Contrast sliders for changing the look of your image. Drag the sliders from one end to the other to see the changes in real time.

To bring out faded colors, choose Adjustment and then Color vibrance. If your old prints have taken on a particular color cast, such as a pervasive yellow tint, try selecting Color balance on the Adjustment menu. The same menu also offers a Hue & Saturation pane, which can shift colors slightly in one direction, and a Saturation slider, which can improve the intensity of colors.
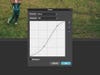
You’ll also find Levels and Curves dialog boxes within the Adjustment menu. These give you more controls for fine tuning the colors, shadows, and lighter areas in your picture. They’re like the menu options we’ve already mentioned, but with a bit more control over the specific sections of the image that you’ll affect. Because these tools can get quite complex, we’d recommend that you consult Adobe’s guides to Curves and Levels before you use these menu options. Even though these instructions apply to Adobe Photoshop rather than Pixlr, the principles of these tools are the same even if you’re using another program.
Finally, Pixlr has a couple of filters that might help you out improve your images’ appearances. To soften grainy parts of a picture, click Filter and then Denoise. To bring out colors and shadows, you’ll want the Mimic HDR filter. And if you make a change that you’re not happy with, just undo: hit Ctrl+Z (on Windows) or Cmd+Z (on a Mac) or select Edit and then Undo.
Getting a feel for photo editing might take a while, and a few false steps. But don’t be discouraged—after all, experimentation is part of the fun. If you persevere even for just 10 or 15 minutes, you’ll get a better feel for what these tools do and how they can help make your old photos look better.
Remove imperfections with GIMP
If the original photo has tears or other small marks, you can fix these imperfections with GIMP. Essentially the free version of Photoshop, this desktop application comes packed with features and has versions for both Windows and macOS. The two tools we’ll discuss are the Clone and Healing options.
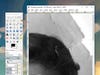
Once you’ve installed the software and opened up your old photo, hit the Clone Tool: It looks like a stamp icon and says “Clone Tool” when you hover the cursor over it. This lets you “clone” one part of an image over another: You can use the pixels on either side of a tear to “paint” over the marred area. First, choose your source for the clone by hitting Ctrl+click (on a Windows) or Cmd+Option+click (on a Mac) somewhere on the image. A selection box will appear to mark your choice. Then, left click on the ugly part of the image to paint over it. In this way you can cover over damaged parts of a photo with the intact ones. If you take your time, and the gaps are small enough, the result can be quite convincing.
If your image only contains slight imperfections, you should get acquainted with the Healing Tool, to the right of the Clone Tool. It works similarly—you select a source in the exact same way. But then, instead of simply pasting that source over the error, the Healing Tool will apply the copied area more intelligently. Just click and paint over the marks in your photo as needed. It’s a gentler option than cloning, and if GIMP has enough background to work with, the results can be very effective.
GIMP features the same color, brightness, and contrast effects as Pixlr, so feel free to dig into those as well. You can find Levels and Curves under the Colors menu, and a Filters menu full of additional options. For example, Despeckle, under the Enhance menu, can reduce grainy noise in an image. Under Colors, the Auto menu has tools to automatically fix certain aspects of your photo.

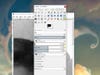
GIMP can also help if, during scanning, your pictures rotated too many degrees or were cropped improperly. Choose Tools then Transform Tools then Rotate to nudge your image clockwise or counterclockwise by a degree or two—GIMP displays a grid on the screen to help you get it right. To fix cropping errors, hit the Rectangle Select Tool (you’ll find it in the top left of the Toolbox), click and drag across the part of the picture you want to keep, and then choose Crop to Selection from the Image menu at the top.
Image editing programs can’t work magic. They can’t miraculously replace missing chunks of pictures or conjure up colors that were never there in the first place. But with enough time and patience, you can repair a lot of damage to old photos to make them as clean as possible.
Automated apps

Once you’ve exhausted your free options, consider investing in some software you have to pay for. We promised you free software at the outset of this article, but in some cases, parting with cash can save the time and effort required to do the bulk of the restoring yourself. All of these paid-for applications take a more automated approach to photo fixing, and they also have free demos available so you can try them before you buy them.
Retouch Pilot ($39.95, available for Windows only) lets you remove imperfections like blotches and tears with a click and drag of the mouse. It basically applies the clone and healing tools we looked at above, but with less work on your part. The software also lets you remove objects from an image by painting over them with details taken from the surrounding pixels. Finally, it can tweak the form and proportions of objects in your photos.
AKVIS Retoucher ($87, available for macOS and Windows) and Inpaint ($19.99, available for macOS and Windows) work along very similar lines: They use automated, clone-style tools to wipe out unwanted scratches, marks, blotches, and other imperfections. Like Retouch Pilot, they only require a swipe of the mouse, so you should consider downloading the free demos for all three apps and comparing results before you purchase one of them.

Finally, certain apps can fix images right on your smartphone. These come in handy if you plan on using your phone’s camera to take digital photos of your physical pictures. TouchRetouch ($1.99 on Android) can remove imperfections from photos with a swipe on the screen. Unfade Pro ($6.99 on iOS) focuses more on reviving faded colors and adding more vibrance to your pictures, rather than clearing up marks and scratches.
