Shooting portraits on photo paper is a mixture of chemistry and a dying art
This complicated chemical process is a far cry from smartphone photography.
This story was originally published on PopPhoto.com. Modern digital cameras make taking a technically nice picture pretty easy. It gets harder and harder to trick smartphone cameras into making truly bad images, and most camera auto modes get it right more often than not. But, it wasn’t always this way. In fact, some photographic techniques still require patience, skill, some knowledge of chemistry, and a big box of rubber gloves. For this project, I shot portraits with a setup that’s decidedly not for photographing people, let alone from close-up. But, that’s the beauty of old school photography—imperfection is what makes it great. It’s also just as much about the process as it is the final product. I shot and developed these photos of the Popular Science staff in the Popular Science office.
Materials
If you’re starting from scratch, this kind of shoot requires a pretty substantial investment in terms of gear. Here’s what I used for the shoot:
- A large format camera: The film requires a big camera, like the ones with the accordion-style bodies for which you need to throw a cape over your head to focus and compose your shot. I have two and both cost me less than $150 each on Craigslist.
- Lots of lights: I used three dedicated photography studio strobes that total 2,000 watts of total power. It’s enough to leave big, pink, residual blobs in your vision after you have your picture taken. You can do without this, but you’ll need to shoot in direct, bright sunlight unless your subject can stay perfectly still for minutes at a time (they can’t).
- Film: For this shoot we used Ilford Harman Direct Positive Paper, which I’ll get into the mechanics of later on. It’s less than $1 per sheet, which actually makes it cheaper than typical black-and-white film in the 4×5-inch format.
- A safe light: A red bulb to illuminate the room where you’ll do your developing.
- Trays and chemicals: A small set of developing trays and a full collection of chemicals (there are three total) should only cost you about $30 total.
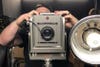
Large-format camera
The shooting process
The “film” we used for this project isn’t plastic, but rather it’s a fiber-based paper coated with an emulsion of silver halide crystals suspended in gelatin. It’s basically the same stuff you’d find if you were making prints in a traditional dark room.
The film isn’t sensitive to red light, so you can load the individual sheets of film into the special holders under the red haze of the safelight. I loaded the film the night before because it’s a fairly time-consuming process, especially in large numbers. I loaded a total of 40 sheets and it took me about the the length of one full episode of the excellent Weirdest Thing I Learned This Week podcast.
The first part of the shoot involved setting up the lights. The typical arrangement (we moved things around throughout the day) involved a bare flash in a standard reflector directly next to the camera lens to provide an even blanket of illumination—we just needed to get a lot of light on the subject to expose the paper.

Digital light test
The second light was a light in a modifier called a beauty dish, which slightly diffuses the light by bouncing it off of a metal plate in the center of the reflector, then funneling it out to the edges of the dish. This light gave direction and texture to the shadows to keep it from looking like a mugshot.
The last light was a 400 watt light—half as powerful as the other two—pointed directly as the back of the subject’s ear to create a kicker light that separates our subjects from the dark black backdrop.
Because the paper absorbs light so slowly, all the lights were fired at full power. It’s bright. Really bright. Like, staring at the sun bright.
We took one or two shots of each person and then headed for the developer.
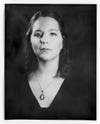
Paper portrait example
Processing the image and making the picture
Developing the paper image only takes a series of three chemicals. The first is the developer, which reacts with the silver halide crystals and causes them to turn into metallic silver. This is what forms the dark areas on the paper that make up the actual image. The developer also includes an alkaline agent to raise the PH, and chemicals like sodium sulfite to reduce the rate at which the chemical reacts with the oxygen in the air. Leaving developer exposed to oxygen too long—especially if it’s used—turns it dark red and renders it useless.
How you develop is your own choice. You can neurotically control the temperature and the agitation if you want to develop for specific times. Or, you can eyeball it and treat it more like an art. I typically choose the latter for one-off prints like this.

Example 2
Once it’s out of the developer, it goes into a mildly acidic solution called a “stop,” which typically uses something like citric acid to stop the silver reaction. Then, the paper goes into a thiosulfate solution called fix, which clears away any undeveloped silver halide crystals that are hanging around the paper. After a few minutes in the fix, it goes into a wash of clean water to remove excess chemicals before hanging up to dry.
From start to finish, the whole process, including loading the film, probably takes roughly six or seven minutes per picture. It’s a far cry from shooting with a digital camera.
The challenges
As you can see with some of the examples, there is a lot of variability, even if the setup doesn’t change much.
Example 3
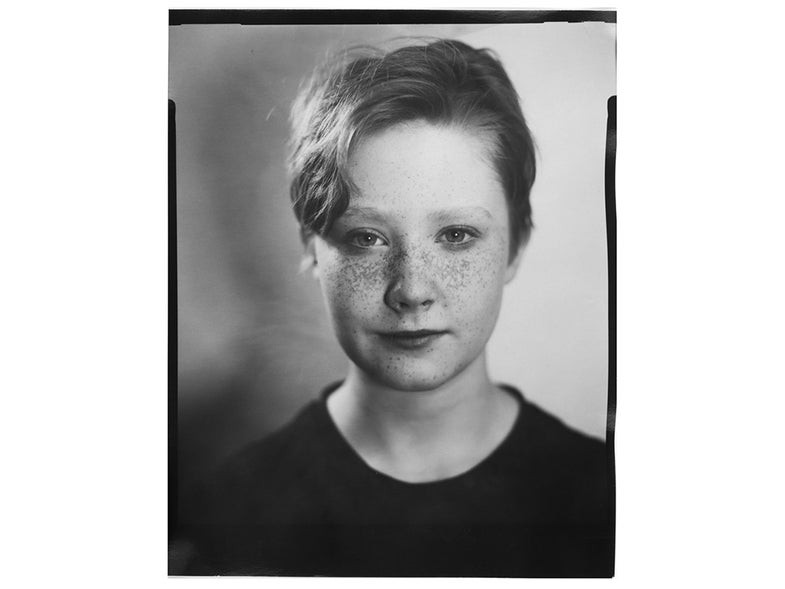
Because the film isn’t sensitive to every color of light, it renders skin differently than you might expect. Freckles appear very pronounced. Even though we used a lens that opens to just f/5.6—which seems tiny and slow by modern digital camera standards—the large negative made for an extremely narrow band of focus, which I frankly missed a couple times when it came to hitting the eyes.
You’ll also notice some chemical patterns on some of the photos, which is the result of too much—or sometimes too little—agitation of the liquid while the picture was in the tray.
I also managed to get a few very blatant fingerprints on some of the prints when I touched an undeveloped print with fixing chemical on my fingers.

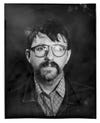
Example 4
Should you do it?
This process obviously isn’t for everyone, but if you want to get into alternative processes, this is by far one of the simplest and cheapest ways to do it. The chemicals aren’t that toxic—at least compared to some others like tintype, which requires chemicals like cadmium bromide, which is a suspected carcinogen.
But more than anything, it’s really fun. You get to see the print develop in a dark room that you can easily set up in your bathroom without a big enlarger, like the ones required for printing film. Also, Harman paper has been going in-and-out of stock at the big photo retailers regularly, which makes it harder to get as the audience for it shrinks. Sure, it’s a lot more work than a selfie, but that’s the point.
This story was originally published on PopPhoto.com.
